Edit simulation scenario
Simulation in Apromore enables us to simulate various scenarios within our process and evaluate the potential impact of these changes. Simulations are done using a BPMN model with a defined simulation scenario. If no simulation scenario is specified in the model, we can define one using the BPMN Editor.
Note
Apromore can automatically discover a BPMN model and its simulation scenario from an event log. It identifies the parameters needed to simulate a process that replicates the provided log. To learn more about discovering a model with a simulation scenario from a log, see Discover simulation scenario from log.
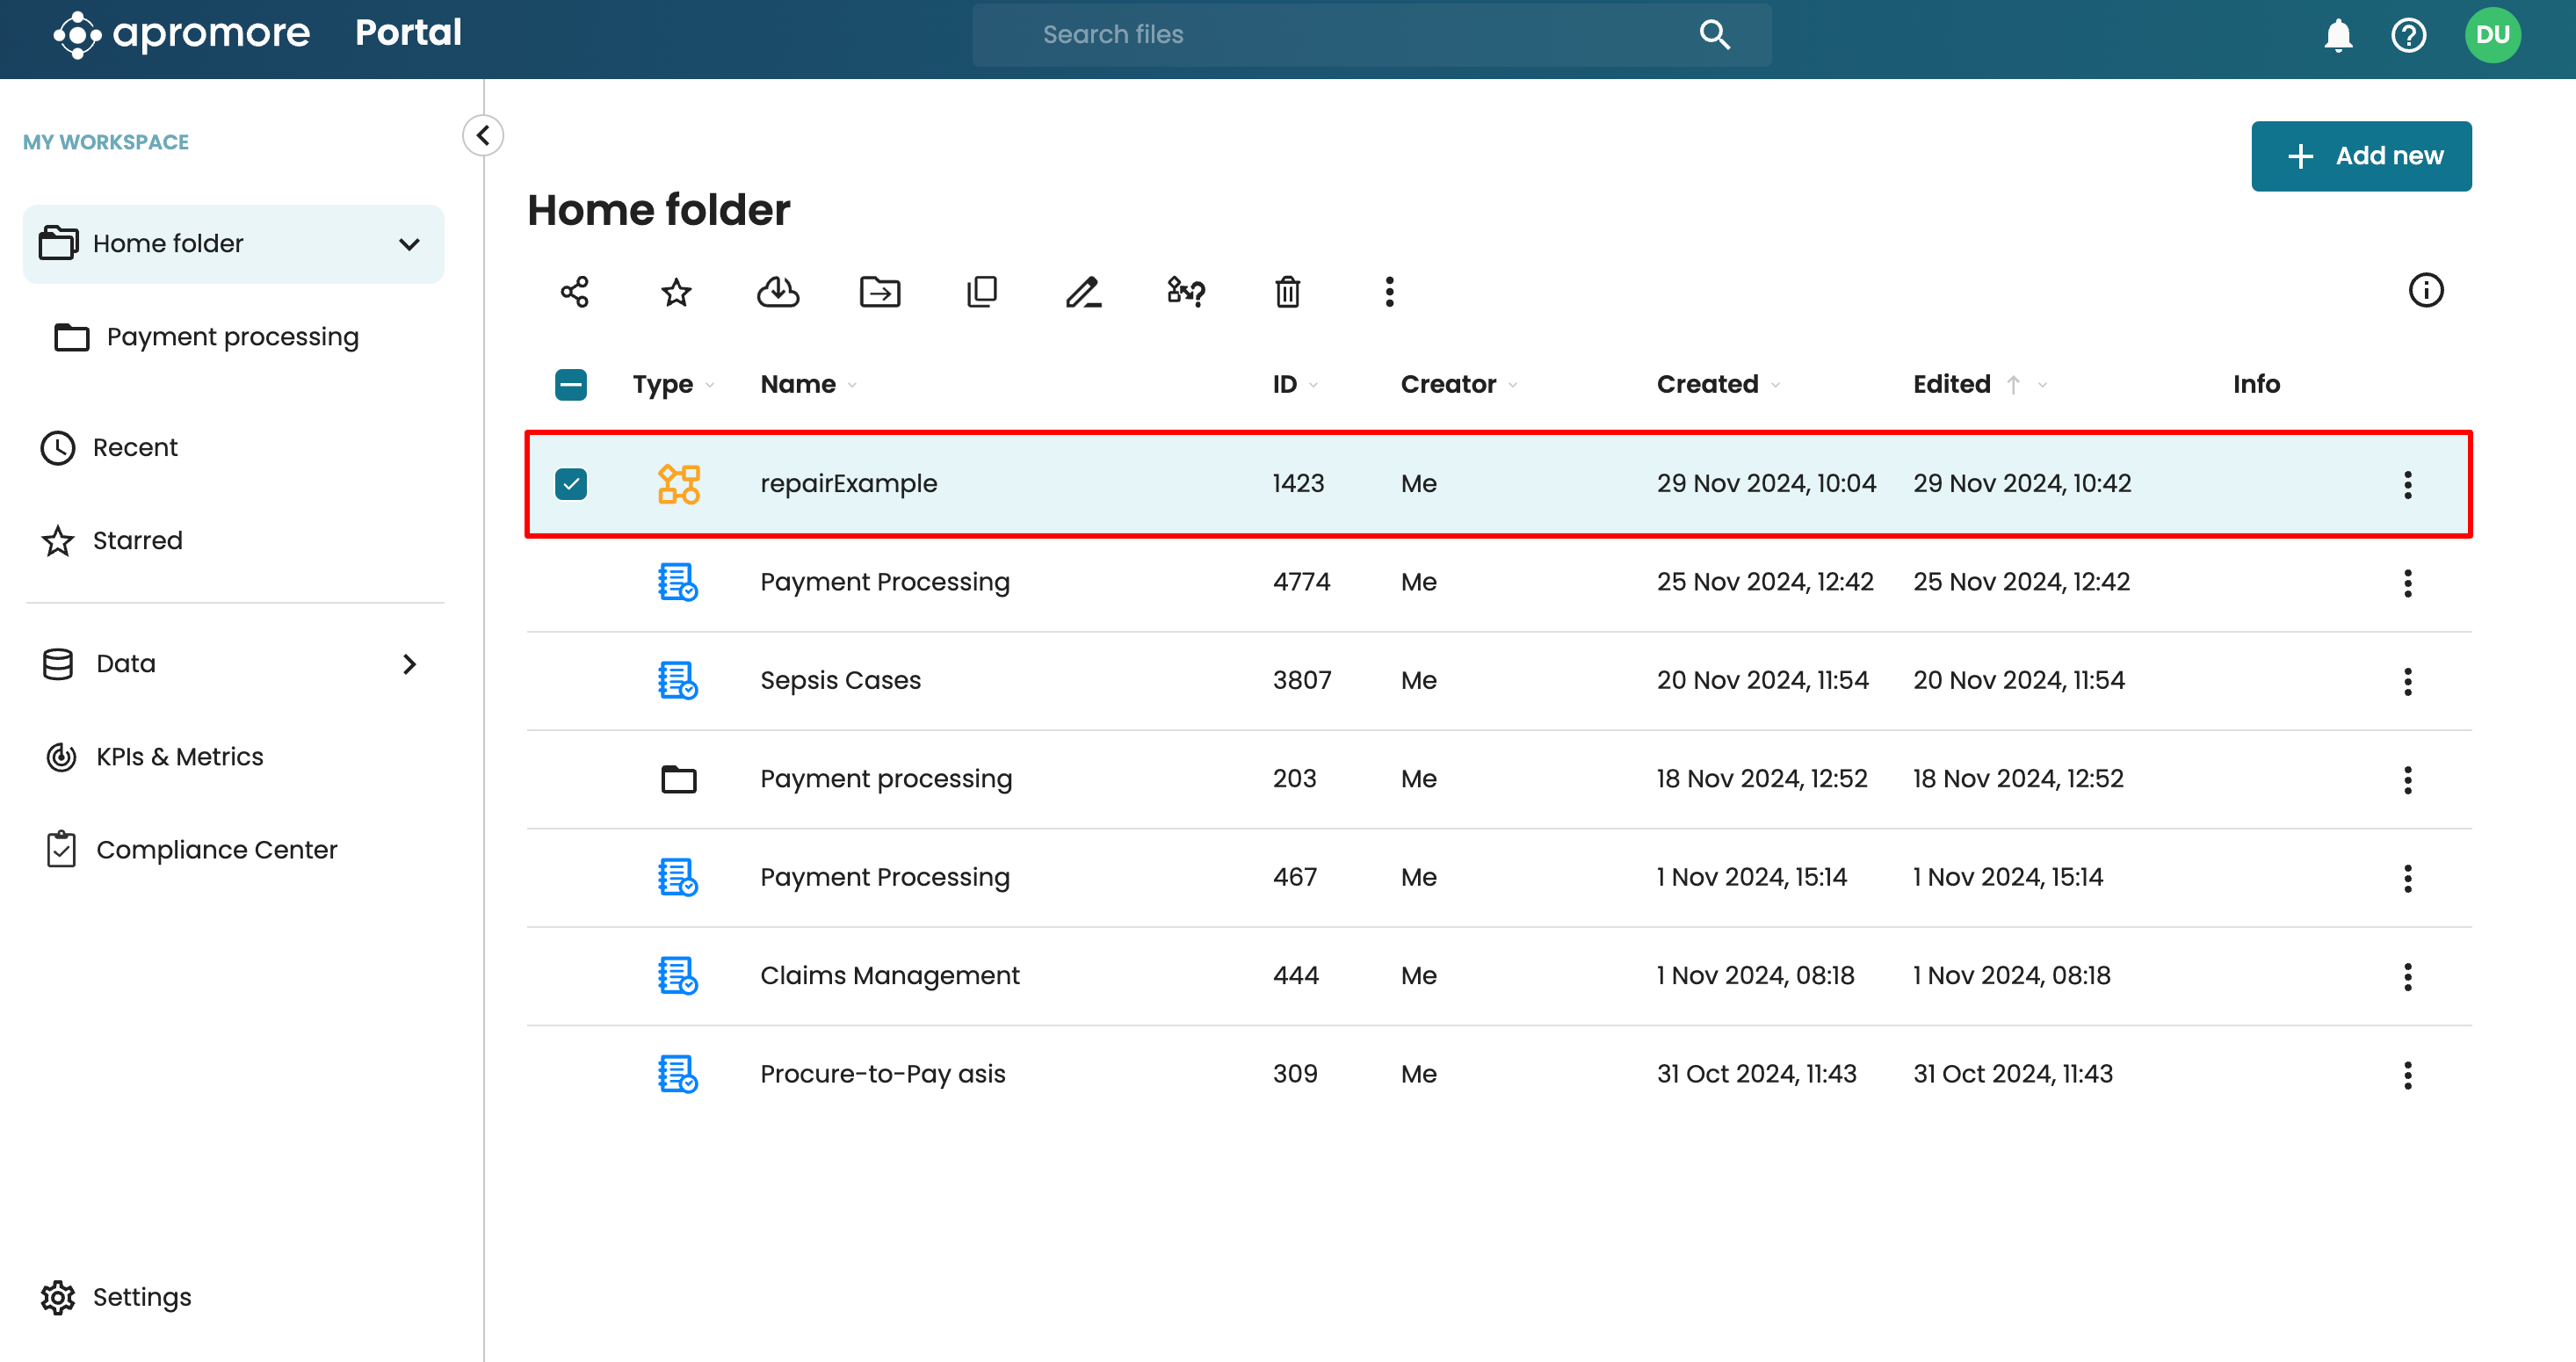
To specify the simulation scenario of a BPMN model, go to Portal and open the BPMN model.
This opens the BPMN Editor, with the selected BPMN model.
Note
We can also open a BPMN model by right-clicking and clicking Edit model.
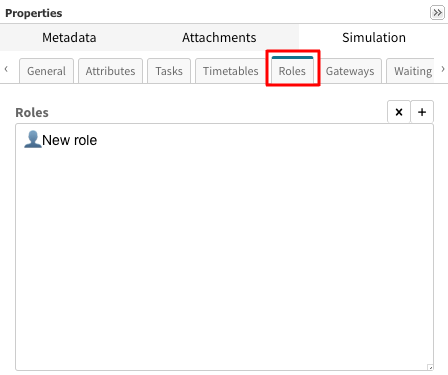
On the right, we see the side panel. Click Simulation to open the Simulation panel.
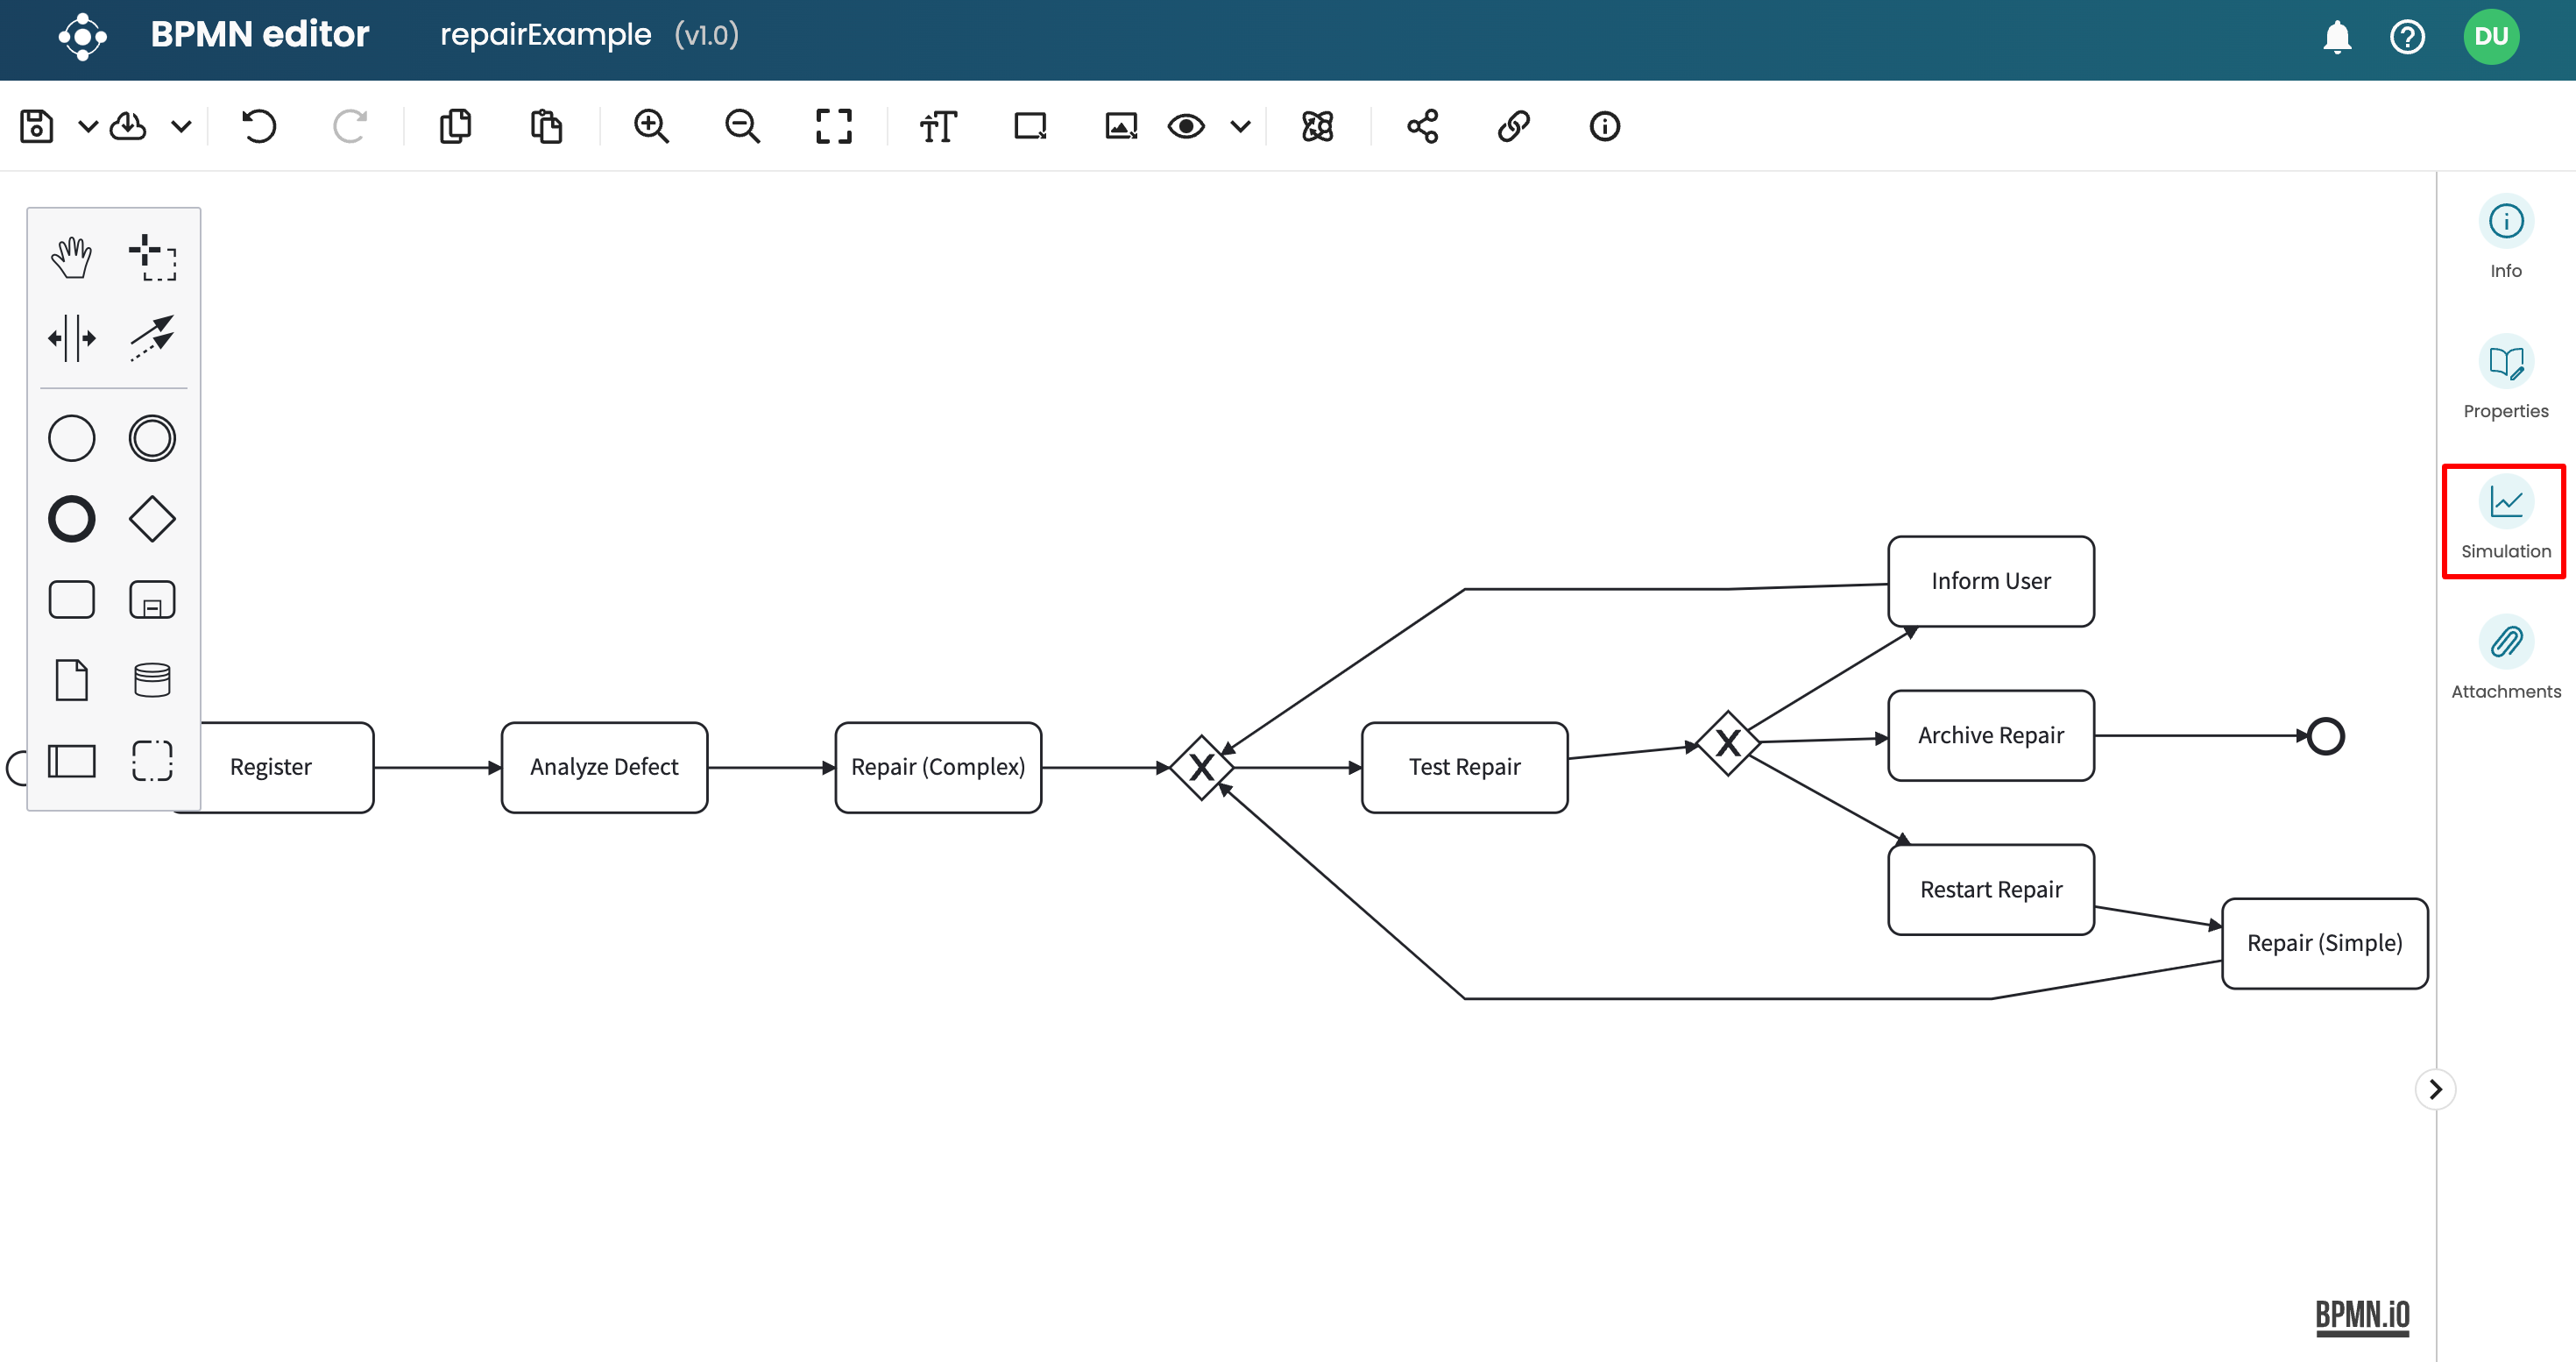
This open displays the tabs where we define the simulation parameters.
The parameters are organized into different tabs.
General
Attributes
Gateways
Tasks
Roles
Timetables
Events
Transition time
Priorities
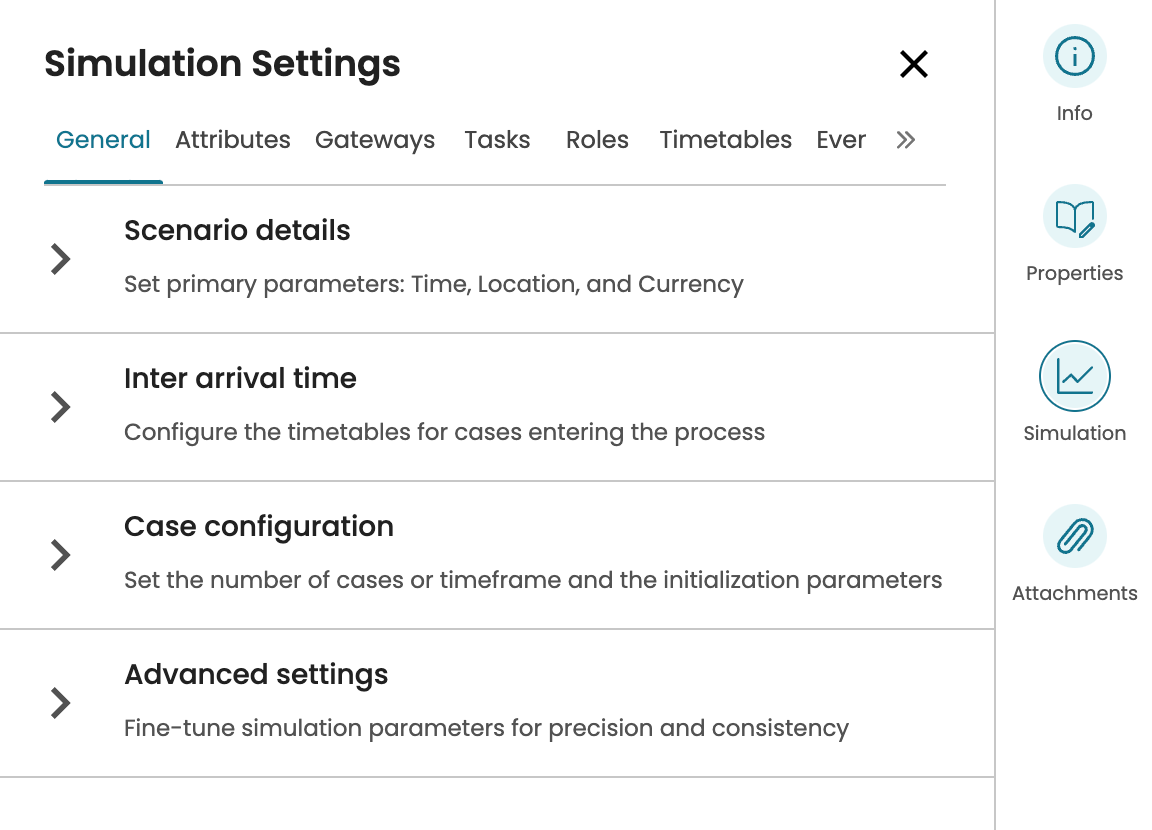
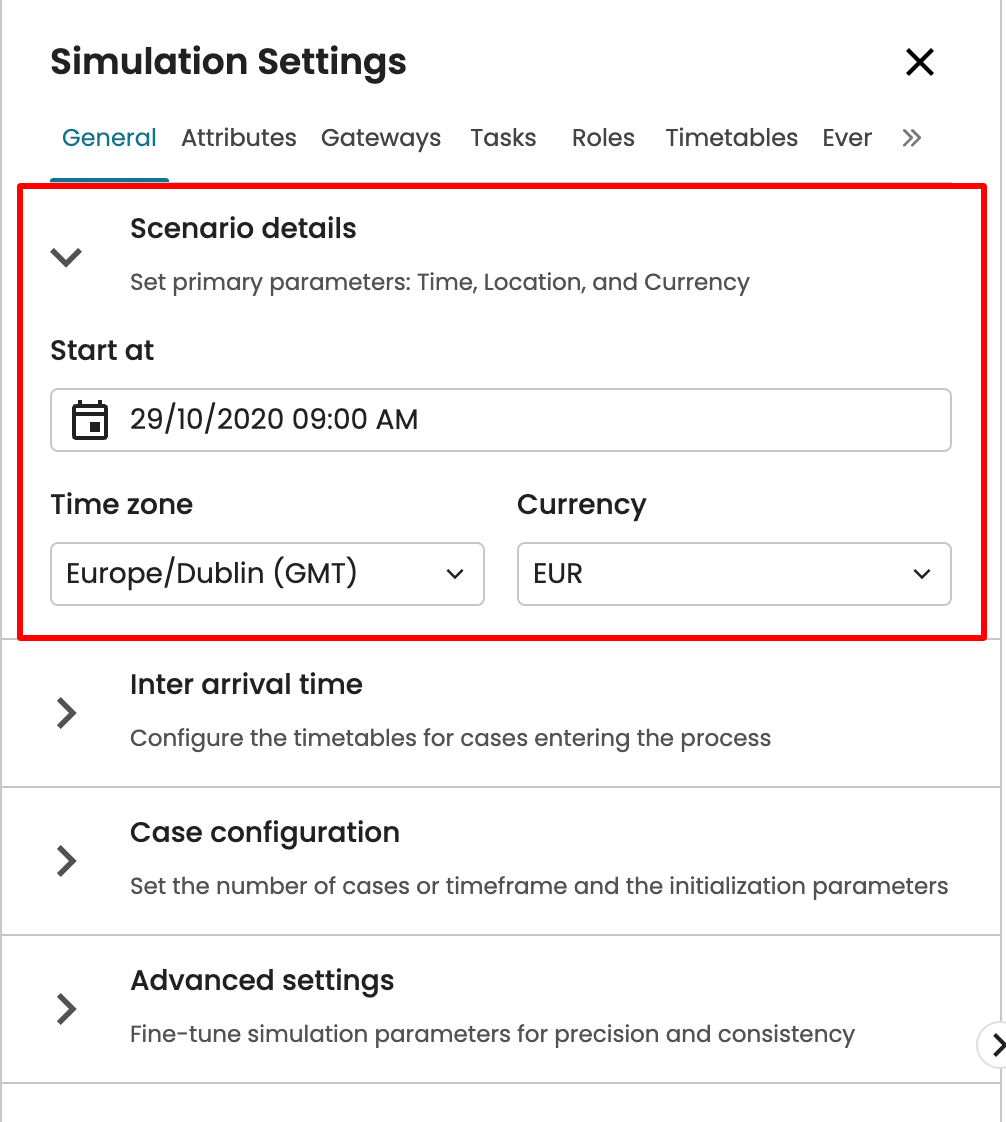
General parameters tab
The General tab allows us to specify properties that apply universally to the process.
We can specify the primary parameters such as the simulated scenario start date and time to determine when the first process starts. We also specify the scenario timezone and currency.
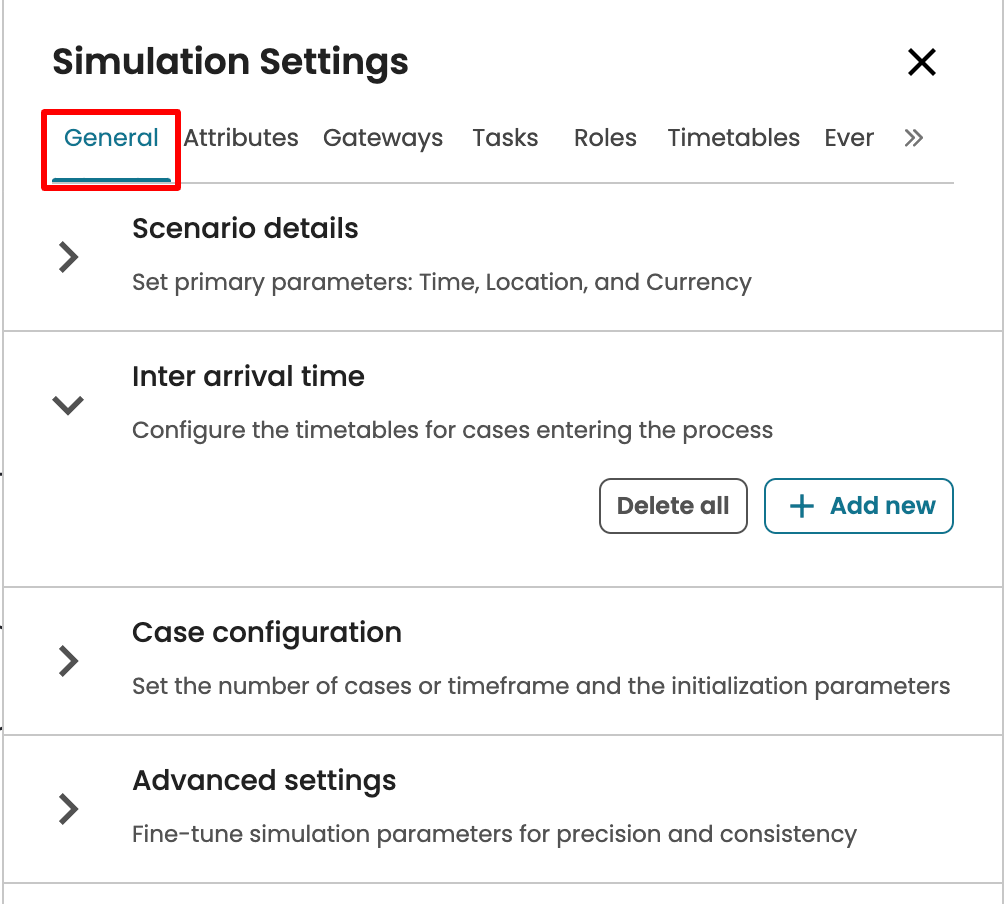
Inter-arrival time
The inter-arrival time is the time between two consecutive arrival of cases. For example, an interarrival time of 30 minutes means that one case is created every 30 minutes on average.
To specify an arrival time, go to the General tab.
An inter-arrival time is specified with respect to an arrival calendar. The arrival timetable determines the periods during which new cases are created. In other words, new cases are only created during the timeslot of the arrival timetable. For example, if we create an interarrival time on a timetable with a “Monday to Friday, 9:00 to 5:00 PM” timeslot, then no cases will be created outside these times.
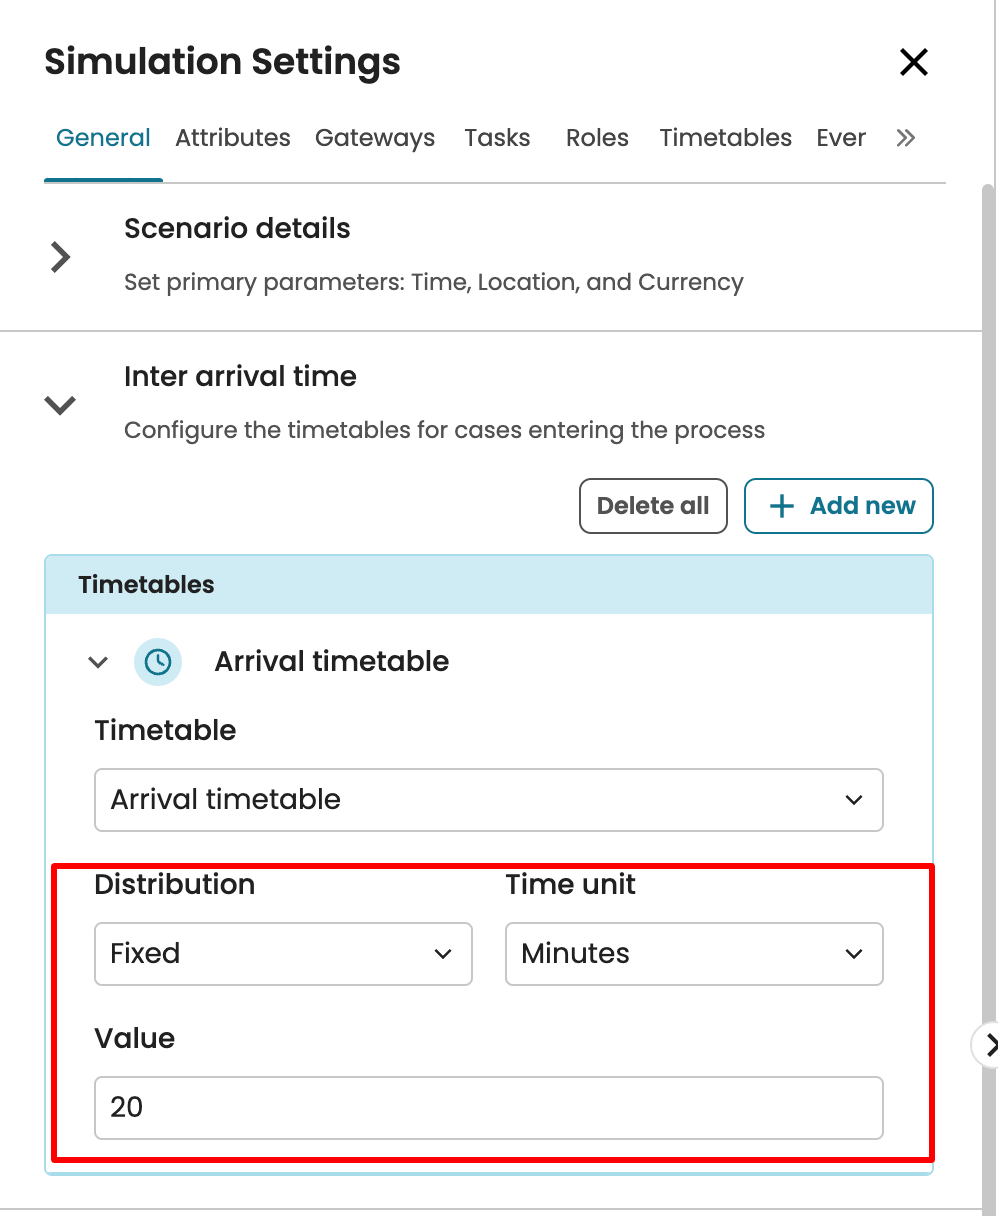
To define an inter-arrival time, click Add new.
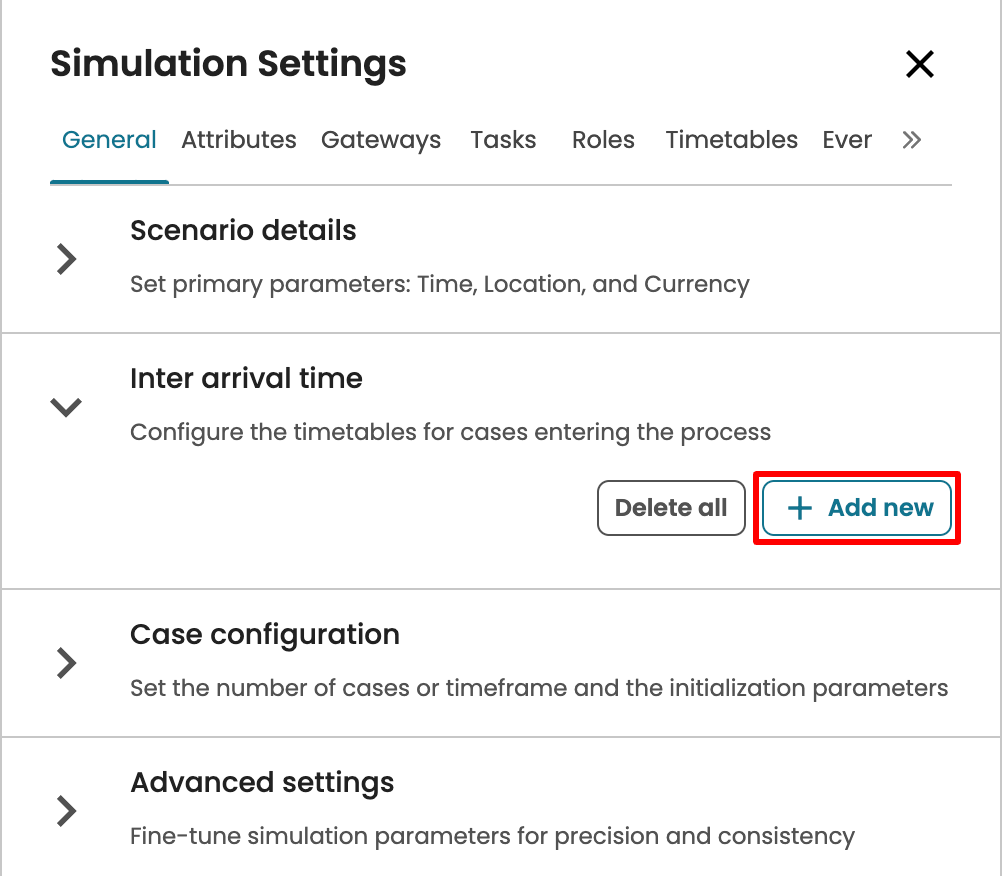
The Arrival timetable is selected by default.
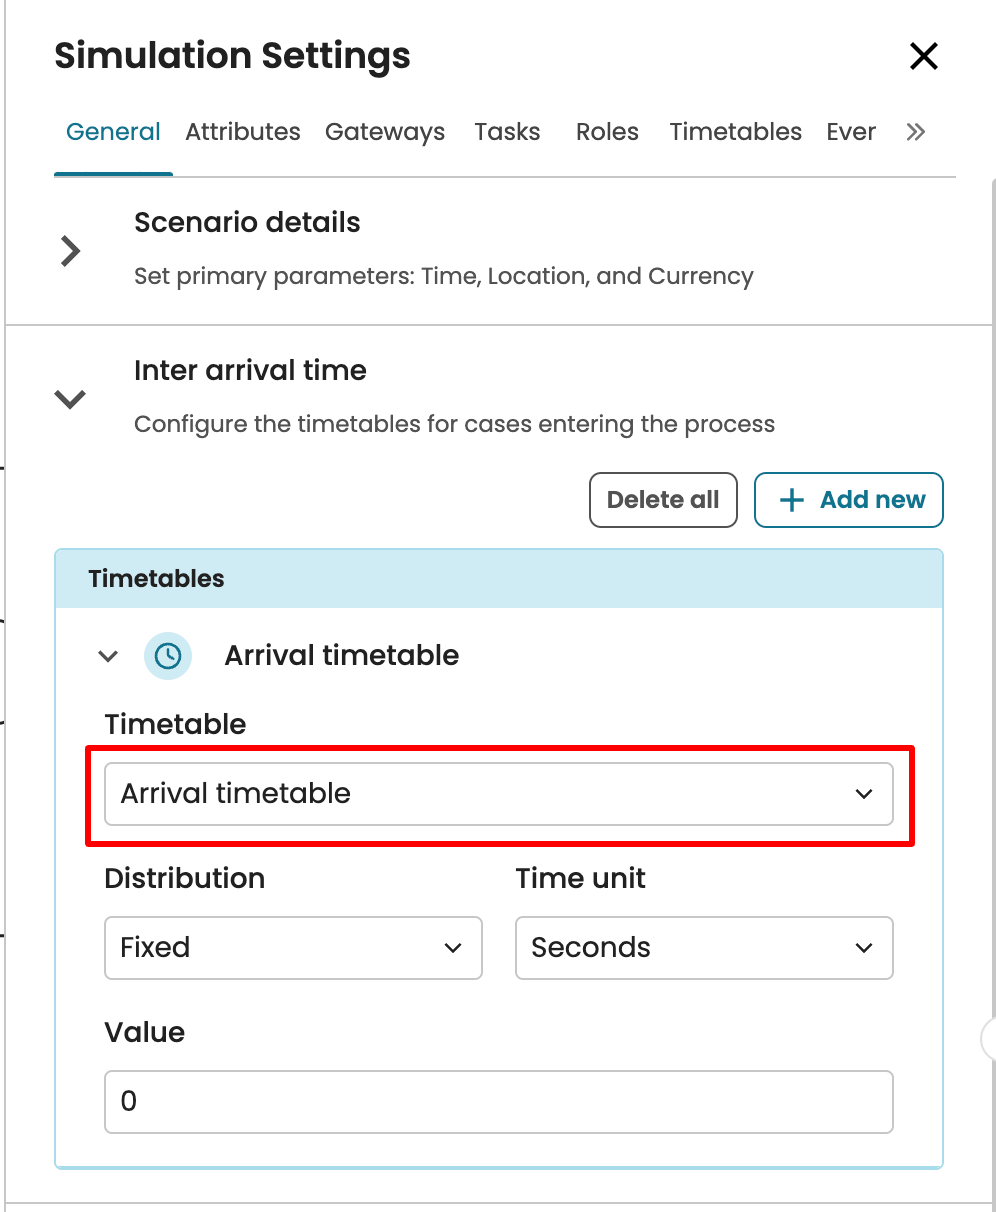
Note
The timetable “Arrival timetable” is created by default. This timetable follows a Monday to Friday, 9 AM to 5 PM timeslot. To learn how to change timeslots or add new timetables, To learn more about creating a new timetable, see Timetables parameters tab.
After selecting the timetable, we can now specify the value of the interarrival time. Apromore offers a variety of statistical distributions for the inter-arrival time. It could be fixed, normal, exponential, uniform, triangular, log-normal, or gamma.
If, for instance, on Monday to Friday, 9 AM to 5 PM, a new case starts every 20 minutes. This is a fixed arrival time, so we choose “Fixed” inter-arrival time and enter a value of 20. Also, we change the Time unit to “Minutes.”
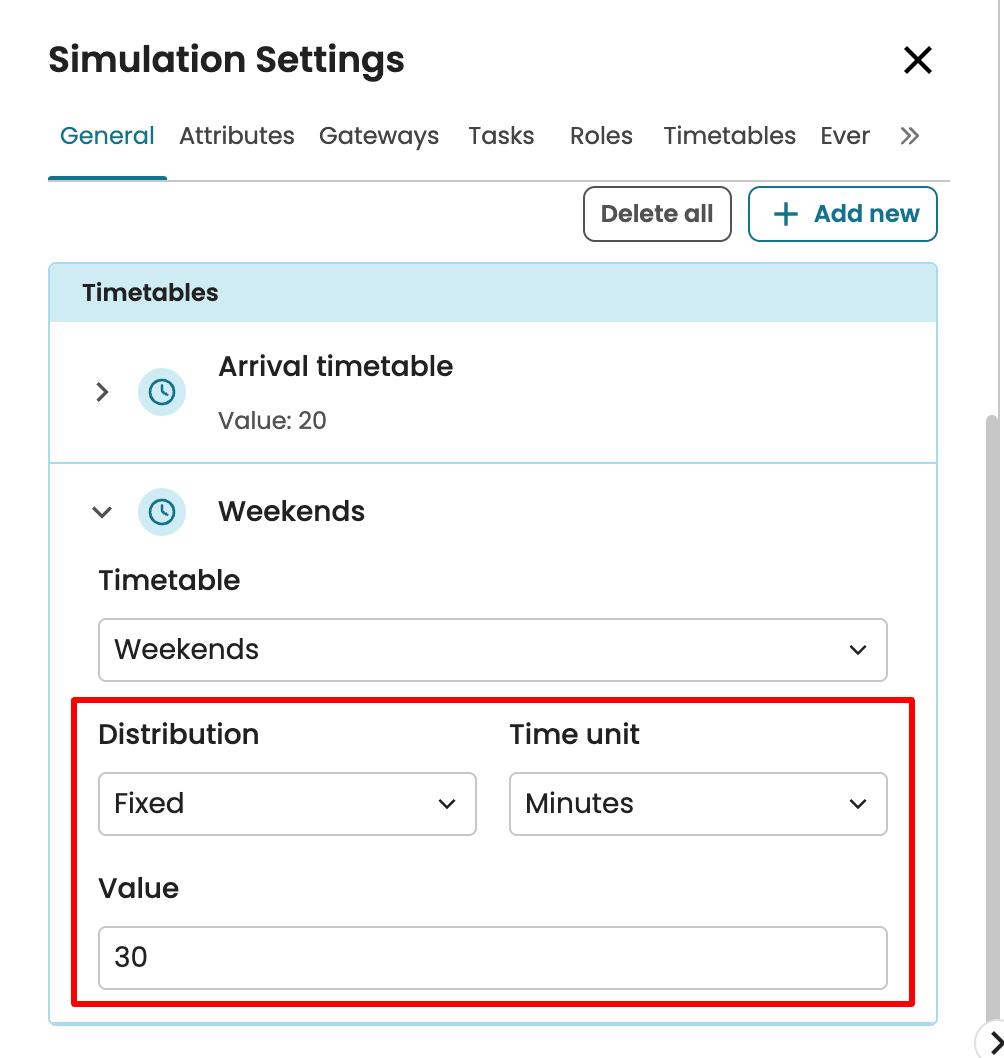
Apromore also allows us to create a different inter-arrival time. For instance, if, during weekends, a new case starts every 30 minutes, we can add a new inter-arrival time to capture this behaviour. First, create a “Weekend” timetable in the timetable tab. To learn about creating such a timetable, see Timetables parameters tab.
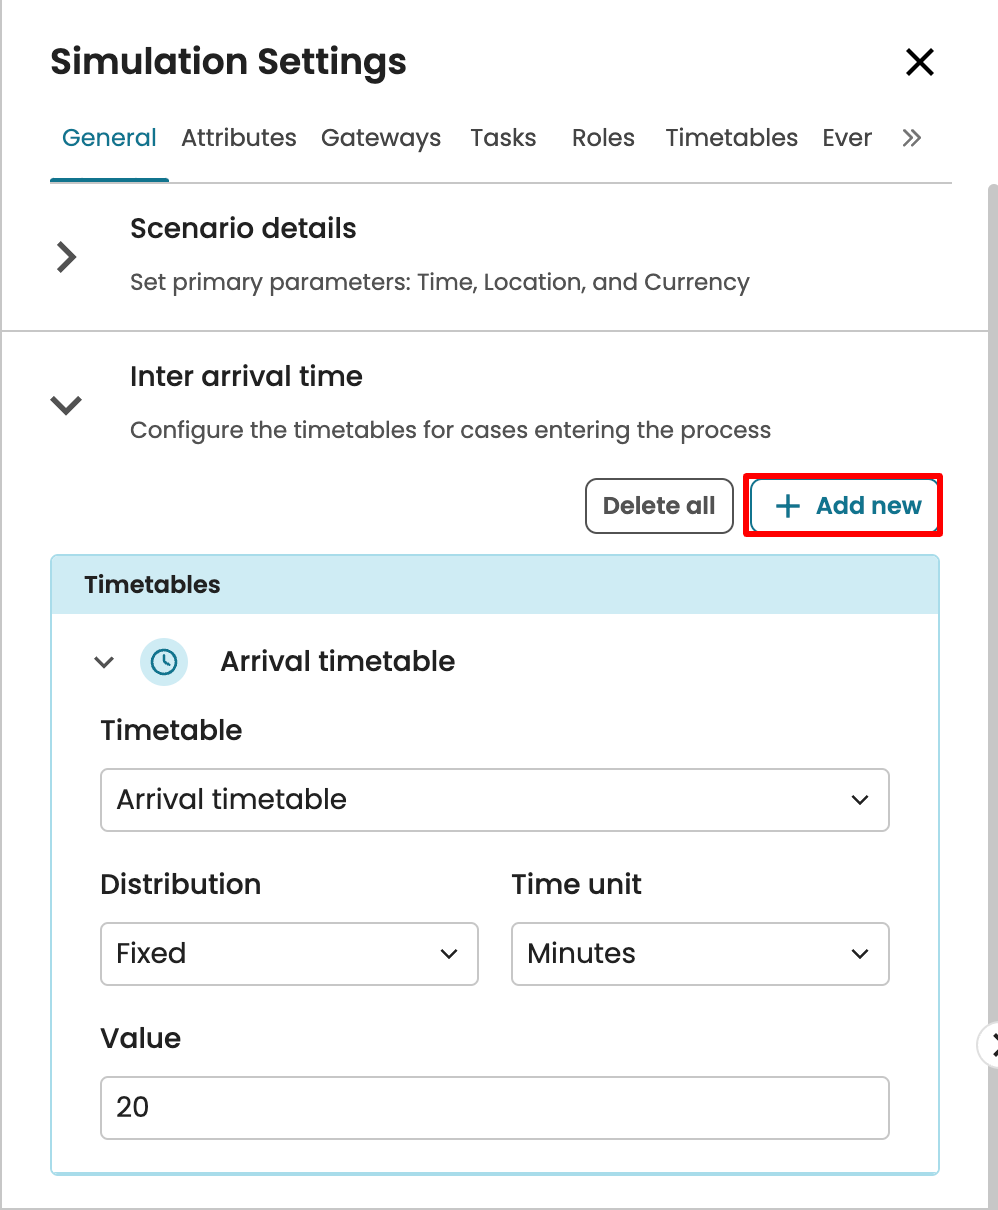
Click Add new to add a new inter-arrival time.
Open the new inter-arrival time that was created.

In the dropdown, select the other timetable we have created. In our case, we select the Weekends timetable.

Now we can specify the arrival timetable for weekends. If a new case starts every 30 minutes, we will set the values accordingly.
Simulation timeframe
To specify how long the simulation will last, Apromore offers two options.
Simulation duration
Cases count
Simulation duration
We can specify the duration timeframe by entering the duration of the simulation. For instance, we may want to create a simulation that lasts for 30 days, irrespective of the number of cases that will be created within that period. To specify the simulation duration, tick Simulation duration.
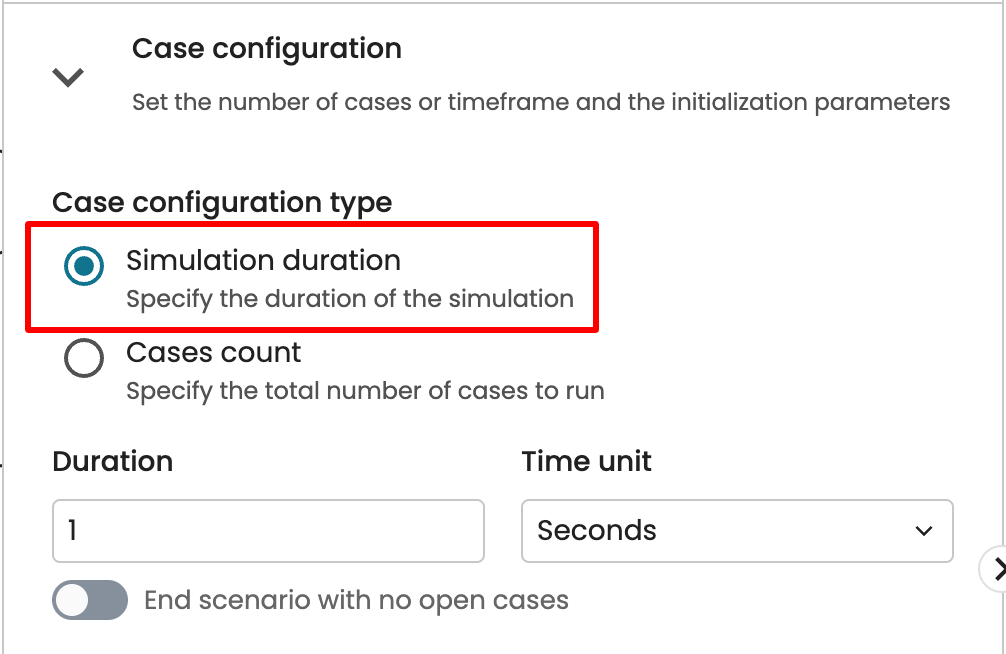
We are prompted to enter the length of the simulation scenario. Enter 30 days.
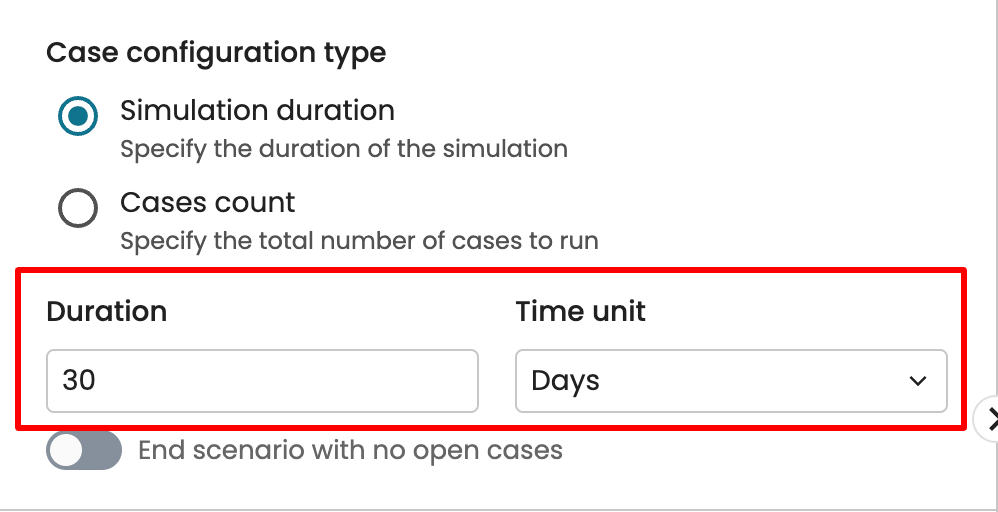
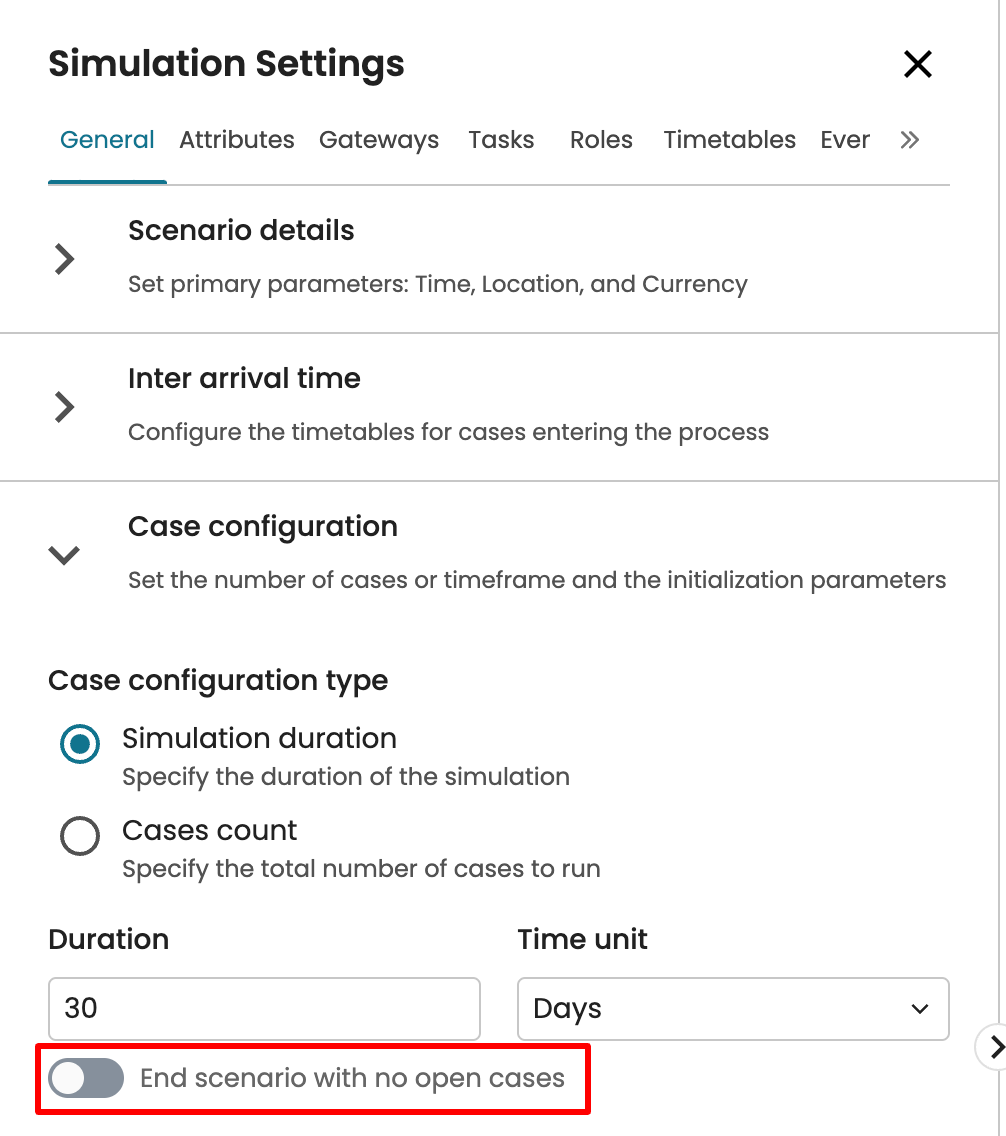
We can also toggle on/off “End simulation scenario with no open cases.” When we leave this option toggled off, the simulation stops strictly after three months. There could be open cases that have not been completed. Conversely, when we toggle this option, Apromore stops creating new cases after three months. However, any case that has been created before that time will be allowed to complete. Consequently, the simulation timeframe may exceed the inputted value.
Cases count
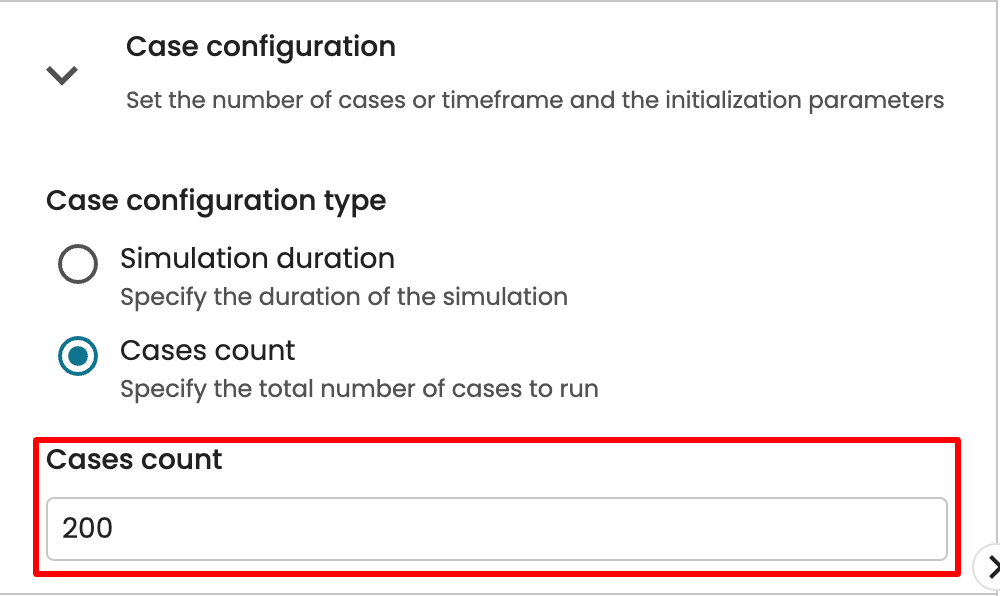
We can also specify a simulation timeframe by specifying the number of cases. For example, when we set the number of cases to 200, then the simulation will stop once 200 cases have been created and completed. To do so, check Cases count.
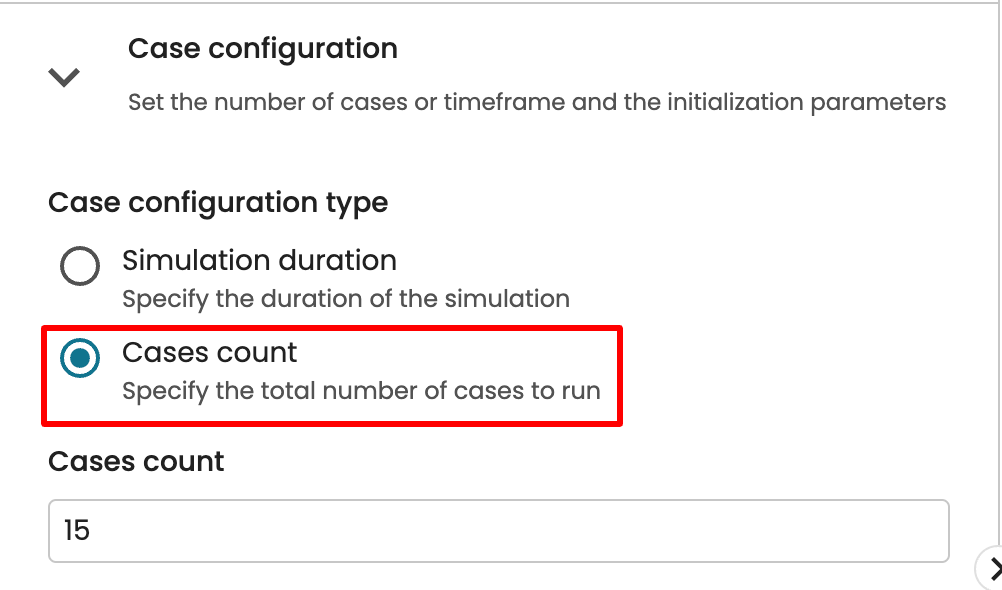
Enter 200 total number of cases.
Advanced settings
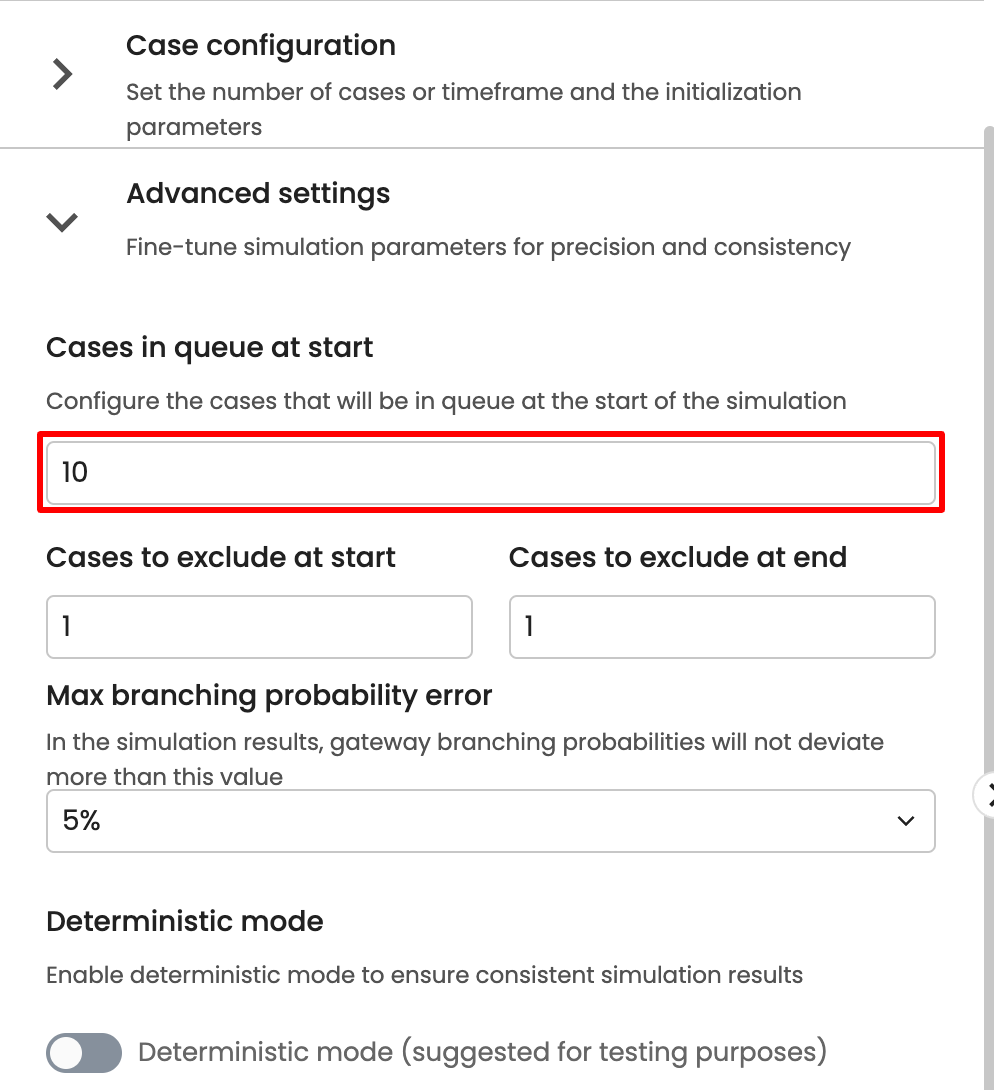
We can set additional settings in the General tab. For instance, we may want a certain number of cases to begin together at the start of the simulation. This is specified in Cases in queue at start. Let us say we want 10 cases to begin together. Click Advanced Settings.

In Cases in queue at start, enter 10.
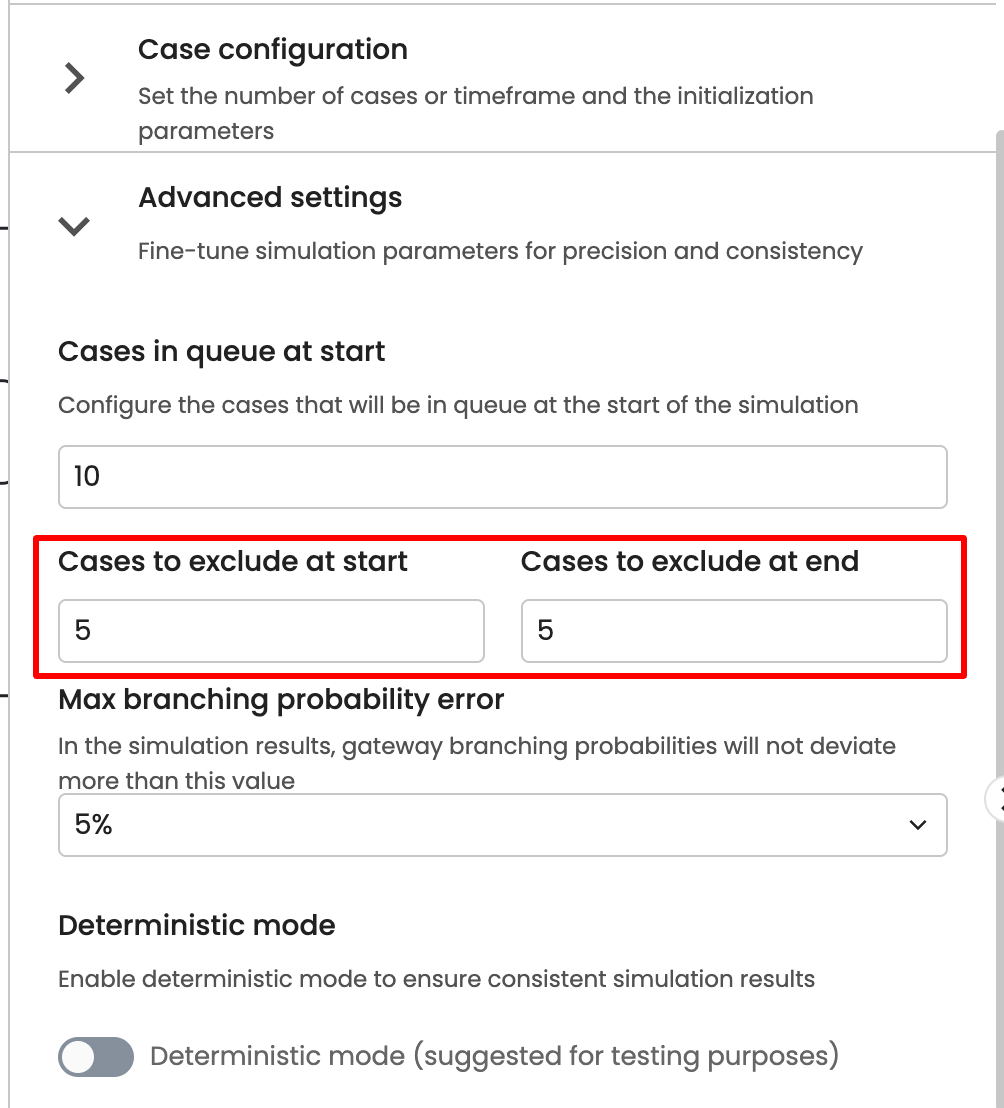
We can also exclude specific numbers of cases at the start and end of the simulation to better focus on the core period where case arrival is most consistent. This ensures that the simulation gives an actual representation of the process, focusing on periods where resource availability is stabilized, and there are no unusual delays.
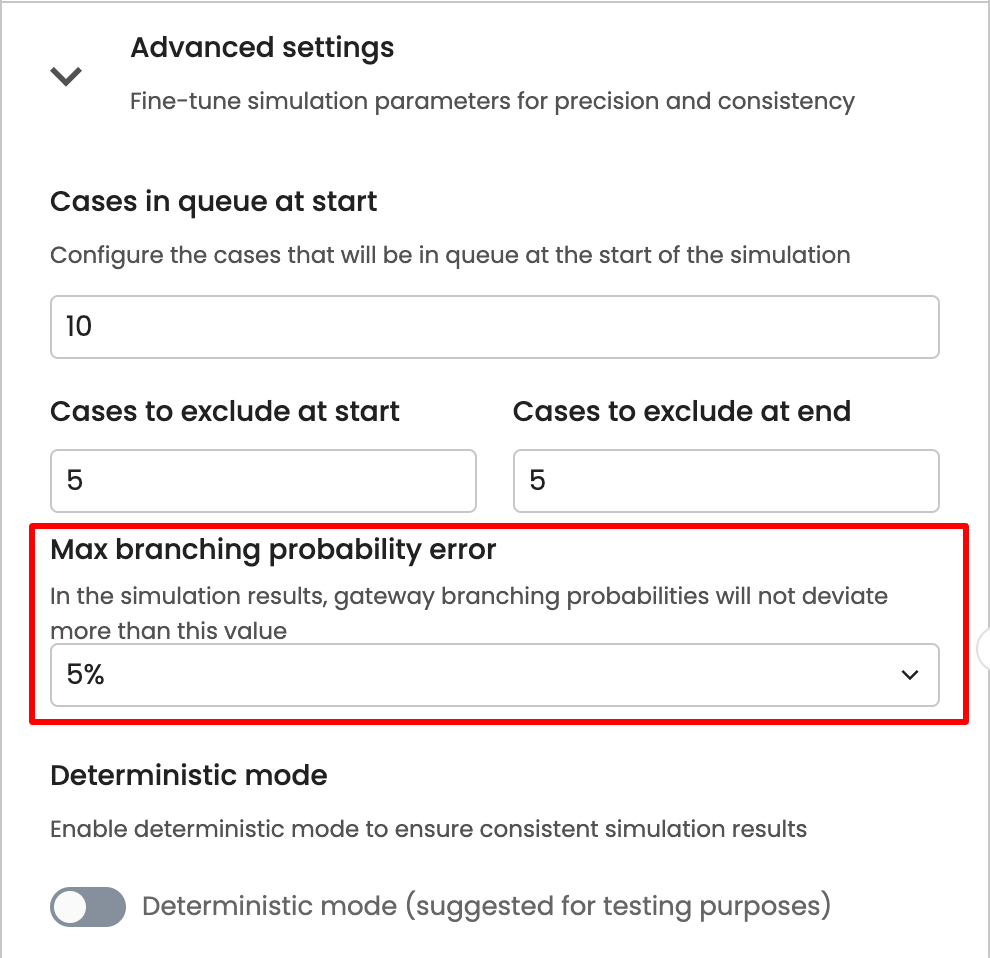
We can specify the max branching probability error as well. When this is done, the gateway branching probabilities in the simulation results will not deviate more than the specified value. If, for instance, we simulate a process model with X/OR split gateways that have probability-based conditions, and we select a maximum branching probability error of 5%, the simulation results of the branching probabilities will not deviate more than 5% for all the X/OR split gateways.
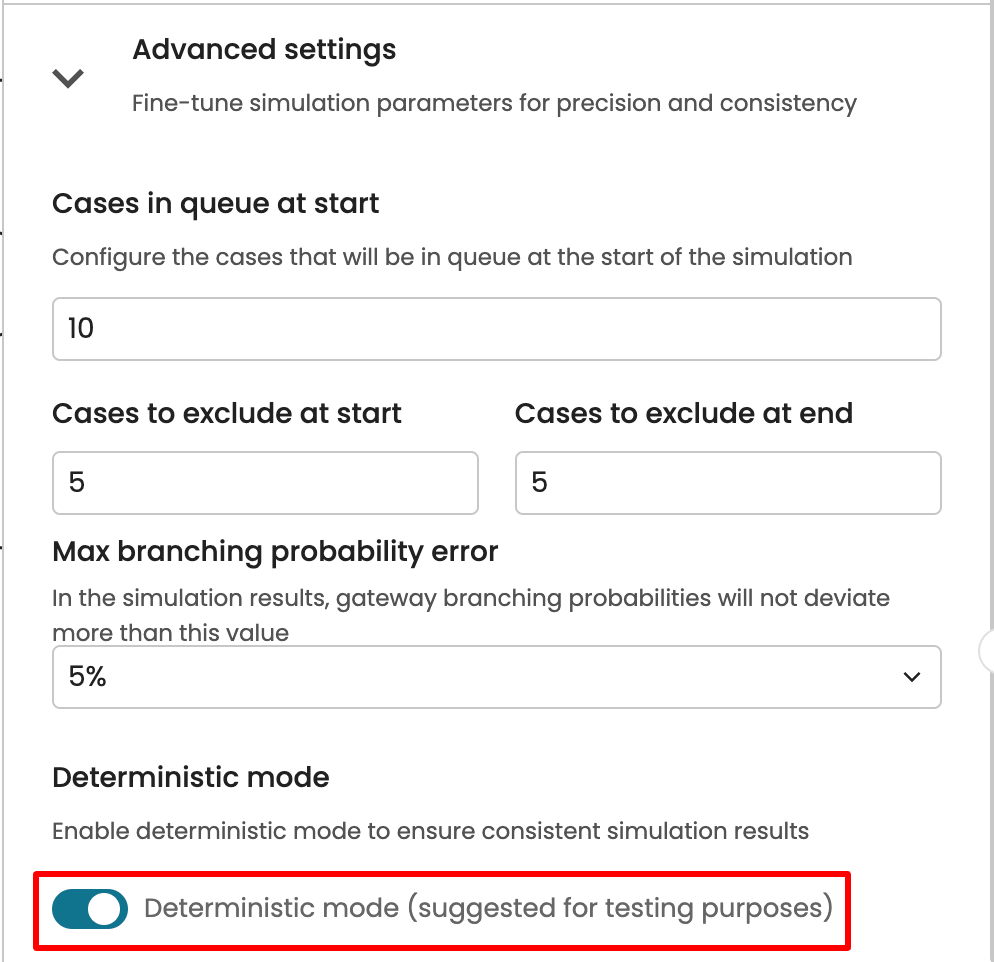
By default, the deterministic mode is unchecked. This means that when a simulation is performed with the same parameters, the simulated log slightly changes between every run. If we want to obtain the same log with the same simulation parameter, toggle on Deterministic mode.
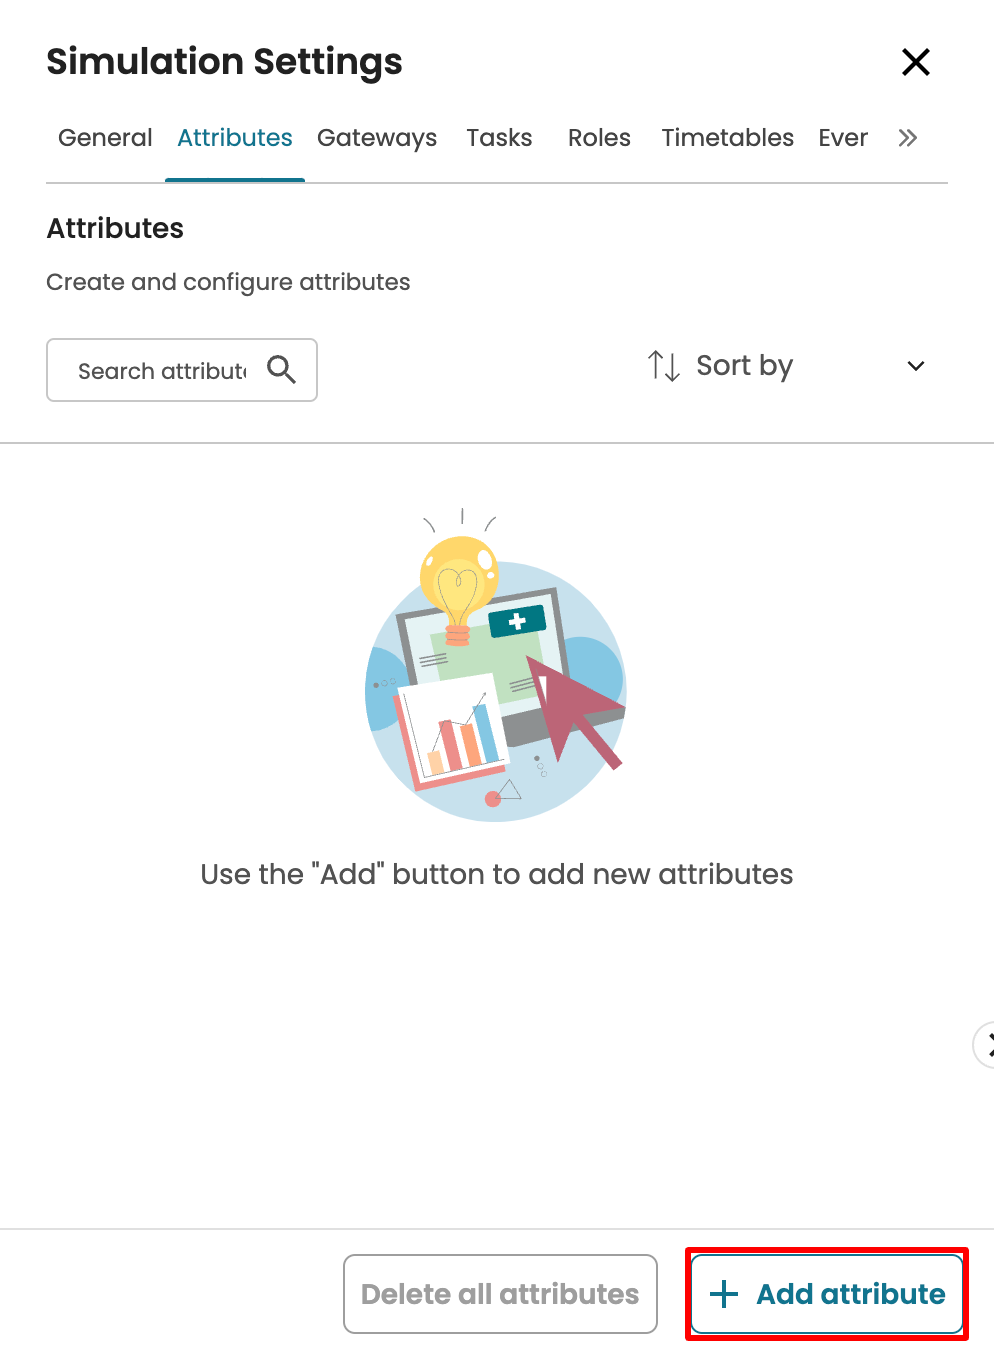
Attributes parameters tab
In a simulation, we can specify that some of the branching behavior of the process depends on one or more attributes. Apromore distinguishes two types of attributes:
Case attributes: These are attributes that remain unchanged in a case, e.g., the “type of customer” in an order-to-cash process.
Event attributes: These are attributes that may be altered by the execution of activities in the case.
We can attach attributes to a simulation scenario. These attributes may behave as case attributes or event attributes, depending on whether they are modified by one or more tasks (event attributes) or never modified (case attributes).
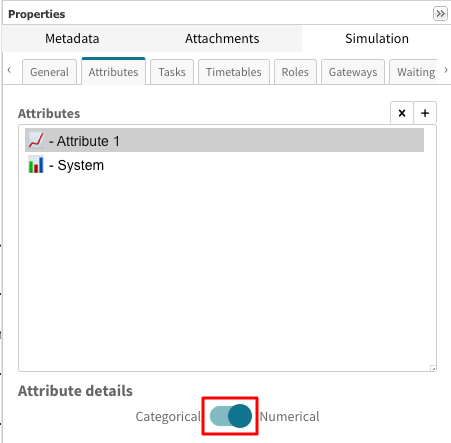
To specify an attribute, open the model in BPMN Editor. Open the Simulation pane and click Attributes to go to the Attributes tab. Click + Add attribute to create a new attribute.
Edit the Attribute name. Say we wish to create a categorical attribute called System, enter System.
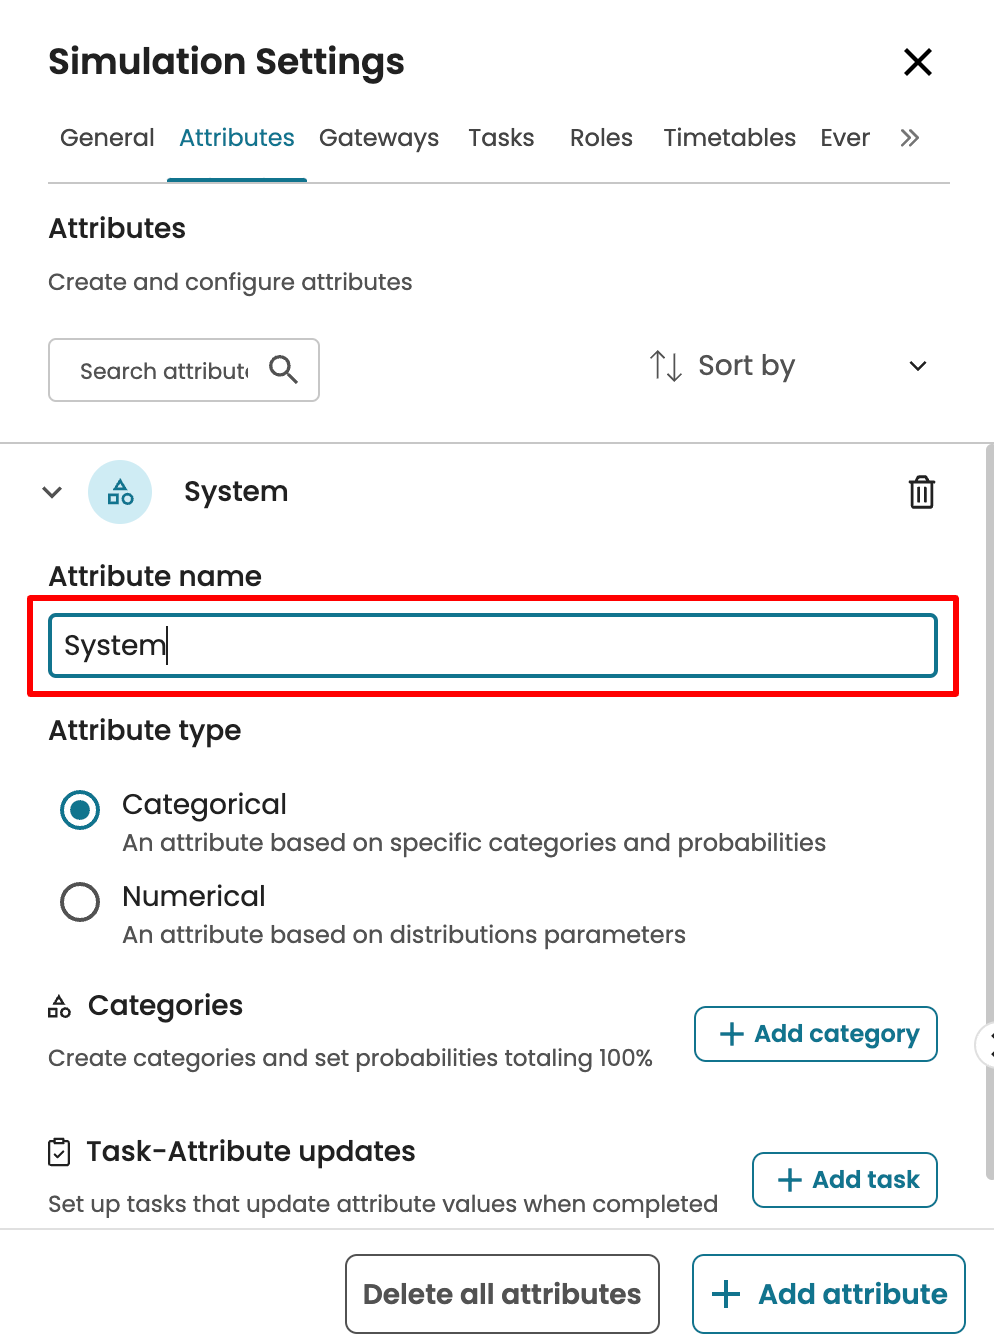
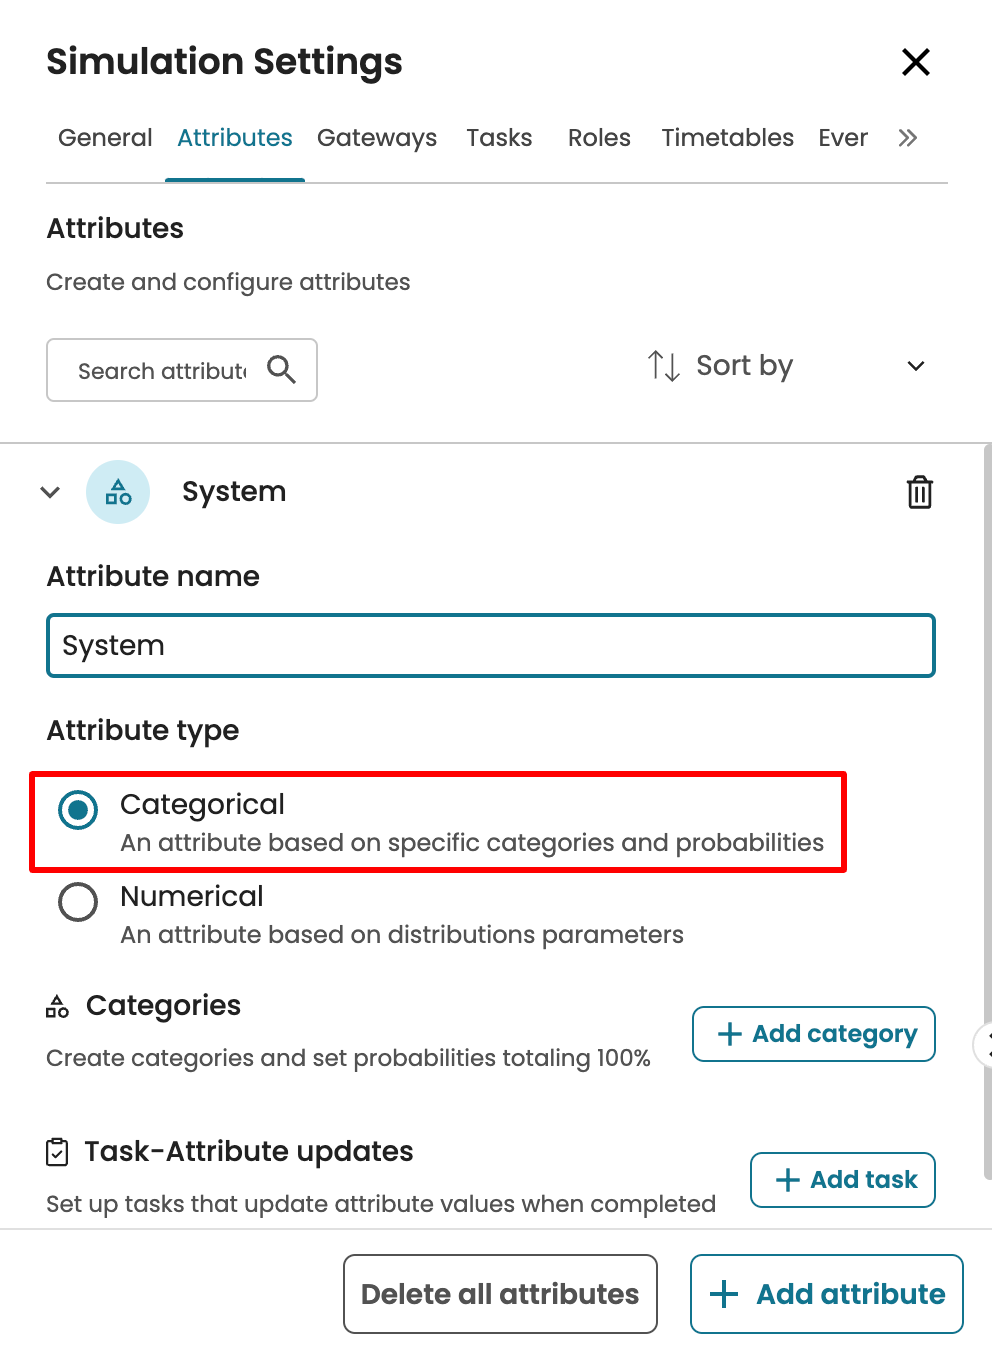
Specify the Attribute type. It could be a categorical or numerical attribute.
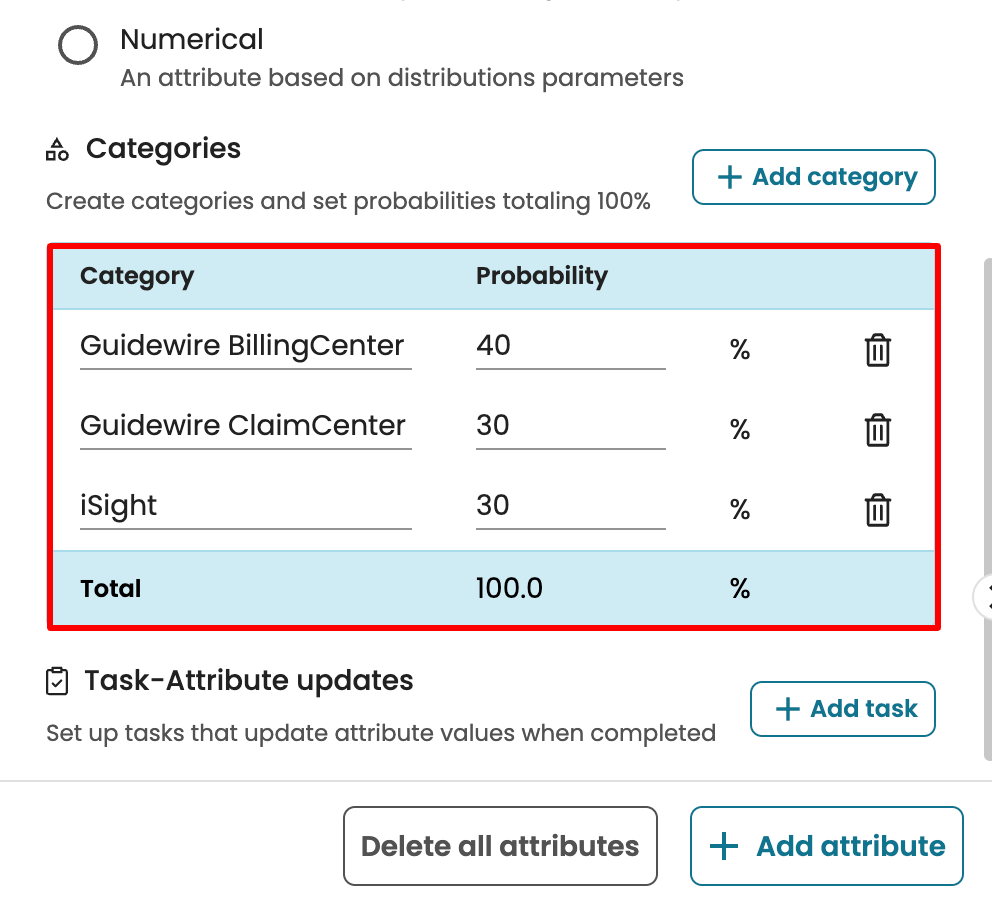
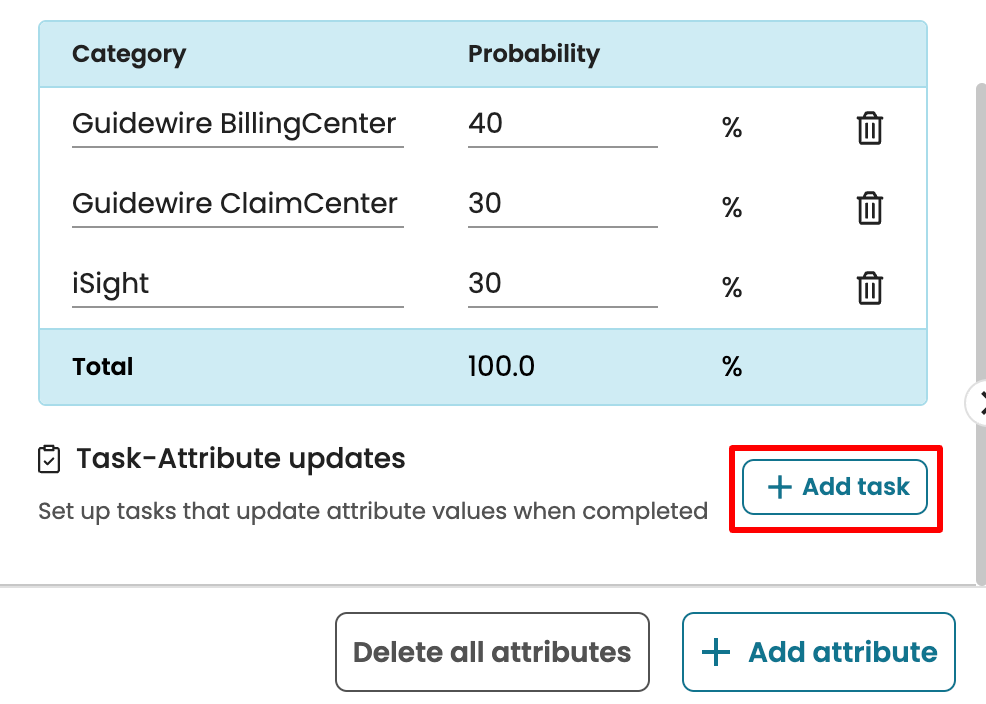
When defining a categorical attribute, we must define the categories and assign probabilities to each. These probabilities determine how frequently a simulated case is assigned a specific category. For example, we can define the following categories for the system: Guidewire BillingCenter (40%), Guidewire ClaimCenter (30%), and iSight (30%). To add attributes, click Add category.
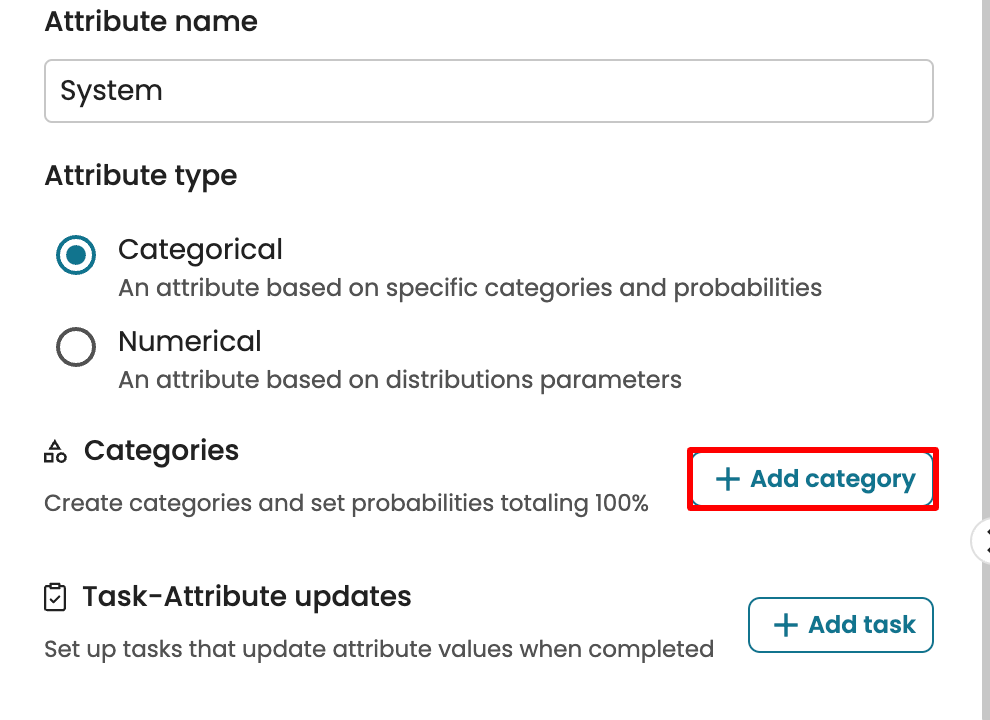
Enter the attributes and their probabilities.
Note
The sum of probabilities for all the defined categories must equal 100.
To capture the fact that an attribute may be modified when a task is being executed, we can specify the task in Task-Attribute updates. Let’s say the “System” attribute changes when performing the “Analyze Defect” and “Register” tasks. Click Add task and add these two tasks.
In the window that appears, add the tasks that update the attribute and click Add.
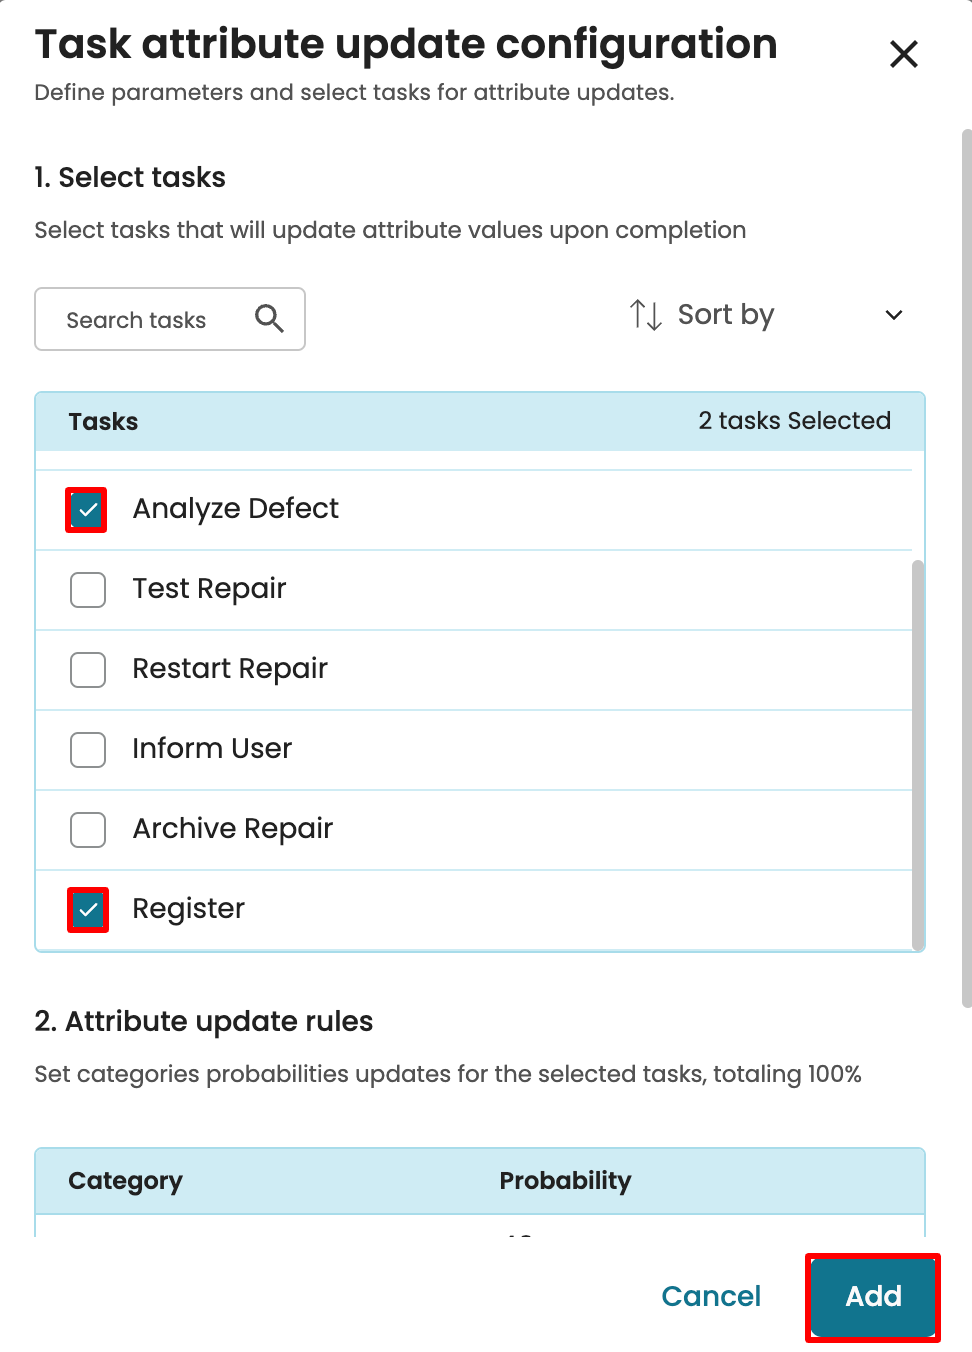
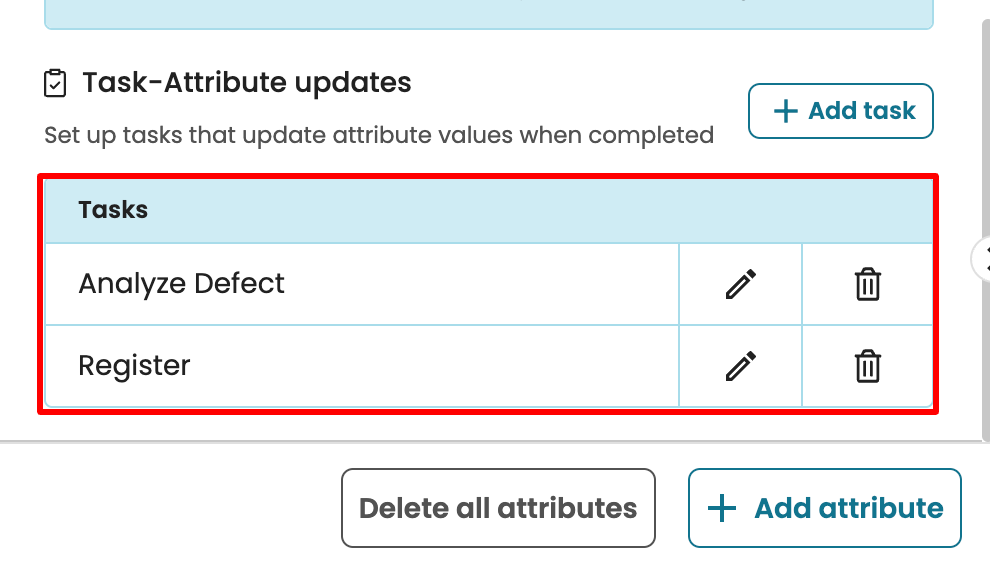
The added tasks are displayed in the “Task-Attribute update” section.
Note
Specifying the “Task-Attribute update” section indicates an event attribute is being created since the attribute value will change within a case.
For categorical attributes, we can also specify the probability distribution after executing a task. Click the pen icon for a task to edit its probabilities.
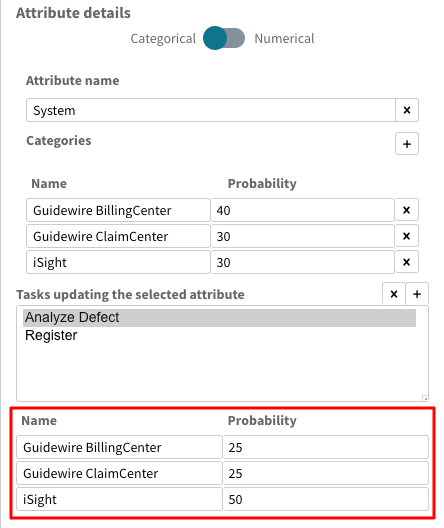
By default, the probabilities are inherited from the probabilities of the attribute.
However, we can change the probabilities for each category. Click Save.
The categorical attribute is successfully defined.
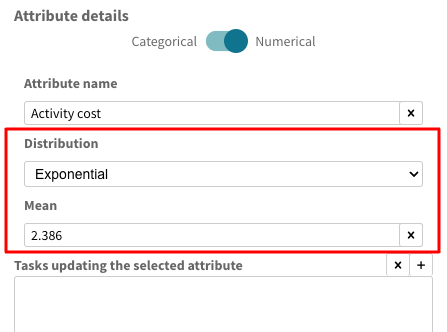
Attributes can also be numerical. Let’s say we wish to create a new numerical attribute. Click Add attribute.
A new attribute is created. We can click it to open its details.
Add a new attribute name. Say Activity cost.
Specify the Attribute type. Here, we select Numerical.
Examples of numerical case attributes would be the purchase amount of a case. In this case, we define its distribution and its value. For example, we can define the “Activity cost” attribute with an exponential distribution and mean of 2.386.
Since this is a case attribute, “Task-Attribute update” is not required. However, if the numerical attribute changes within a case, click Add Task to define the tasks responsible for the change and specify their distribution.
We can delete all attributes by clicking Delete all attributes
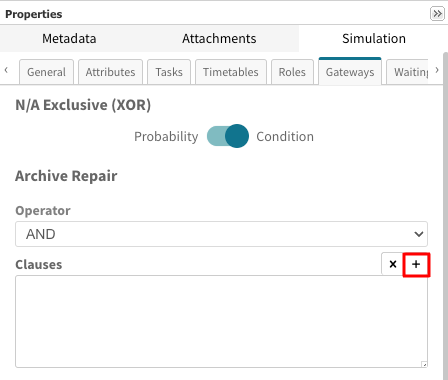
Gateways parameters tab
Gateways is a BPMN notation used to control how a process flows. Gateways can be exclusive (XOR), meaning that precisely one alternative path can be selected, or inclusive (OR), meaning several paths can be selected. The Gateways tab is used to specify the behavior of the gateways in a process.
To define gateway probabilities, go to the Gateways tab.
The BPMN model contains only 1 forward XOR with the 3 successors. This is why only one gateway is displayed.
To view the details of the gateway, click the gateway.
We can now define the gateway rule.
There are two ways of defining a gateway rule:
Through conditions
Through probabilities
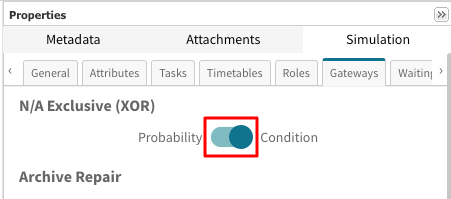
Specifying gateways through conditions
We can specify a gateway behavior through conditions. To do this, select Condition.
When defining a gateway by condition, Apromore determines the pathway (successor) based on the conditions provided. A condition is a requirement that must be met for a task to proceed along a particular path. To ensure accurate routing, we must define conditions for each possible successor.
In the selected gateway, there are three successors – Restart Repair, Inform User, and Archive Repair. Hence, we define the condition for each.
To create a condition for a successor, click the successor to open it.

Click Add condition.

Conditions are created based on case duration or other attributes within the model. For example, if we want the “Restart Repair” task to be executed when the activity cost is less than 20 EUR, we can define a condition to specify this requirement.
Select Activity cost as the attribute.
Specify the rest of the condition – activity cost is less than 20.
Note
When using attributes to define conditions, the attribute must have been defined in the Attributes tab. In this example, the “Activity cost” attribute has been created. To learn about creating attributes, see Attributes.
Warning
When defining a gateway that leads to a rework using conditions, avoid using attributes that remain static. If a condition is based on an unchanging attribute, it will always trigger the rework, potentially creating an infinite loop. During simulation, Apromore will notify you if such loops are detected.
We can define multiple conditions to determine a successor pathway. For example, we may want the “Restart Repair” task to trigger when the activity cost is 20 EUR and the system is iSight.
Click Add Condition.
Specify the new condition.
When multiple conditions are created, we must specify whether all conditions must be met or if at least one is sufficient to trigger the pathway. To require that all conditions are fulfilled, in the Conditions dropdown, select All the conditions must be true.
If, however, we want the pathway to occur when any of the conditions are met, select Any condition can be true.
Note
When defining conditions for a gateway, we must specify conditions for all possible successor pathways to ensure proper routing.
We can specify the condition for the “Inform User” successor. Select the successor to specify its condition. Click Add condition to add a new condition. Let’s say we want the “Inform User” task to be done when the system is Guidewire BillingCenter.

We can also define gateway conditions using the case duration. If we want the “Archive Repair” to be done when the cycle time is greater than 40 minutes, select the “Archive Repair” successor, add a new condition and select Case duration as the attribute.
Complete the condition.

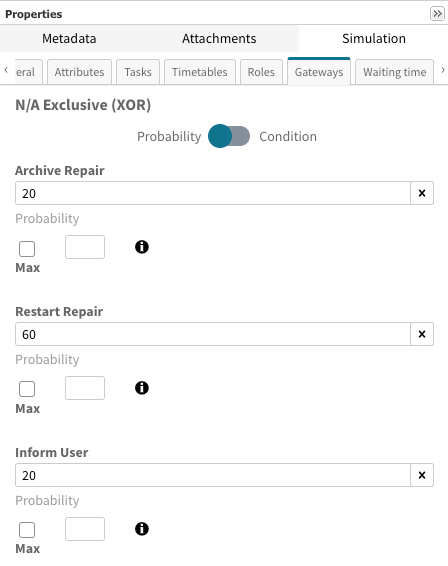
Specifying gateways through probabilities
Gateway rules can also be defined using probabilities, which define the percentage of cases that follow each gateway path.
We can specify the likelihood of each task occurring after the gateway. For example:
Restart Repair occurs 20% of the time.
Inform User occurs 20% of the time.
Archive Repair occurs 60% of the time.
To specify a condition using probabilities, in the Gaeway tab, select a gateway and select Probability as the Gateway rule.
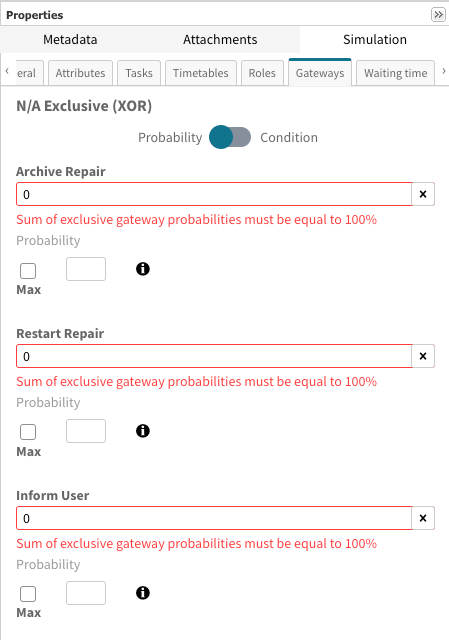
Enter the probabilities.

Note
The sum of probabilities must equal 100.
The Max column allows us to limit how many times a branch can execute during a simulation, even when probabilities are defined. For example, even though the “Restart Repair” task should occur in 20% of the cases, we can specify that this task occurs not more than 10 times. Set the Max value to 10.
Note
To prevent deadlocks, which occur when all branches are restricted and the process cannot continue, ensure at least one branch does not have a Max value.
Task parameters tab
The task tab is used to specify the behavior of each task in the scenario. To specify the task parameters, go to the task tab. The simulation parameters for all the tasks in the BPMN model are shown. The simulation parameters to define are:
The role pool is responsible for performing this task. These are the roles defined in the Roles tab. To learn more about creating a role and assigning to a task, go to Role parameters tab. Please note that we can assign multiple role pools to a task. When this is done, any specified roles can do the task.
The probability distribution of the task duration and the parameters of this distribution (e.g., the mean in the case of an exponential distribution). The task’s duration is the time it takes for a role to execute one instance of a task. Please note that the duration of a task must not include the waiting time before the start of the task. It should only include the processing time.
Fixed cost: A fixed cost may be incurred when performing a task. This can be specified in the Tasks tab.
External delays in arcs: Some tasks may be delayed before they are executed. We can set the external delays that exist in the arc.
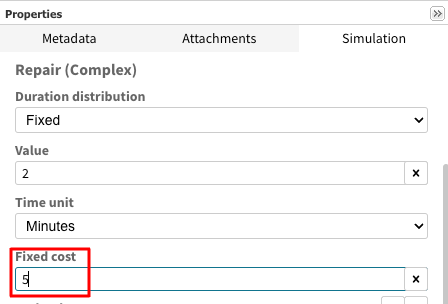
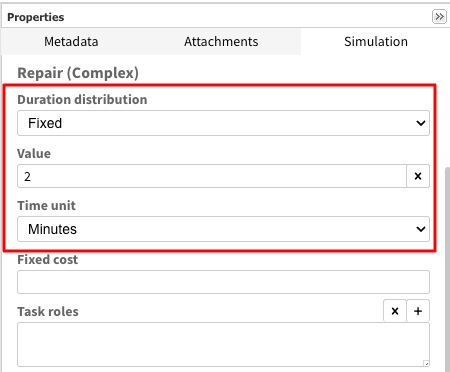
Suppose we want to specify that the “Repair (Complex)” task occurs every 2 minutes. We can select the Fixed Duration distribution, set the Value to 2, and the Time unit to Minutes.
Assuming the “Repair (Complex)” task requires external equipment with a fixed lending cost, we can specify the cost in the Fixed cost section. Let’s say this cost is 5 EUR.
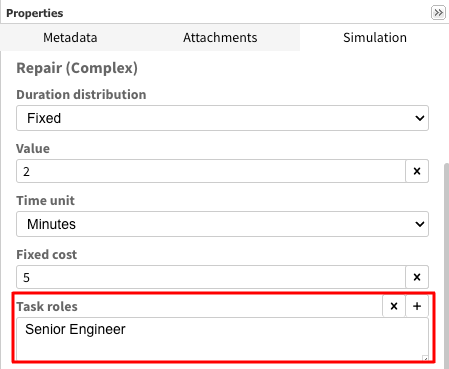
A role can be assigned to the task. For example, if the Senior Engineer performs the “Repair (Complex)” task, click Add Role to specify the role that performs this task.

Select “Senior Engineer” from the list of roles and click Save.

Note
Roles must be created in the Roles tab before they can be assigned to tasks. For details on creating roles or role groups, refer to Role parameters tab.
Once a task is assigned to a role in the Roles tab, those roles will appear as Task Roles in the Tasks tab, indicating the assignment.
We can have multiple role pools for the task. If, for instance, the Engineers’ role group (including both Junior Engineers and Senior Engineers) does the “Repair (Complex)” task, the role group must first be created. We can select Engineers from the Task Add roles to task window.

Note
We can precisely define the parameters of a task by clicking the task in the BMPN model. The simulation parameters tab displays the parameters for only the selected task.
Role parameters tab
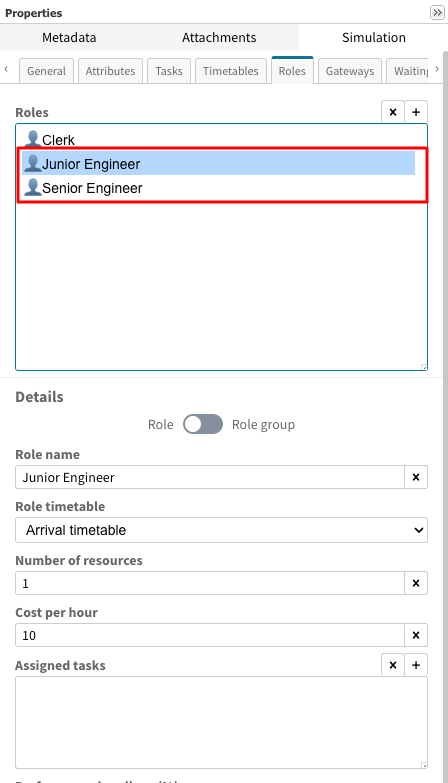
The role parameter tab is used to define a role or role group used in the process. To create a new role, go to the Role tab and click Add role.
A new role is created. Click it to define its properties.
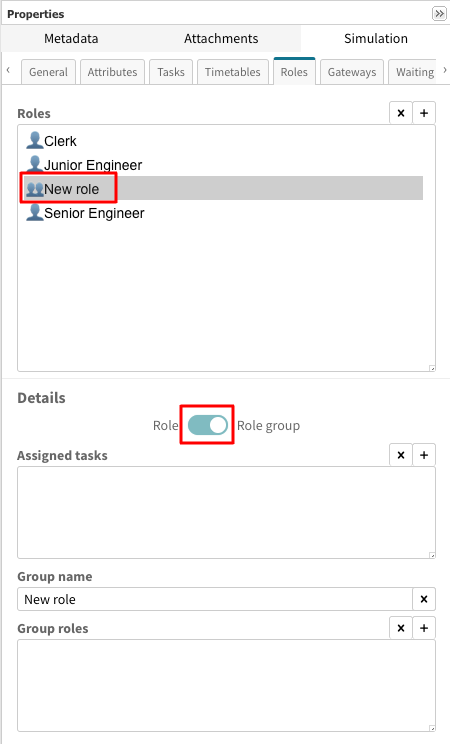
Define the Role type. We can either create a single role or a role group.
Single role: This is a job title assigned to one or more resources that perform specific tasks. For instance, when a “Clerk” does the “Register” task.
Role group: A role group is used when multiple roles do one or more tasks. For example, a ‘Junior Engineer’ and ‘Senior Engineer’ can do the ‘Analyze Defect’ task.
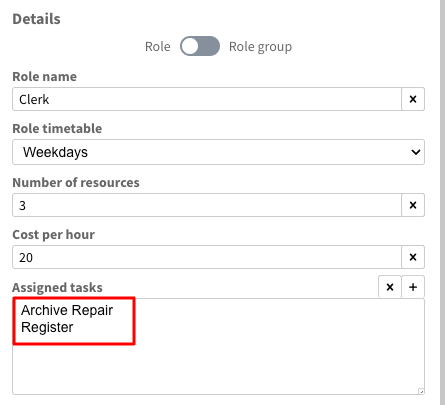
Let’s define a role called “Clerk”. Edit the Role name to Clerk.
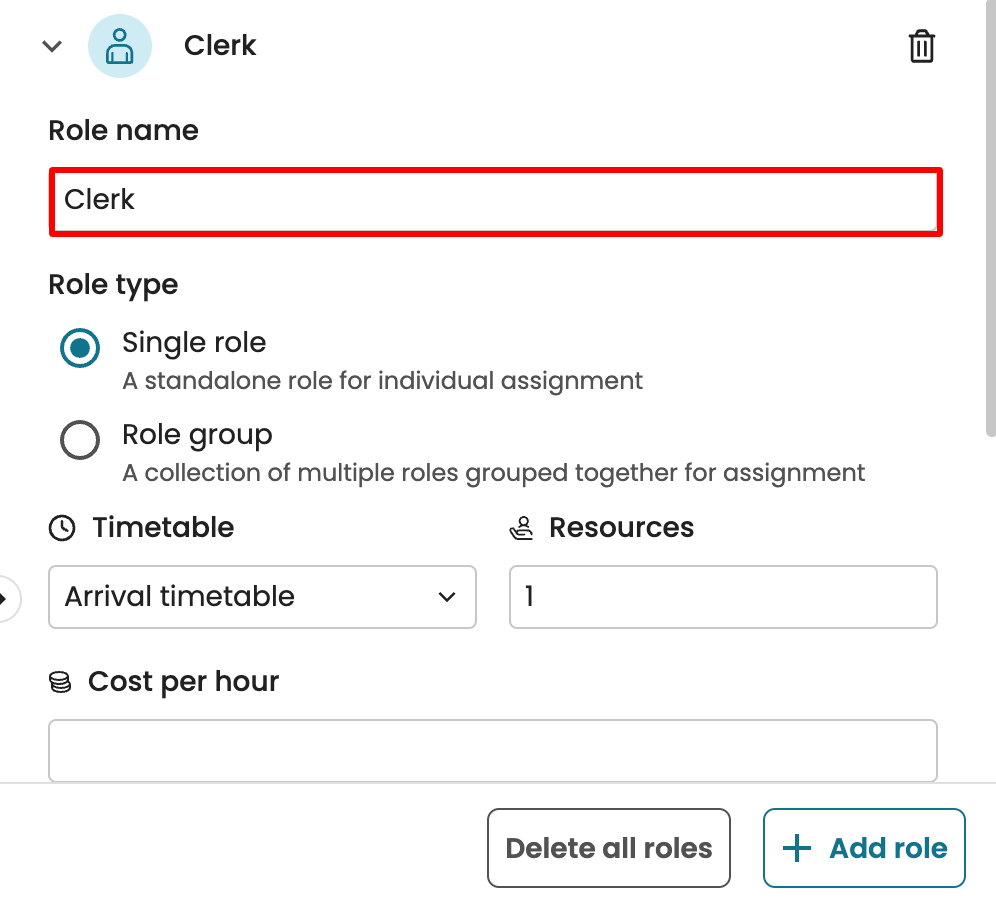
Select Single role. The clerk works during weekdays. Click the Timetable dropdown and select Weekdays.
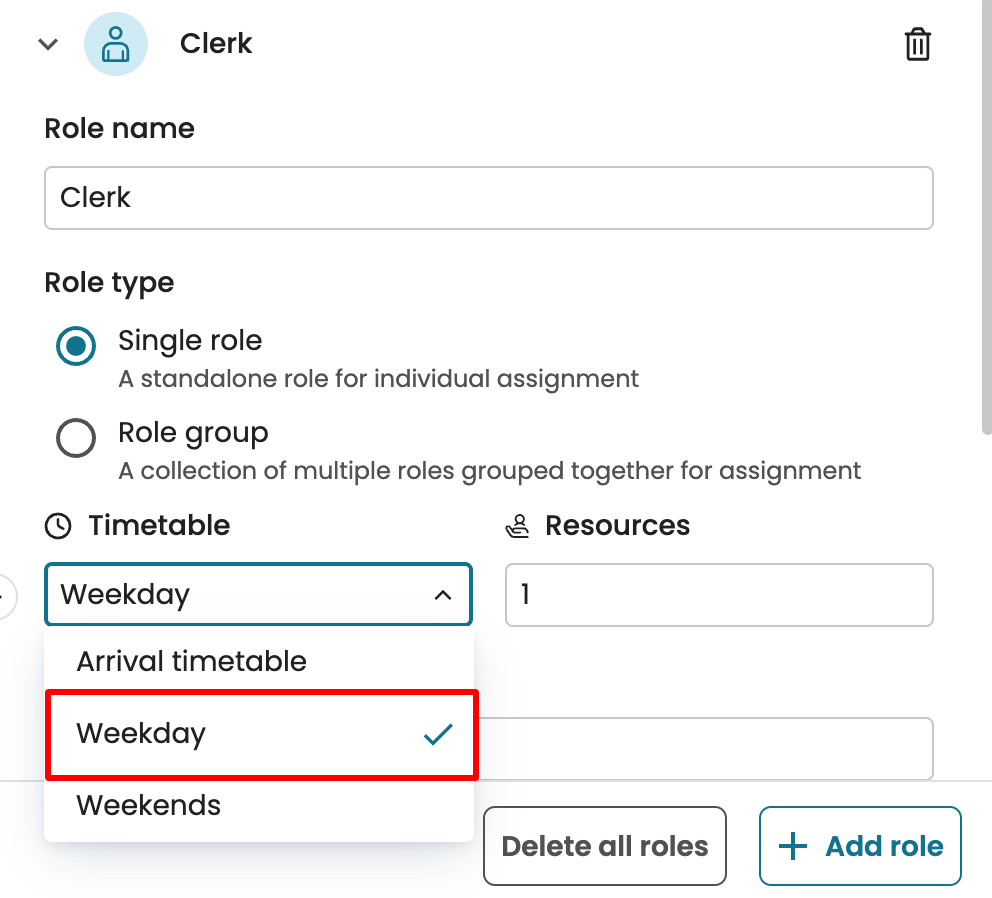
Note
The timetables displayed here must have been defined in the Timetables tab. To learn about creating timetables, see Timetables parameters tab.
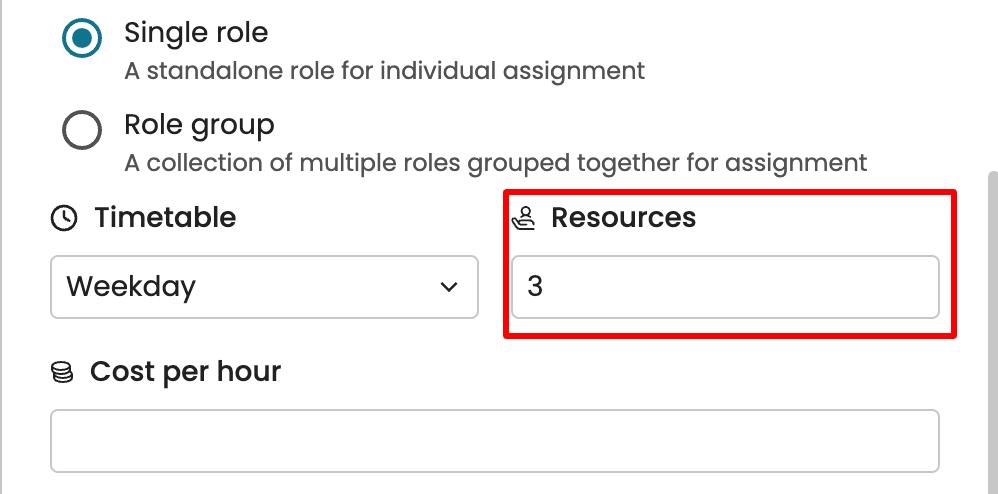
Resources define the number of individuals assigned to a specific role. For example, if there are three clerks available, enter 3 in the Resources field.
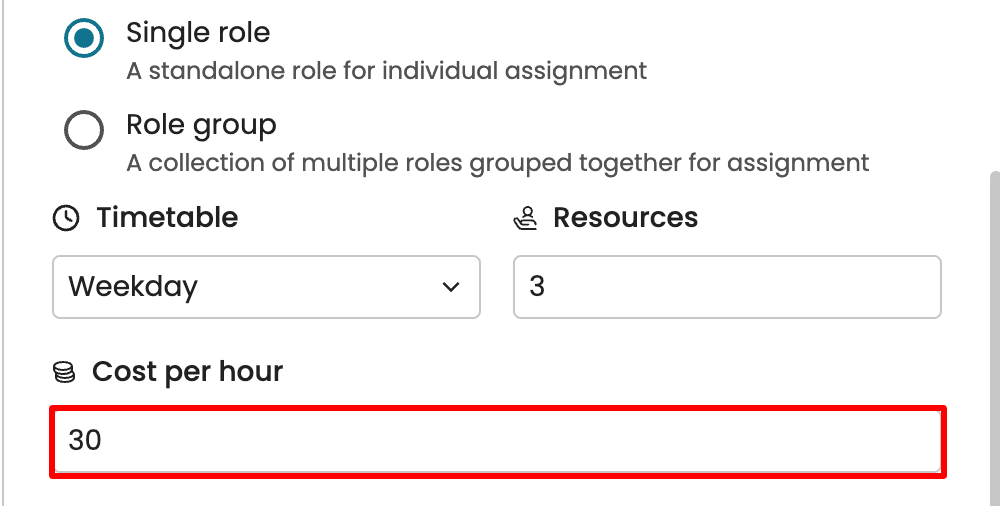
Each clerk costs 30 euros per hour. Enter 30 in the Cost per hour field.
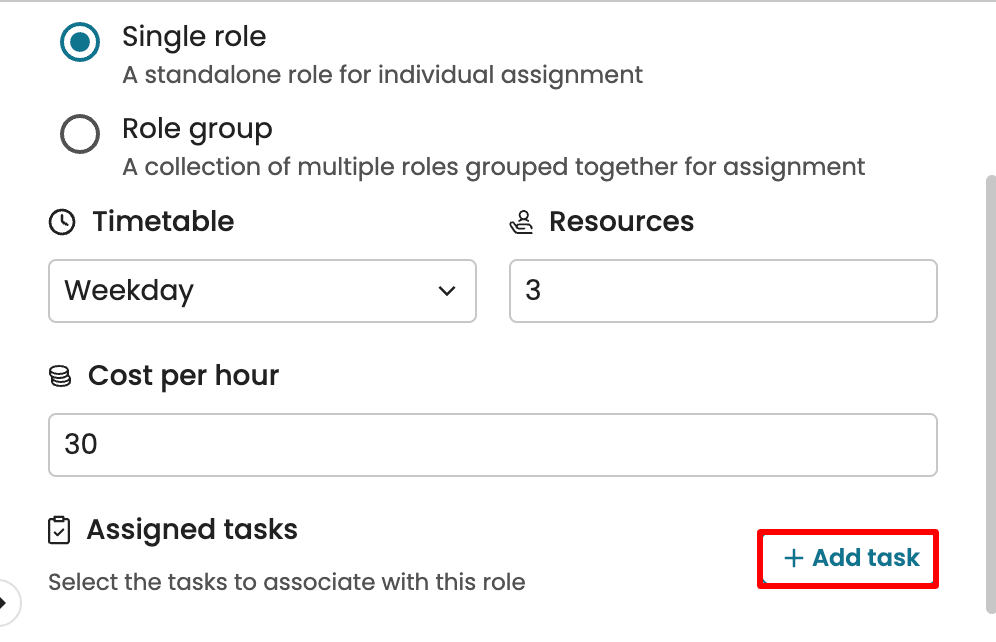
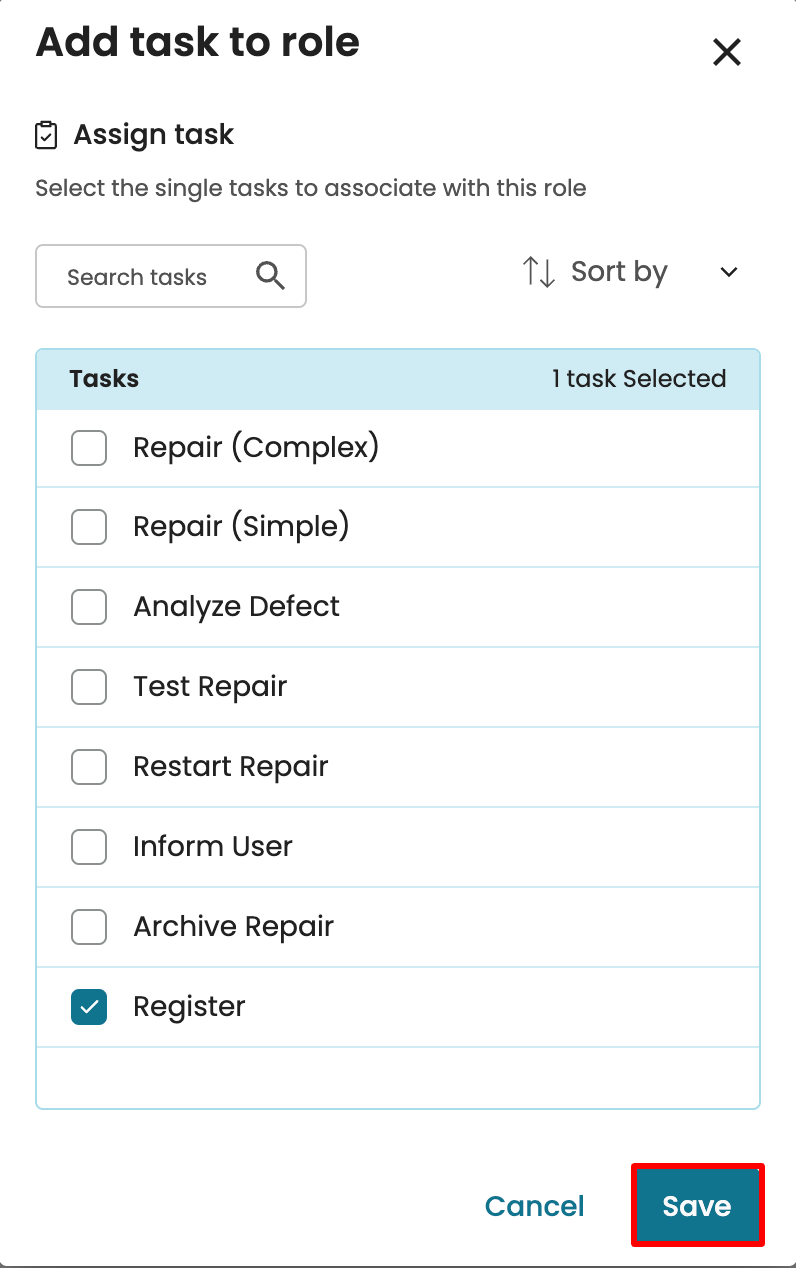
Importantly, specify the task(s) that the role will perform. If the clerk does the“Register” task, click Add task.
Select the task and click Save.
We can add more tasks to a role. If, for instance, the clerk also does the task, “Archive Repair,” we assign this task to the resource by clicking Add task and selecting the new task. Click Save.
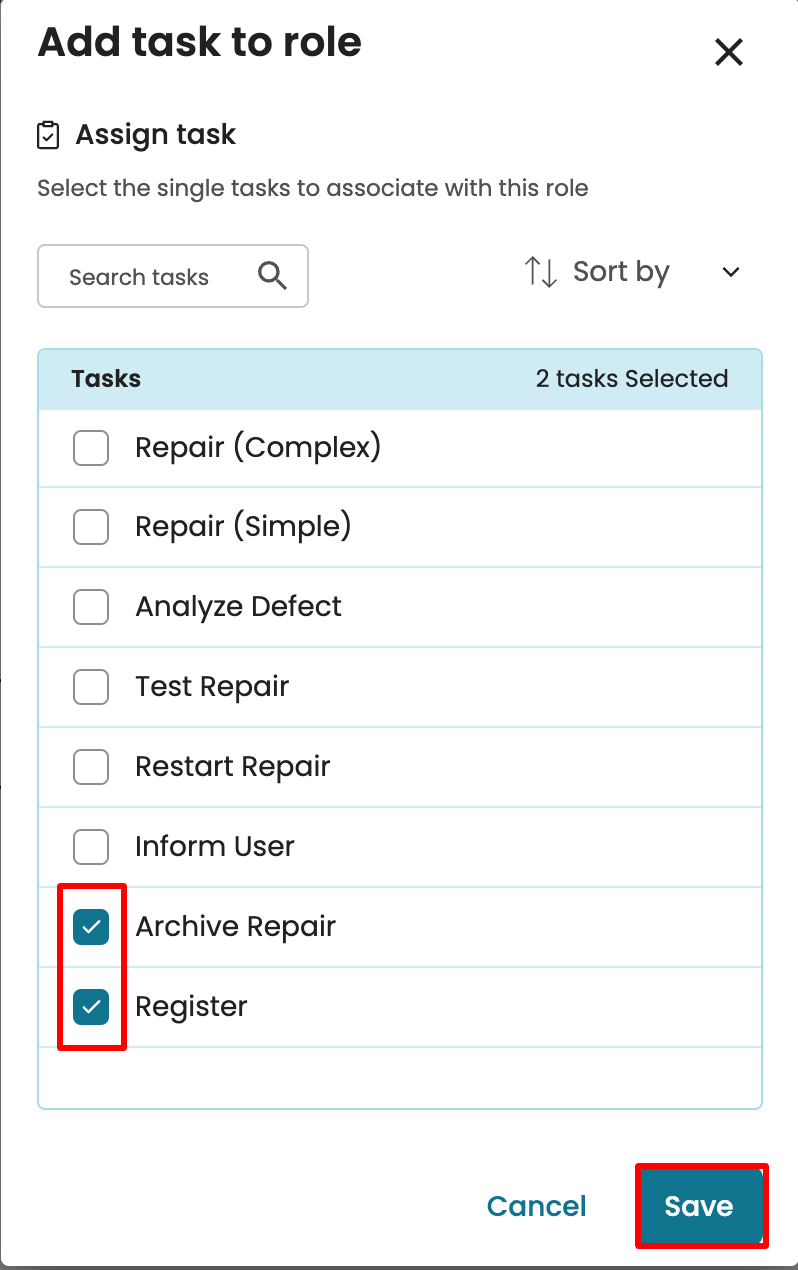
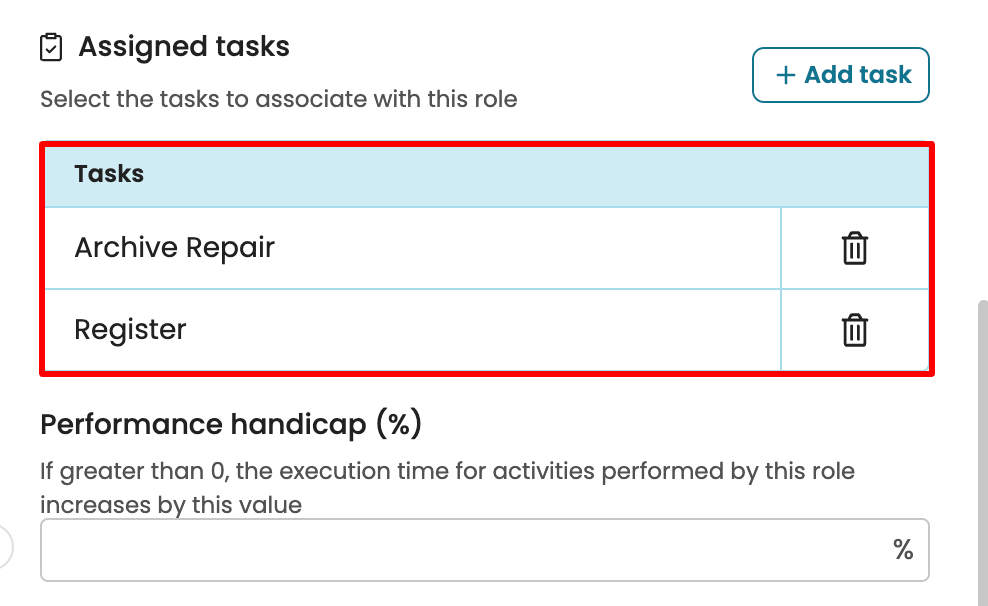
The selected task will be added to the Assigned tasks for the role.
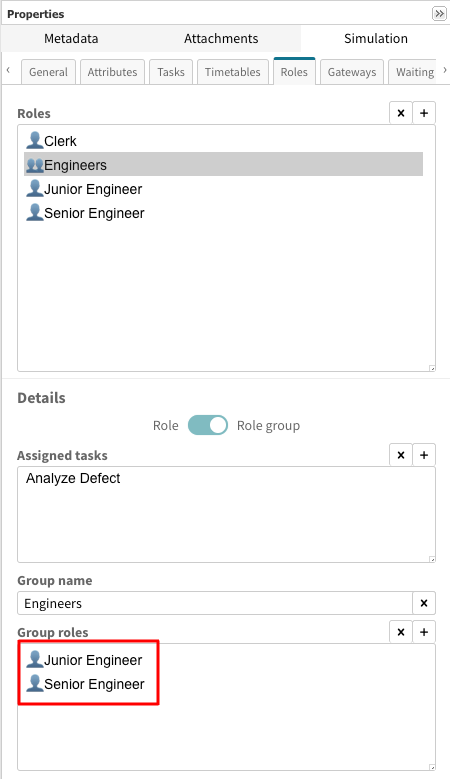
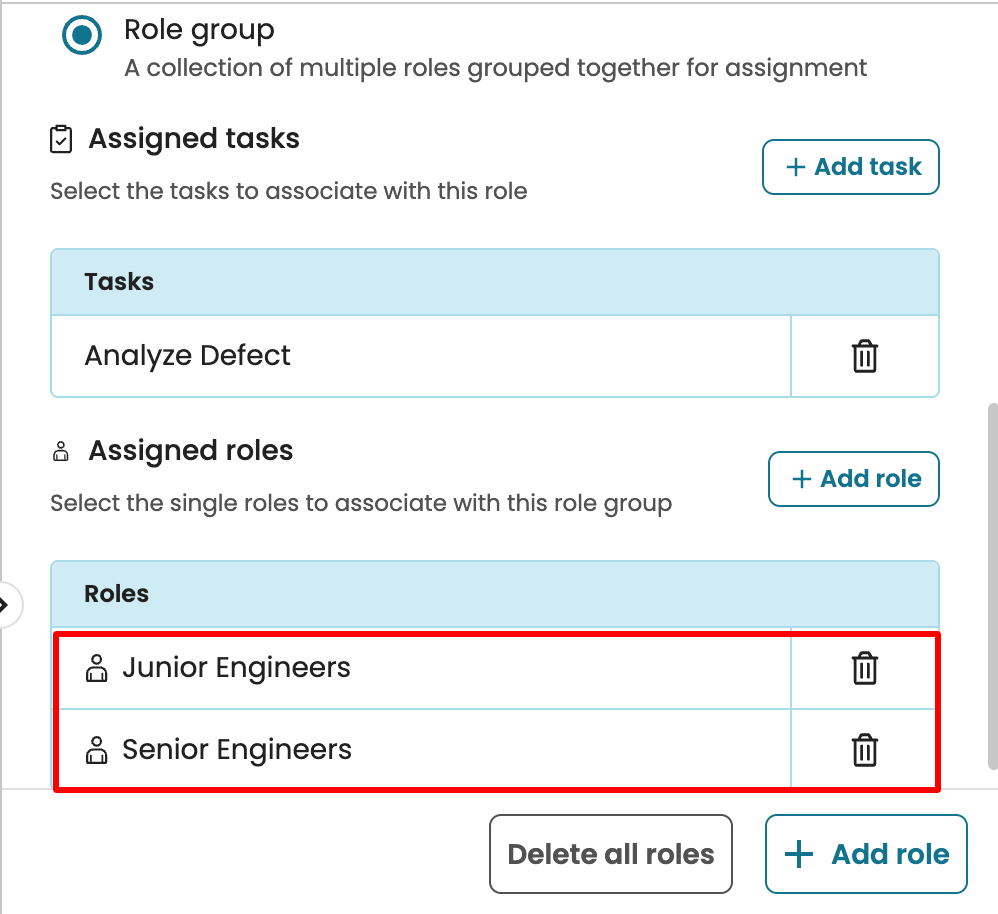
On the other hand, we can define a role group. Say a ‘Junior Engineer’ and ‘Senior Engineer’ can do the ‘Analyze Defect’ task. In such a case, they should be defined as a role group.
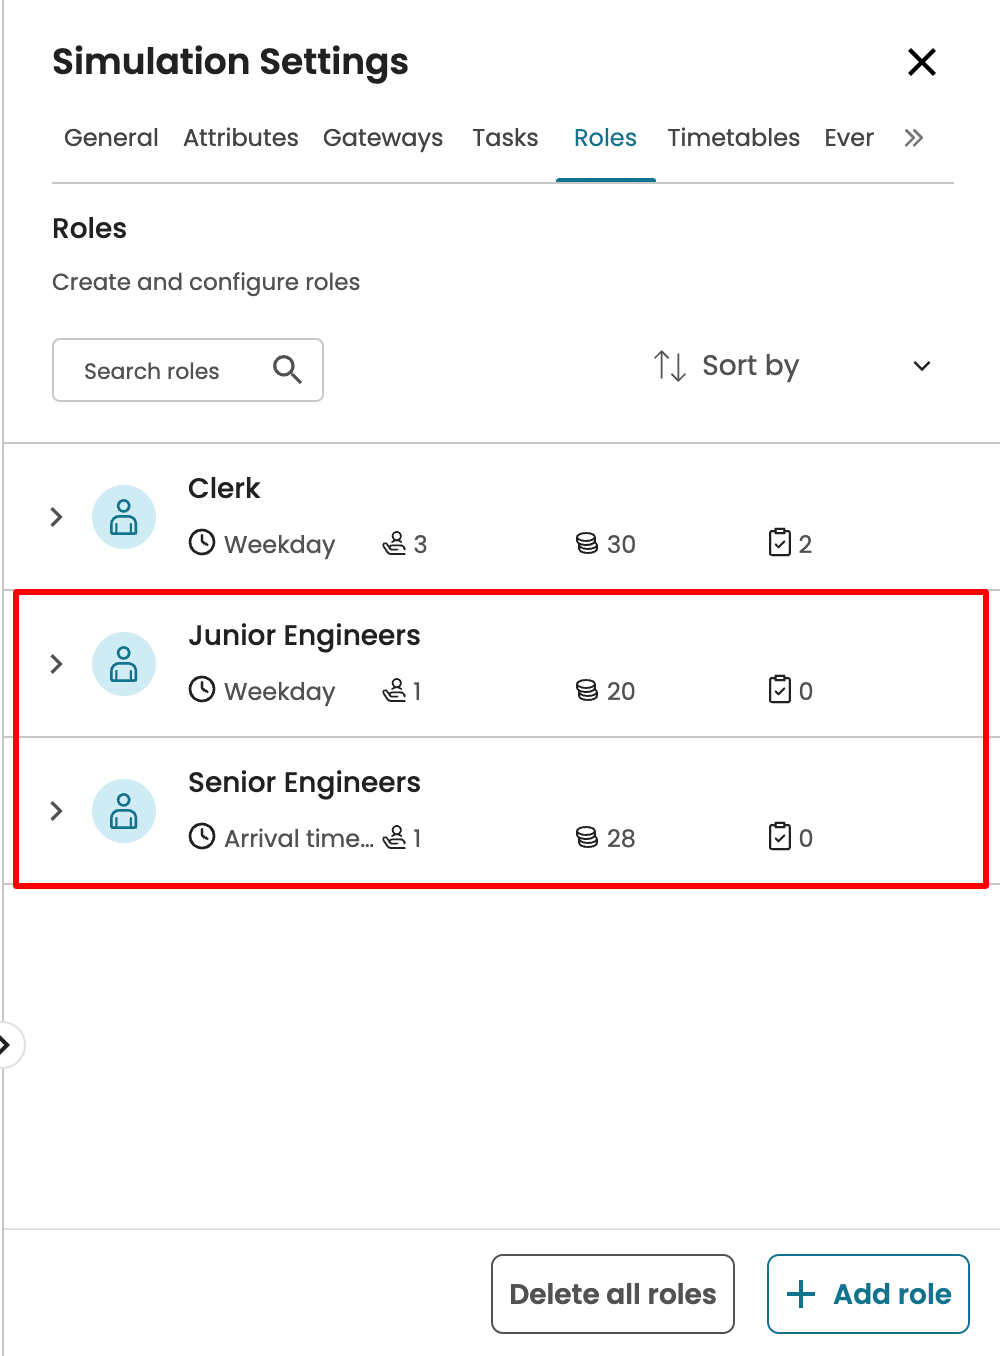
Before specifying this role group, we first must define the Junior Engineer and Senior Engineer roles. We have created two new Roles (Junior Engineer and Senior Engineer).
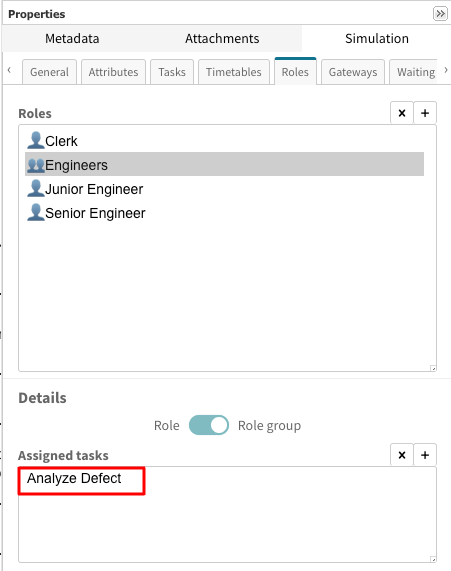
To create a role group, click Add Role, edit the name (e.g., “Engineers”), and select Role Group as the role type.
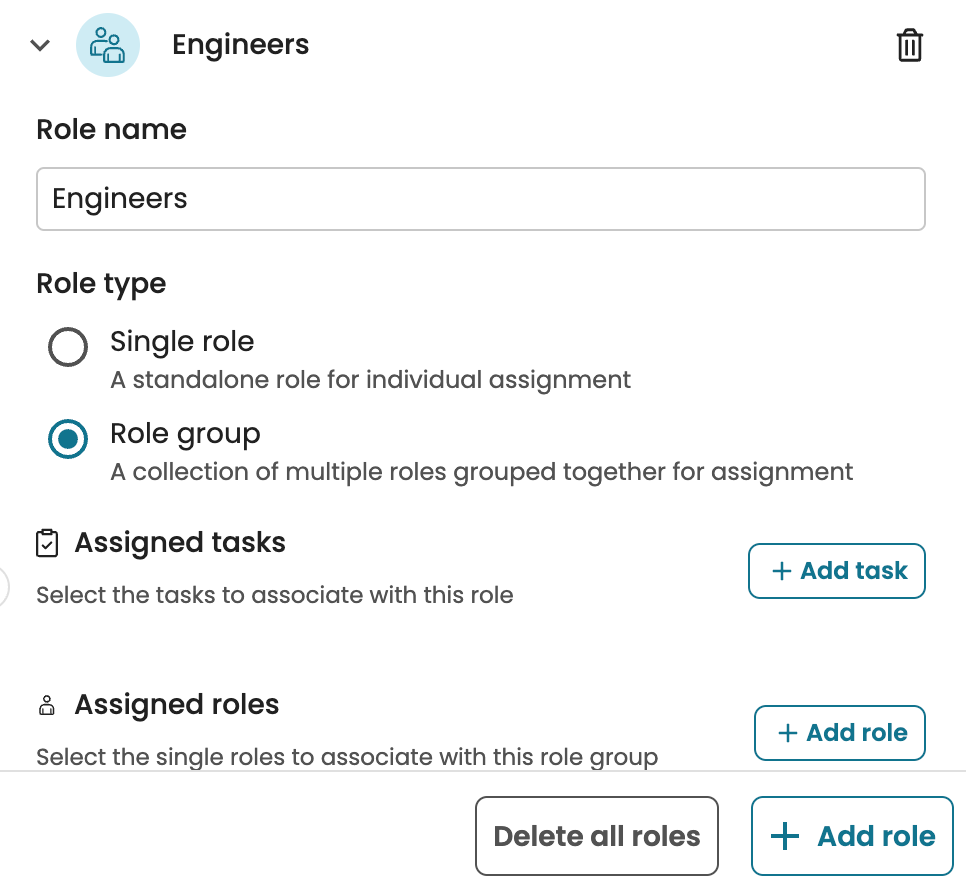
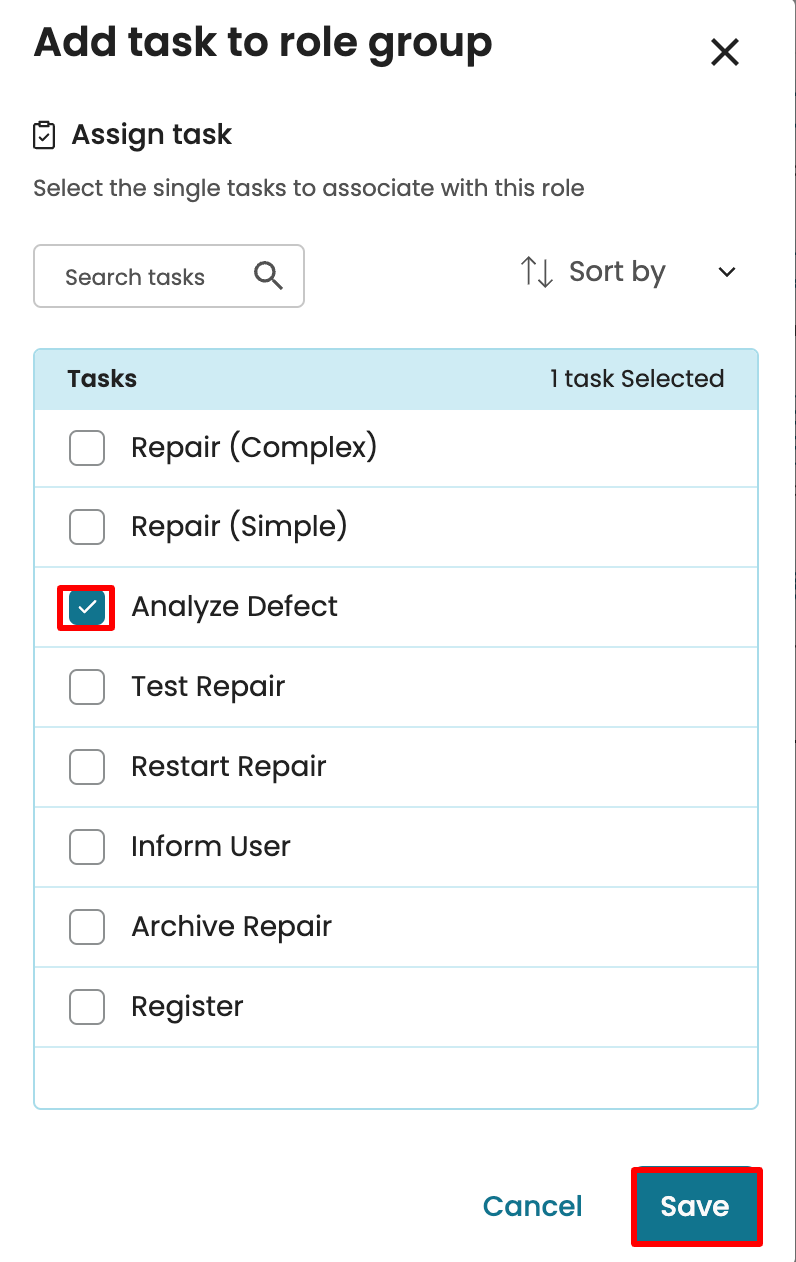
Click Add Role and assign the task “Analyze Defect” to this role by selecting it from the list of tasks.
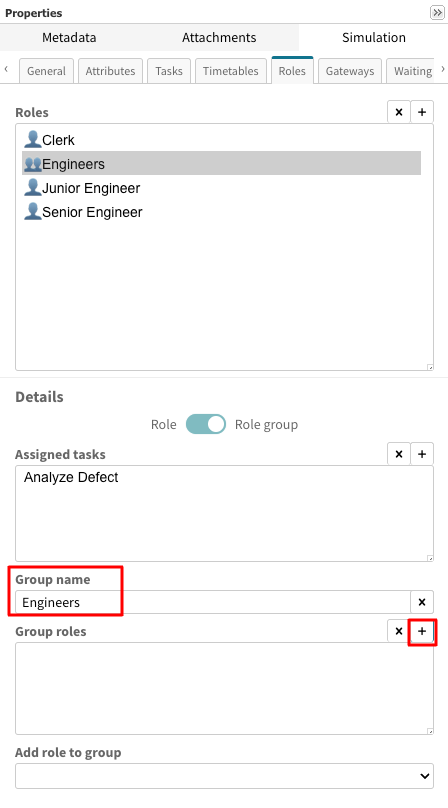
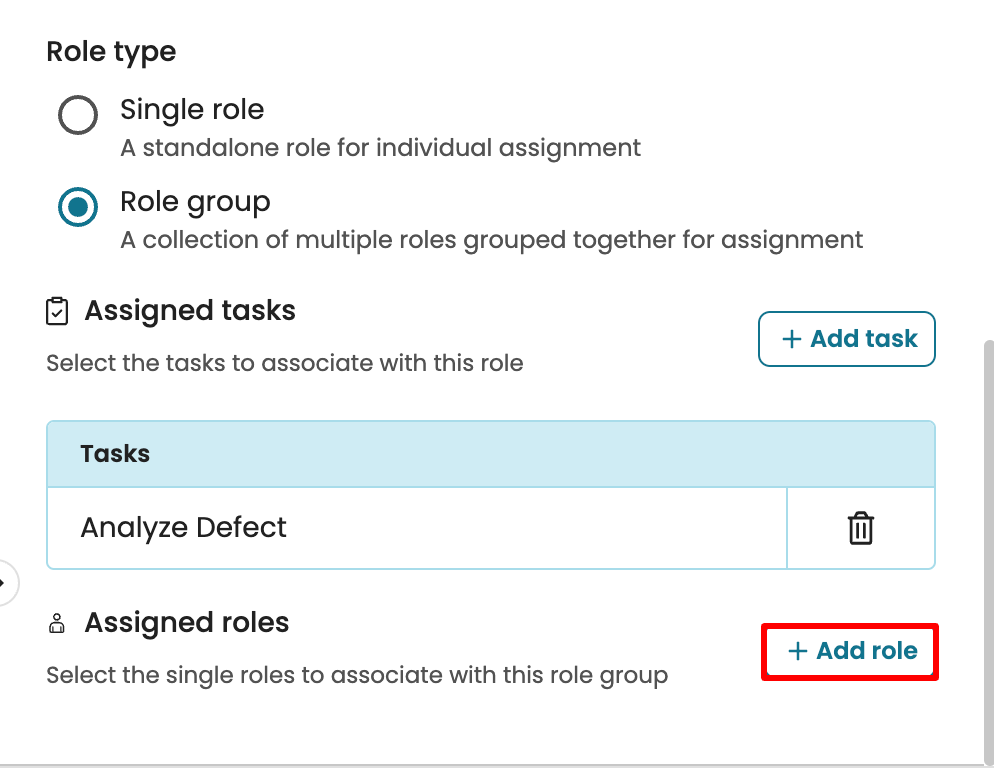
Finally, associate this role group to a role. In other words, all roles selected will do the tasks assigned to this role group. Click Add role.
Select the single roles from the dropdown and click save. In our case, we select “Junior Engineer” and “Senior Engineer”.
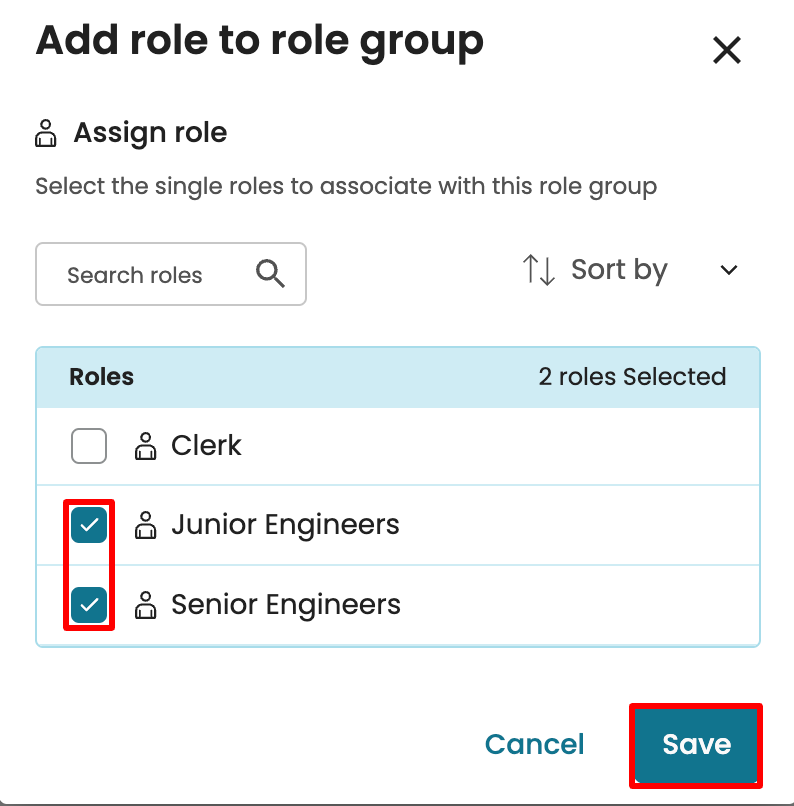
The Junior Engineers and Senior Engineers now perform the “Archive Defect” task.
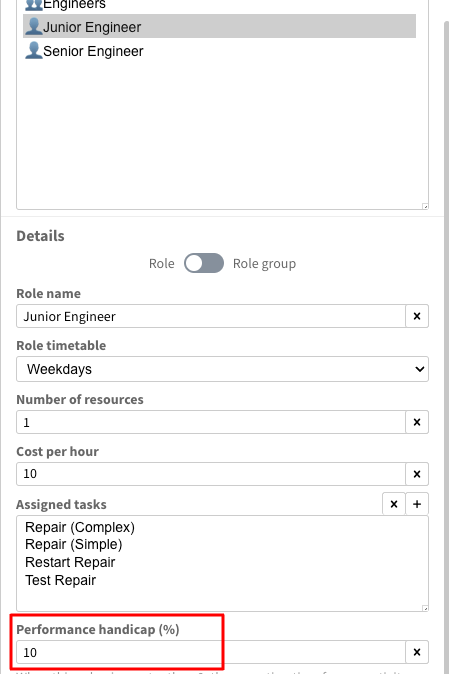
Role performance handicap
In some cases, a role may take longer to complete an activity than the assigned activity duration. For instance, assume we have two different roles, namely “Junior Engineer” and “Junior Engineer”. Let us assume that both roles can perform the same tasks (e.g., “Test Repair”, “Restart Repair”, etc.). However, the resources for the “Junior” role are 10% slower due to their lack of experience. To capture this difference, we can add a 10% “performance handicap” to the Junior Engineer.
To this end, go to the Roles tab. In the “Junior Engineer role” specify the Performance handicap as 10.
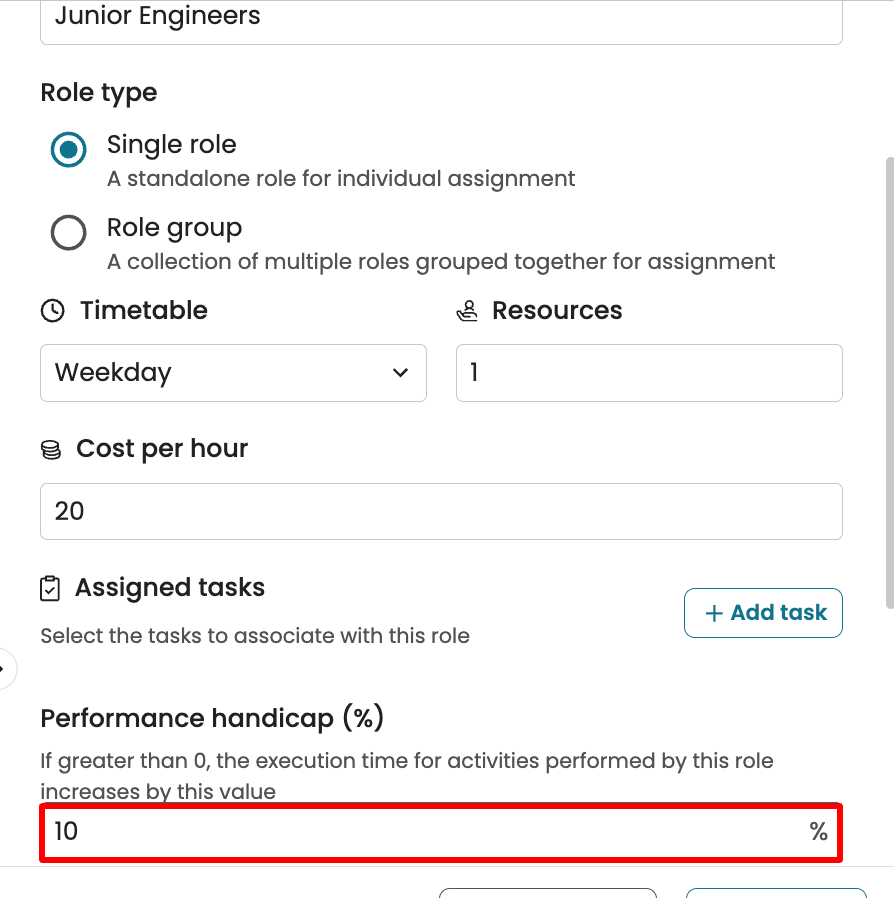
The activity instances that the Junior Engineer performs will be, on average, 10% longer in duration than those performed by the Financial Managers. For instance, a 15-minute activity instance would take 15 + (15 * 10%) = 16.5 minutes to the Junior role.
Role maximum allowed overtime
When we simulate a process model, a resource may sometimes begin an activity instance just before their work shift completes, in such a way that the resource is unable to complete the activity instance within their current shift. For instance, consider the following example. Mark (a Clerk) starts the “Archive Repair” activity, which takes 30 minutes at 4:40 PM. However, his shift ends at 5.00 PM, so he does not complete the activity in the current shift. The following day, Mark continues the activity execution and completes it in 10 minutes (at 9.10 AM). In other words, the default behavior of the simulator is to interrupt an activity instance at the end of a shift and resume it at the beginning of the next shift (e.g., the next work day).
In reality, when faced with such situations, a resource may opt to do a 10-minute overtime to complete the task instead of postponing its completion to the next working day.
We can now capture this behavior by assigning a “maximum allowed overtime” to a role. In the above example, if the Clerk role has a maximum allowed overtime of 10 minutes or more, the simulator will consider that Mark will use overtime to complete the above activity instance within the same work shift where it started.
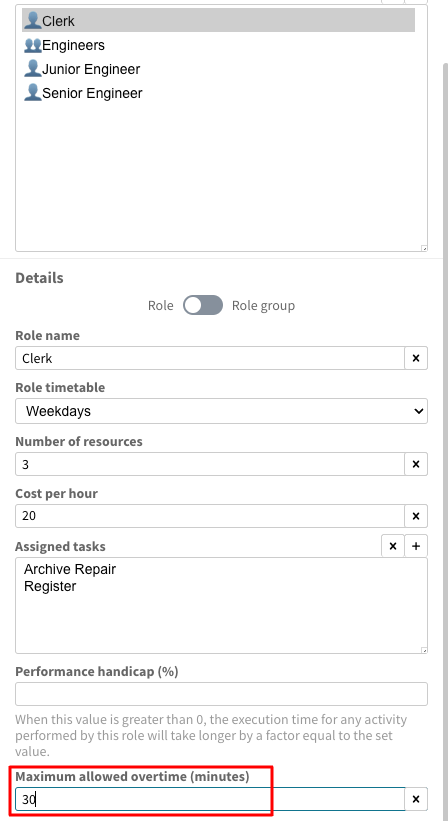
To specify overtime hours allowed, go to the Roles tab. Add a new role and specify the role name, role timetable, number of resources for that role, and the cost per hour. In Maximum allowed overtime (in minutes), enter the overtime the role can take, say 30 minutes.
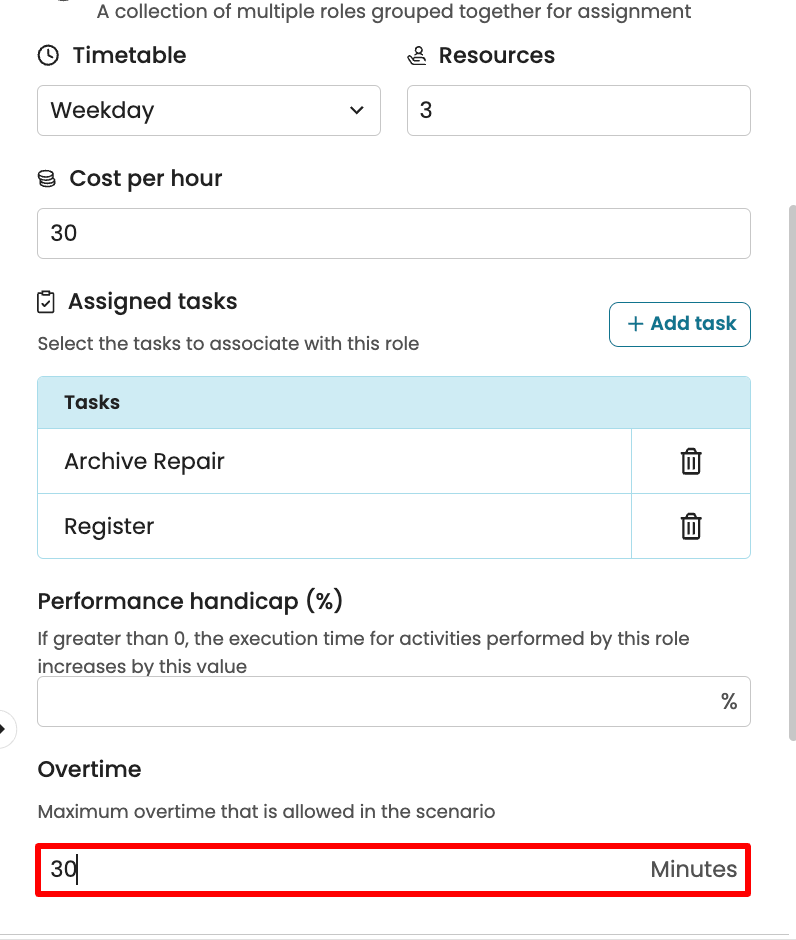
In the screenshot above, we defined the Weekdays (Mon-Fri, 9 AM to 5 PM) timetable with a 30-minute maximum allowed overtime. Thus, the simulation engine considers the role to be valid until 5:30 PM if necessary but not beyond.
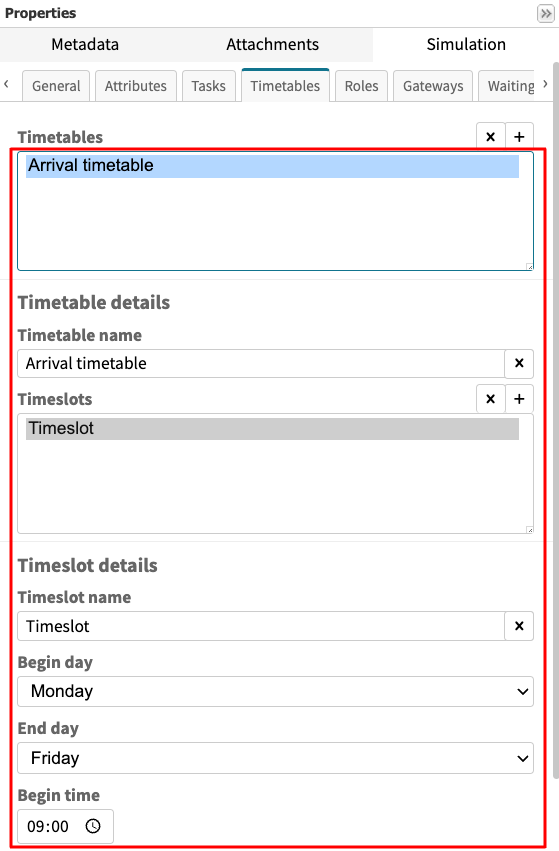
Timetables parameters tab
The Timetables tab is used to define time periods where cases may occur differently. For instance, the case scenario on weekdays may be different from those on weekends. In such a situation, weekdays and weekends should be defined as separate timetables.
Note
By default, a timetable called the Arrival timetable is created. This follows the weekday timeslot of Mondays to Fridays from 09:00 to 17:00.
To view a timetable, go to the Timetables tab and click on a timetable.
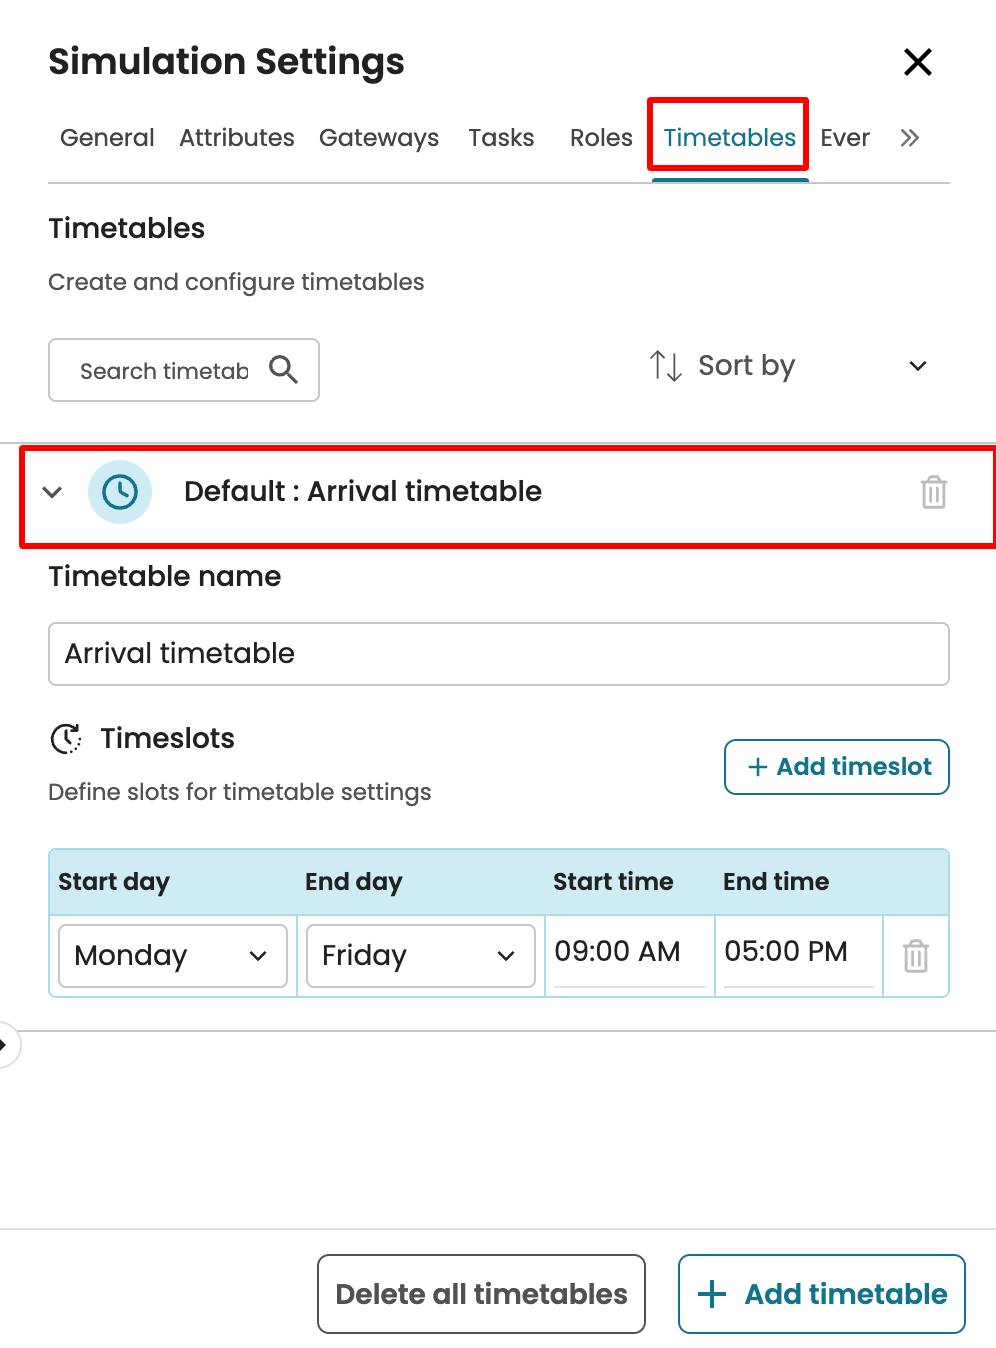
Note
One timetable may consist of many different timeslots. This is very useful when workers (also known as actors/resources) work in shifts.
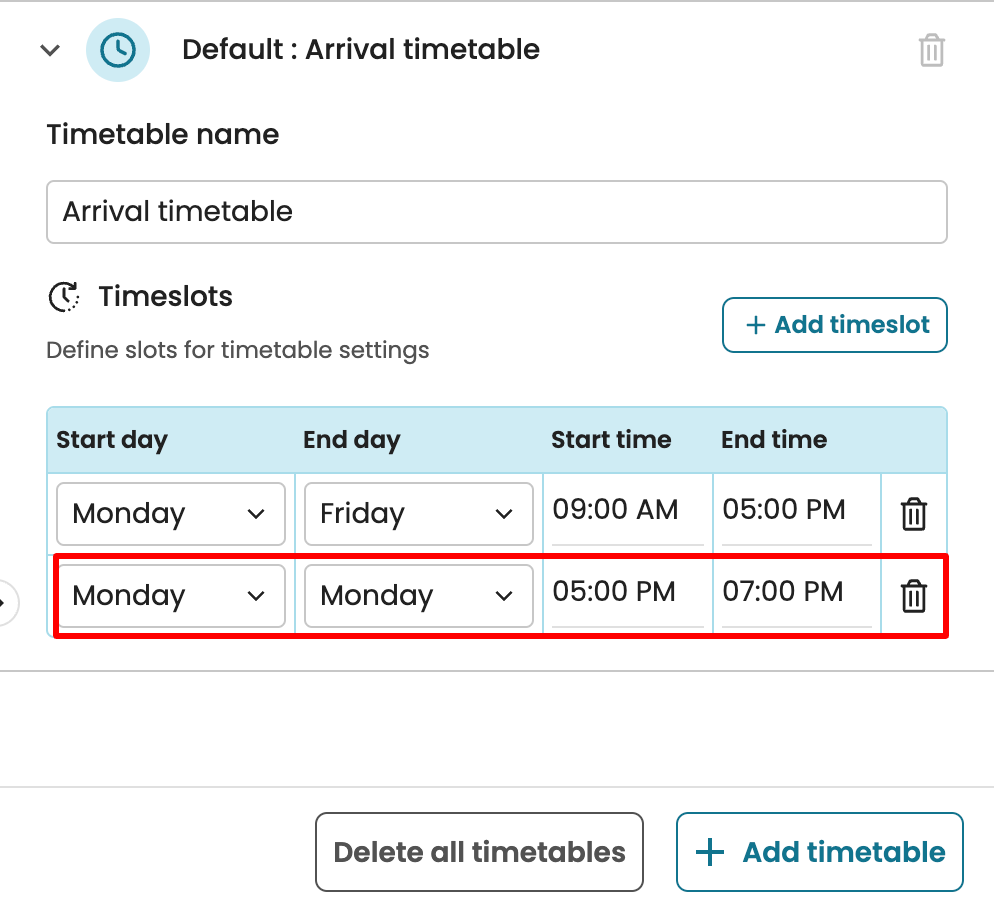
For example, if we want the arrival timetable to include only Monday, 5 PM to 7 PM, click Add Timeslot and specify the details.
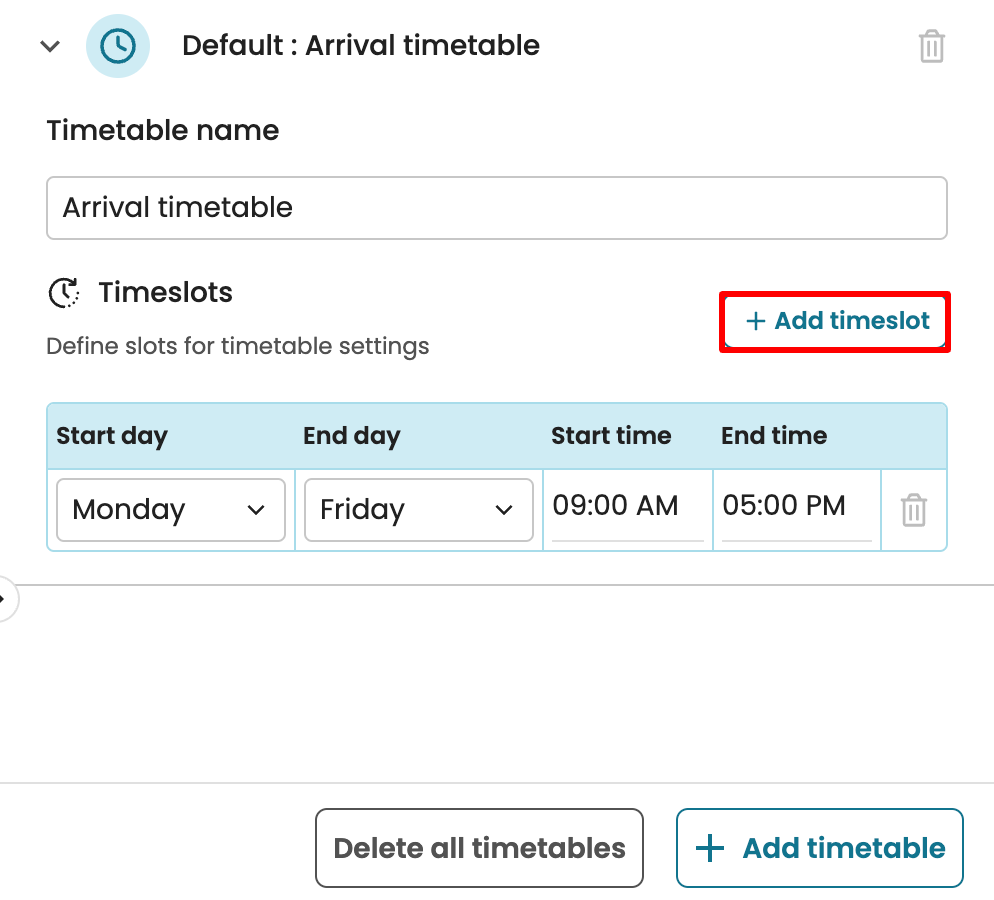
Specify the additional timeslot detail.
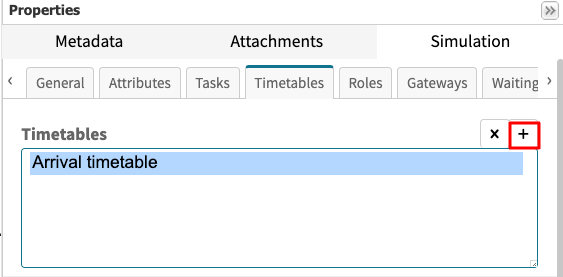
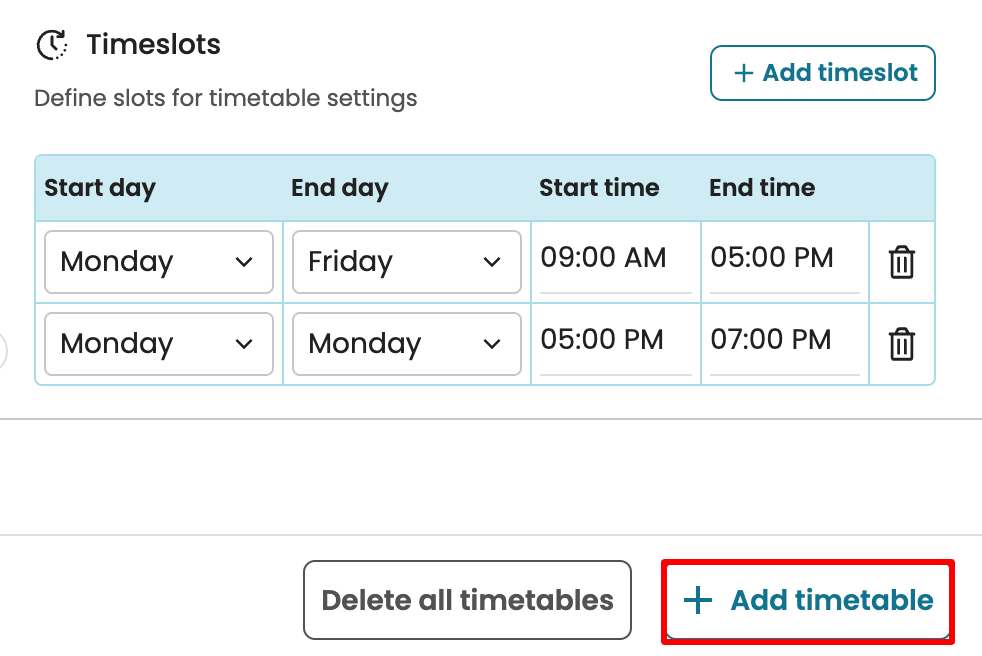
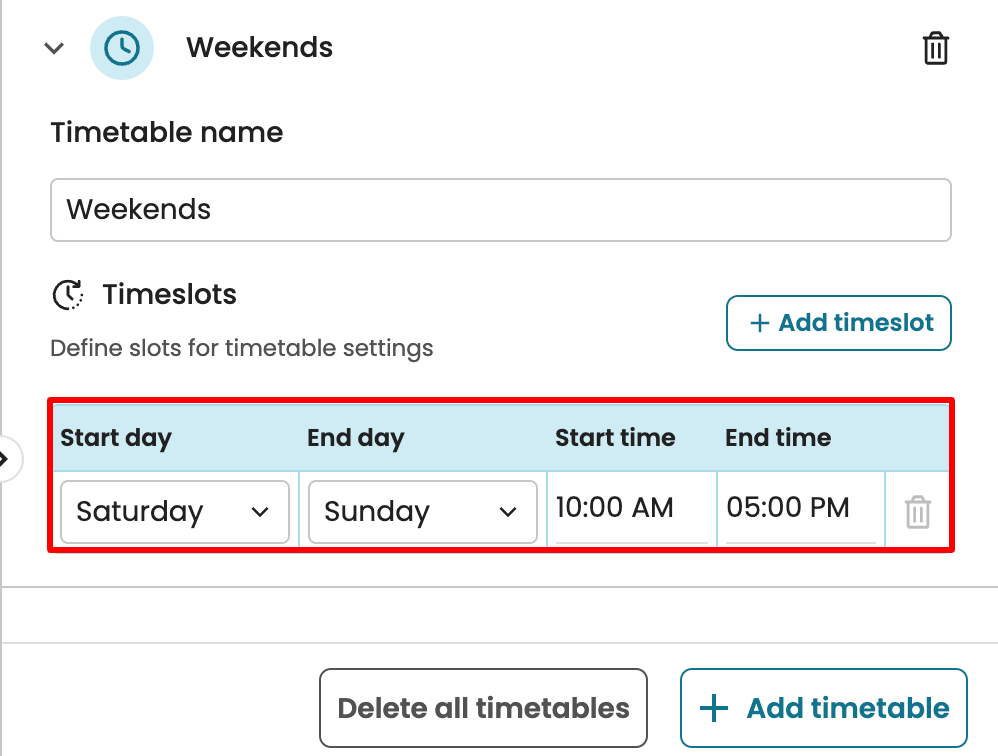
We can also create multiple timetables. Let us say we wish to create a weekend timetable with a timeslot from Saturday to Sunday, 10:00 to 17:00.
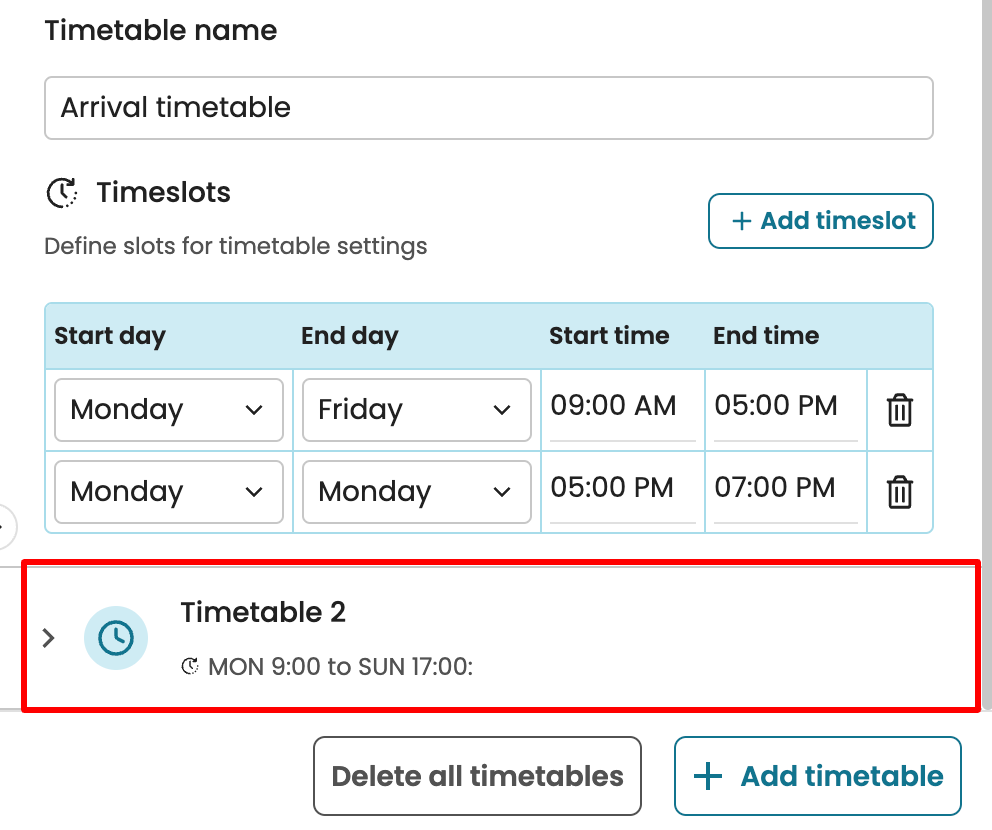
To create a new timetable for Weekends, click Add timetable.
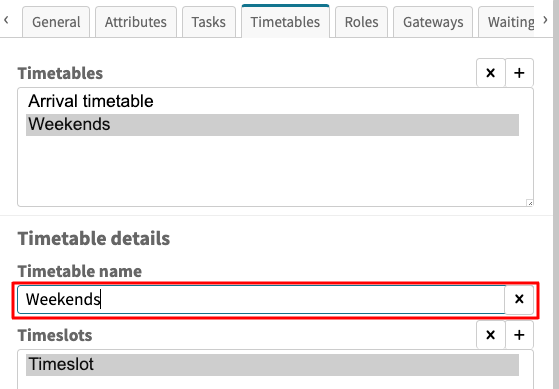
Click the newly created timetable to open it.
Rename the timetable as Weekends.
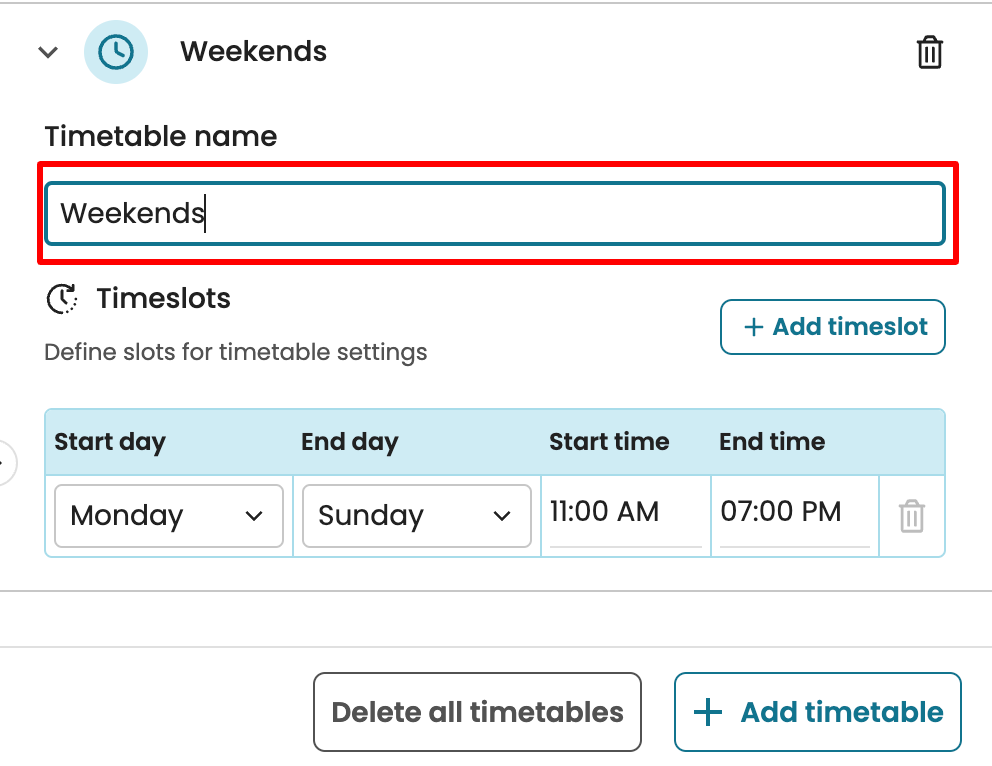
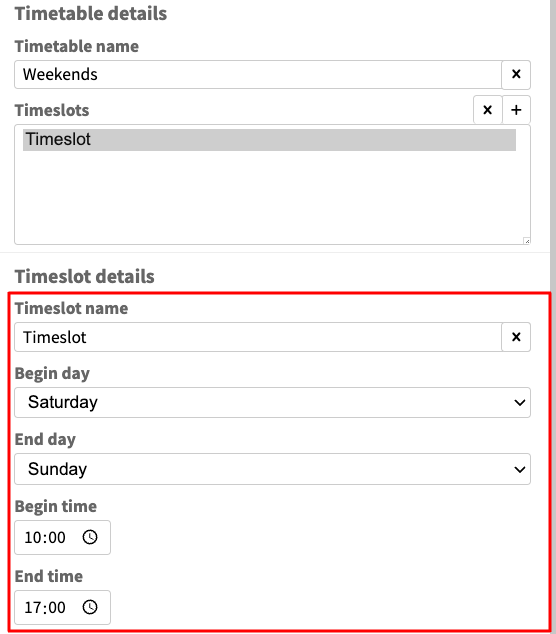
Create the Saturday to Sunday, 10:00 to 17:00 timeslot for this timetable. Change the begin day, end day, begin time, and end time values.
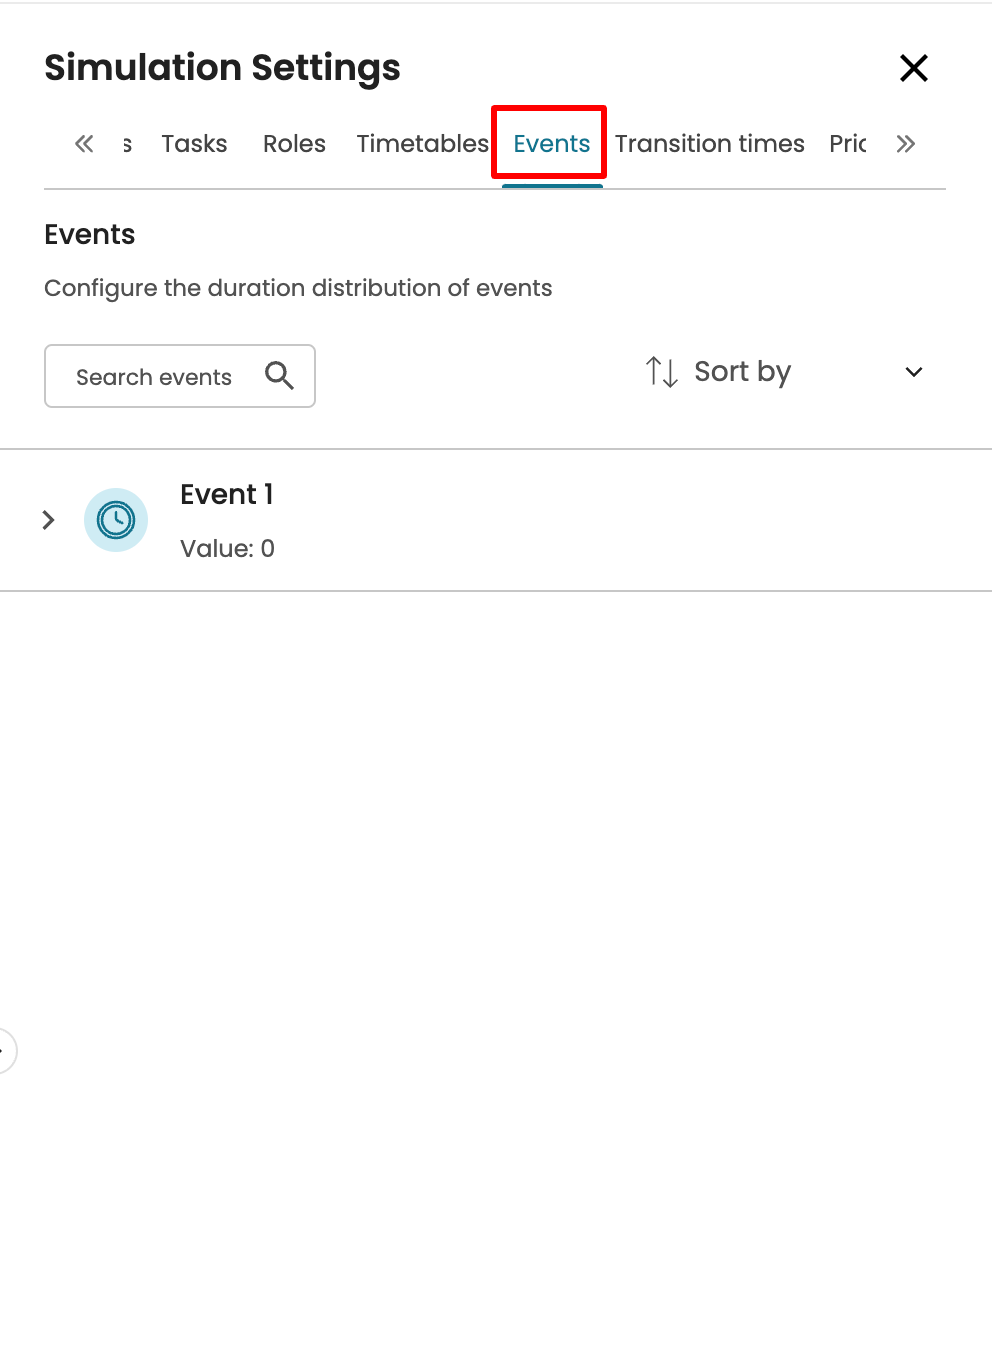
Events parameters tab
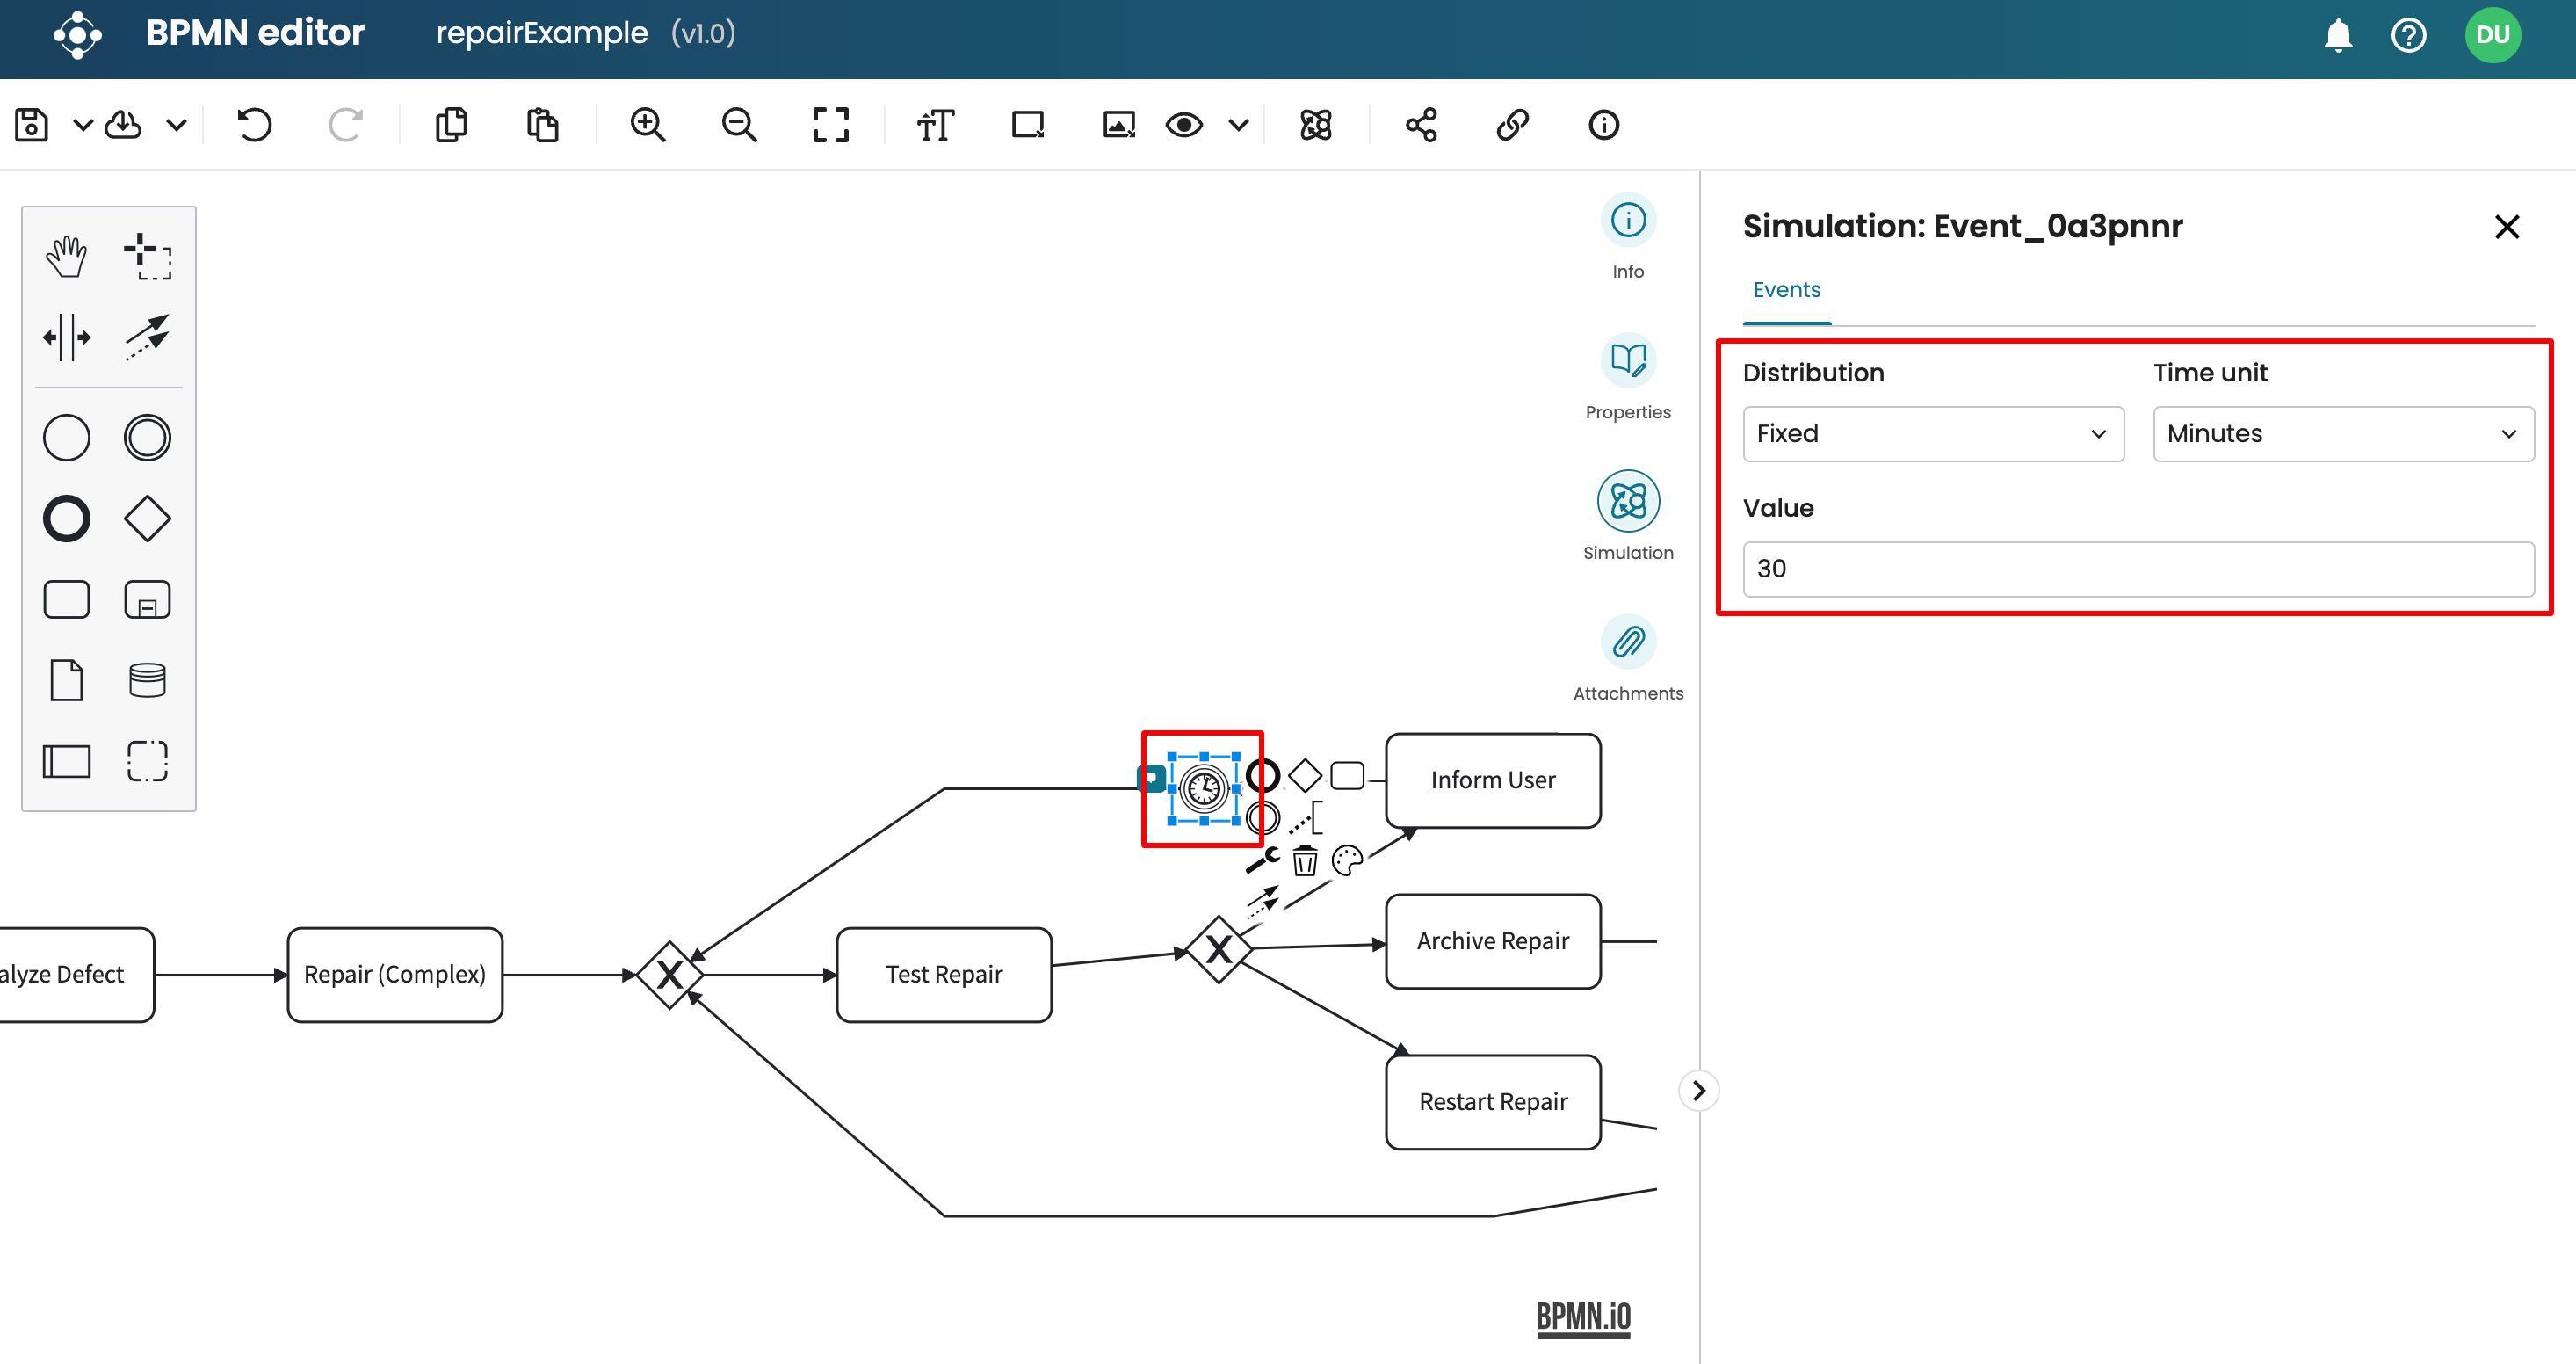
When events exist in the model, we can define the behavior of such events. For example, if we have a time intermediate catch event, we can specify how long the timer should wait. Go to the Events tab.
Apromore displays the parameters for events in the model, allowing you to configure each event’s details. For example, we can click on this timer event and set it to trigger the process to continue only after 30 minutes.
Note
Parameters are not defined for start and end events, as they are instantaneous by default.
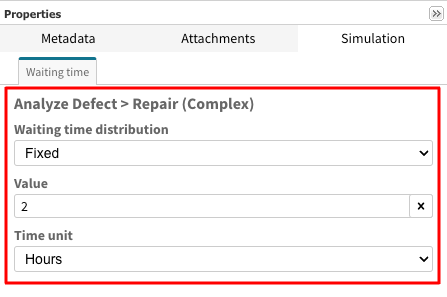
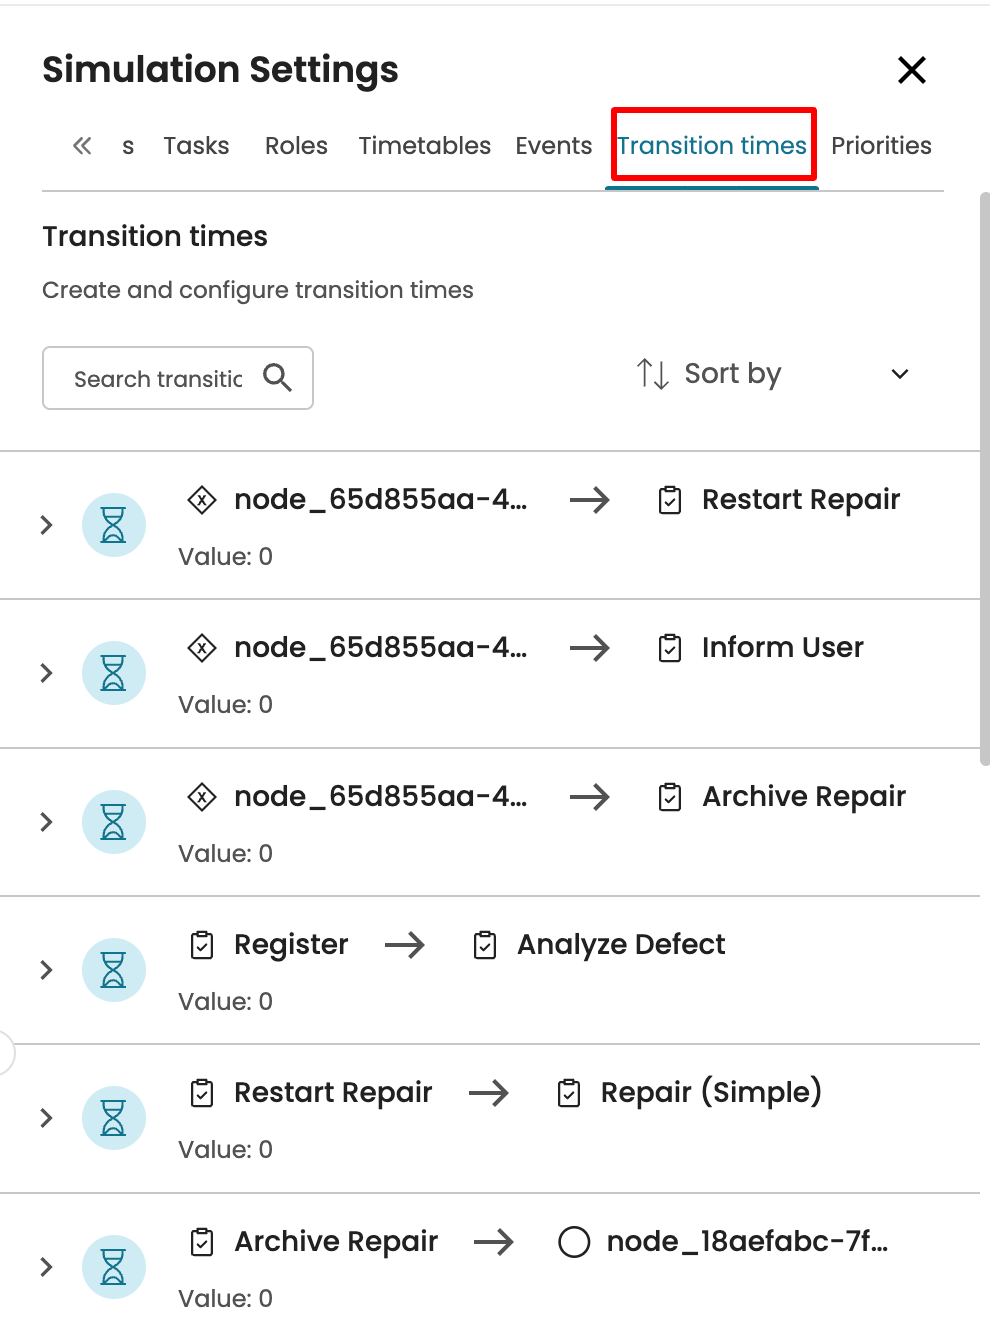
Transition time parameters tab
We can specify a delay in sequence flow (arc). The transition time parameters for all the arcs appear. If the Engineers hypothetically wait for 2 hours before they begin their task, we can specify this in the Transition times tab. By default, all the waiting times are set to zero. Here is the arc for the waiting time we wish to specify.

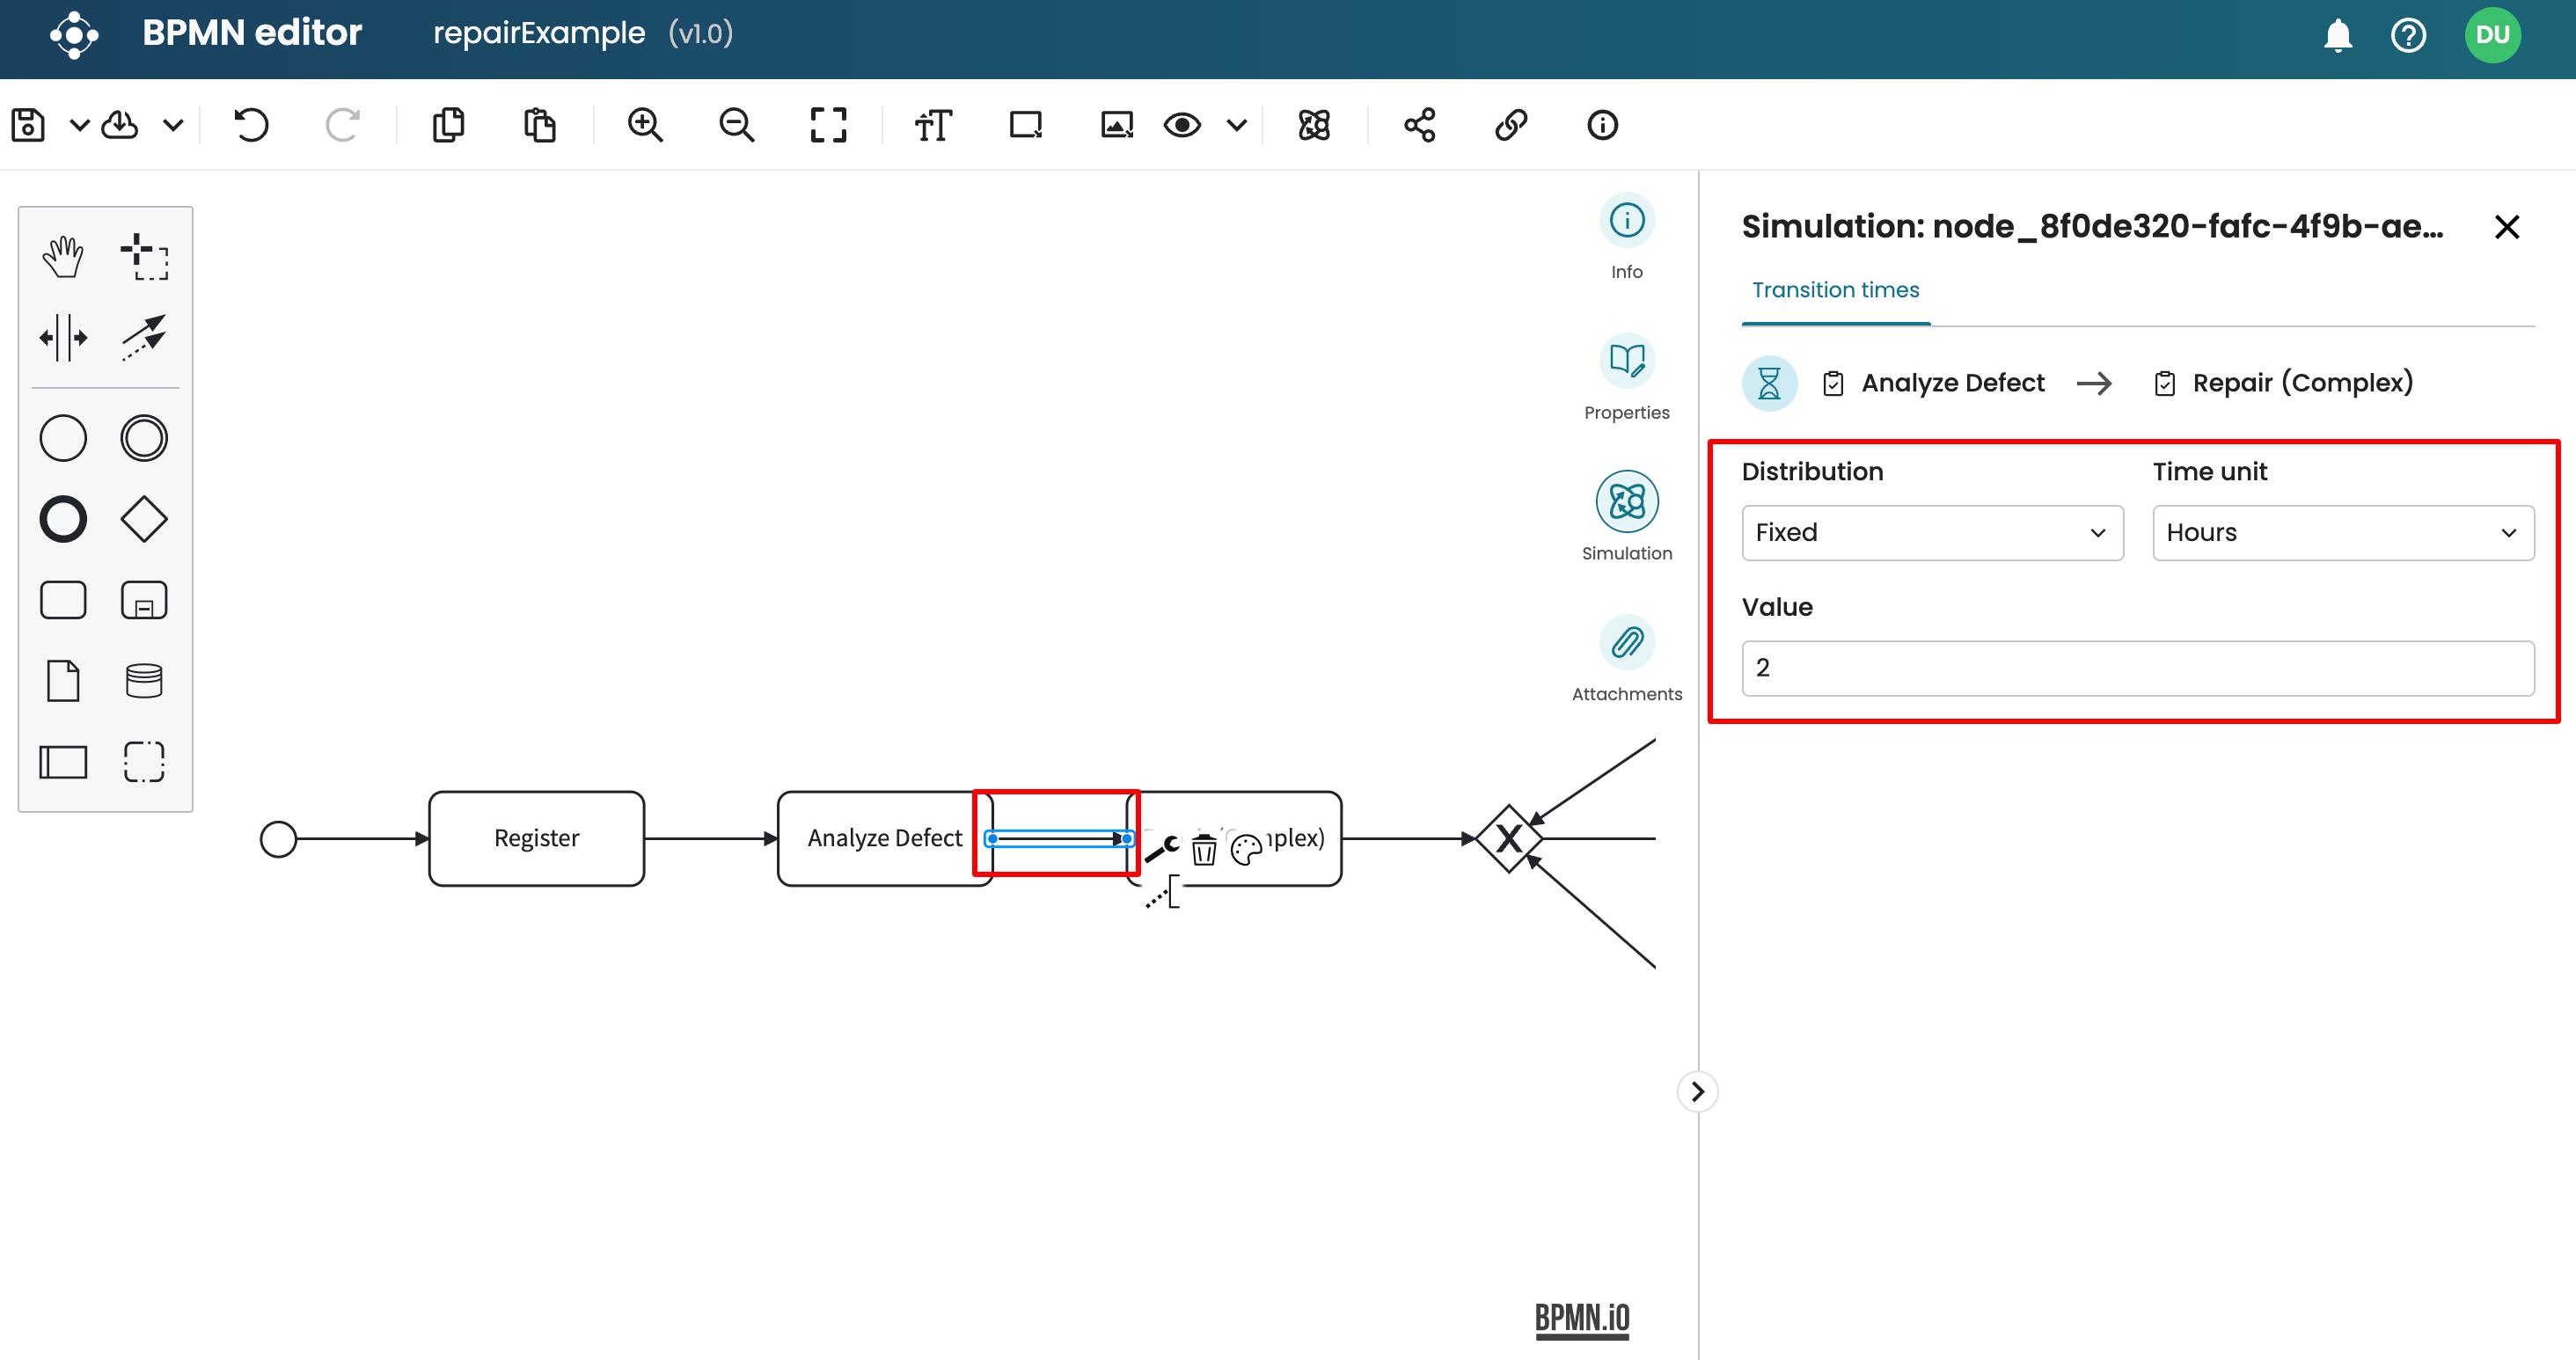
To define the transition time for the arc going to the “Repair (Complex)” task, go to the Transition times tab.
Click the Analyze Defect > Repair (Complex) arc in the model. This displays the transition time parameters for the selected arc. We can define the distribution as Fixed, set the value to 2, and the Time unit to hours.
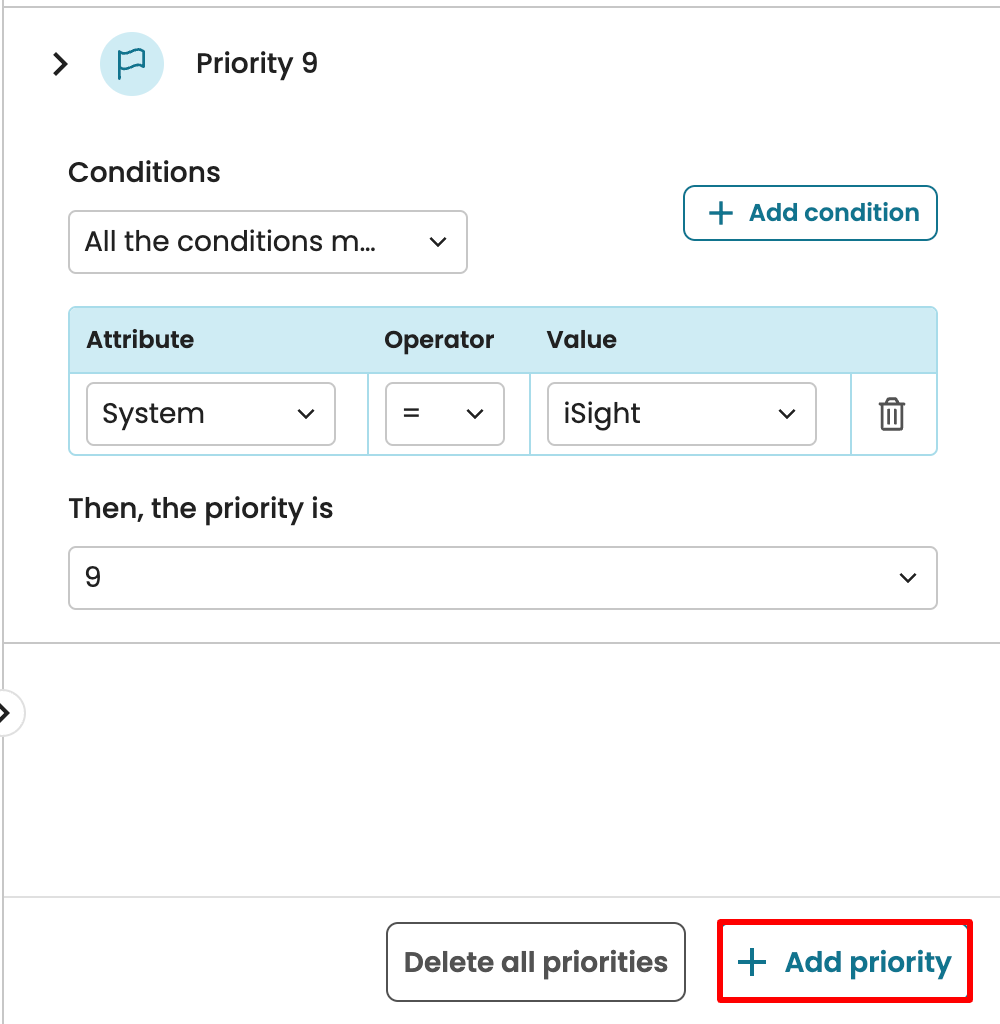
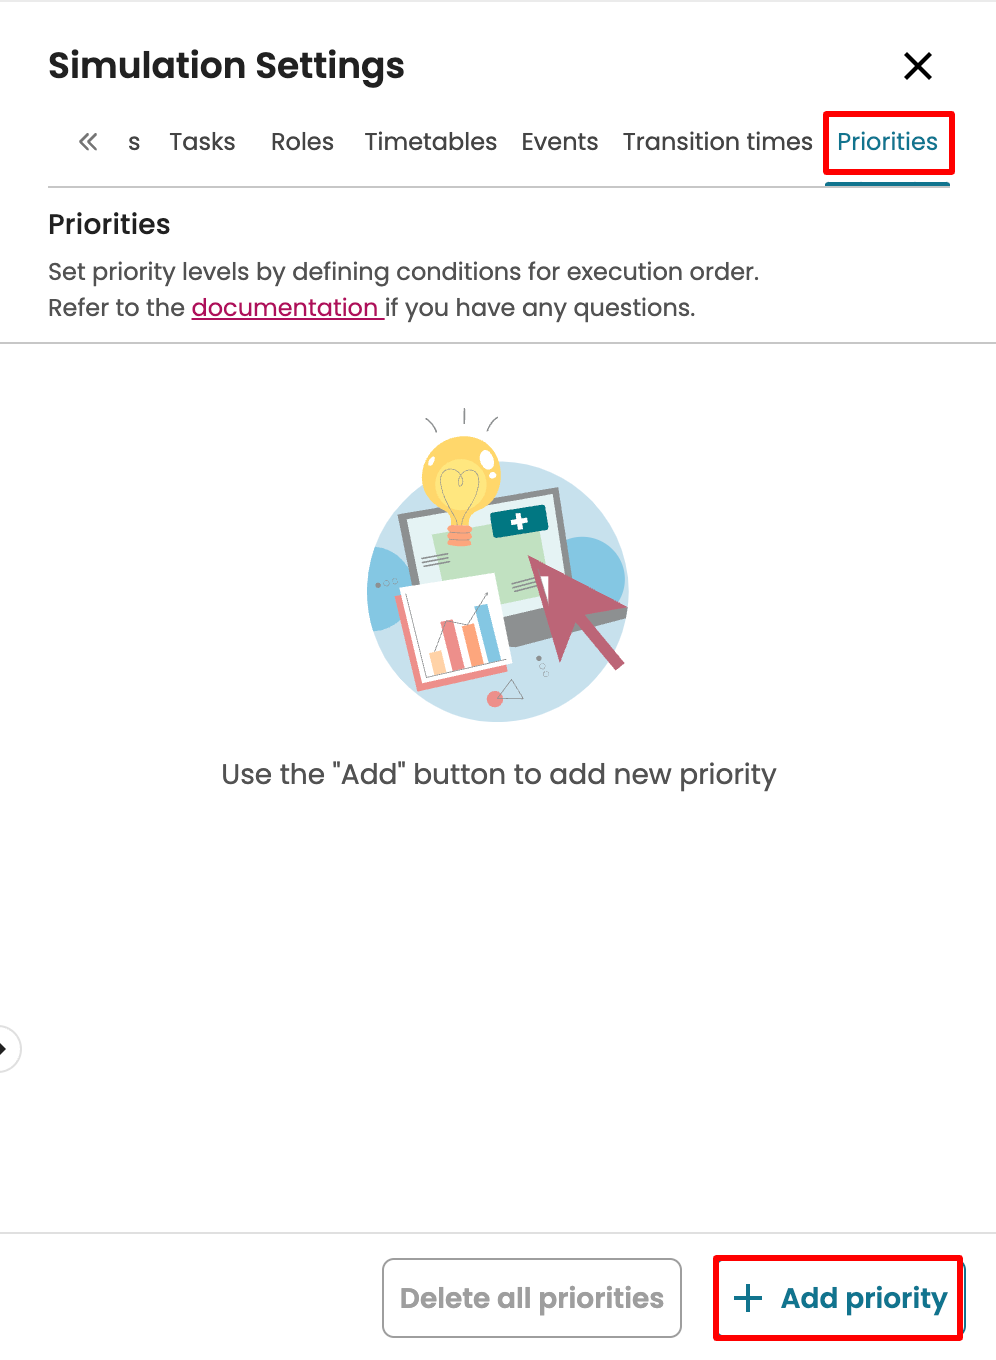
Priorities parameters tab
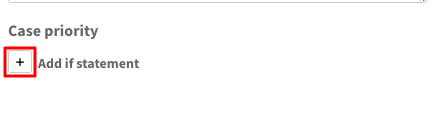
We can define the priorities of cases based on some conditions. For instance, if a case attribute is equal to one of the categories, the case should be a high priority, or vice versa. To add a priority, go to the Priorities tab and click Add priority.
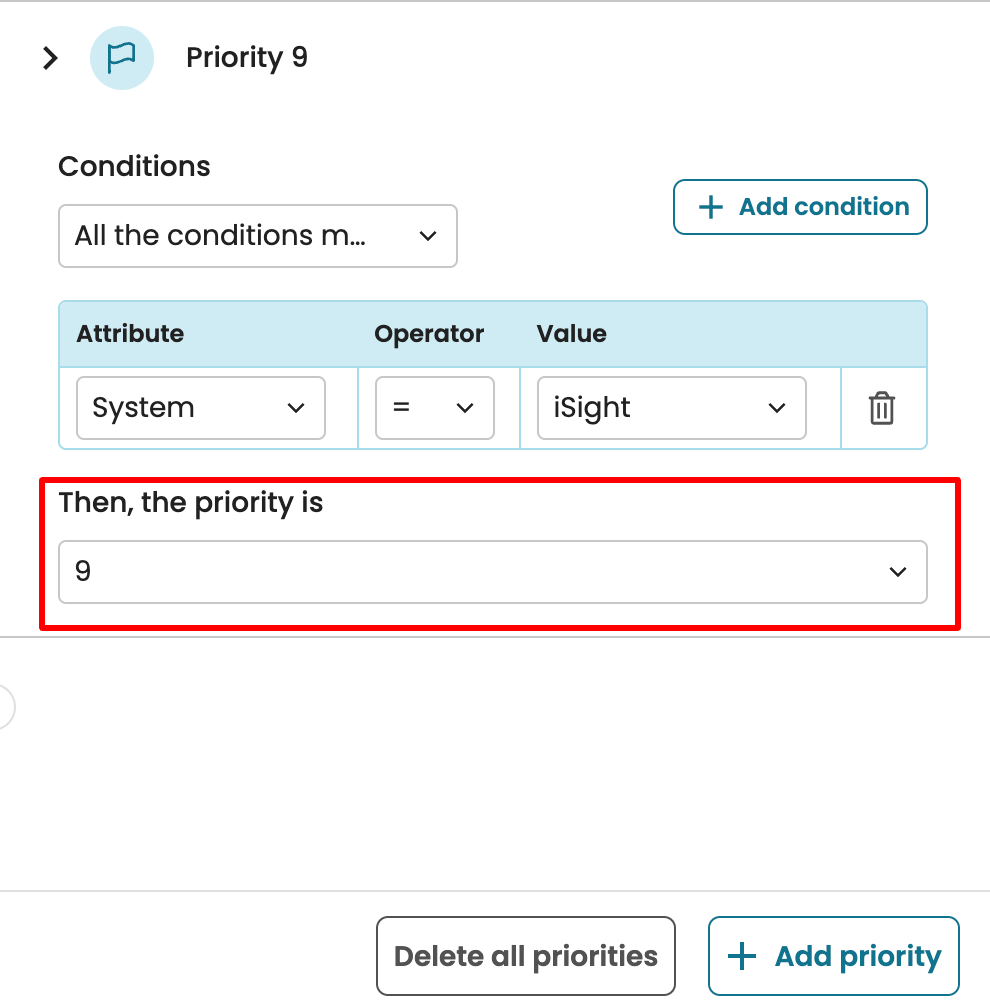
Click on the created priority to edit its value. Priorities are determined based on conditions. For instance, we can say if the system is iSight, it should be a high-priority case. To do so, click Add condition.
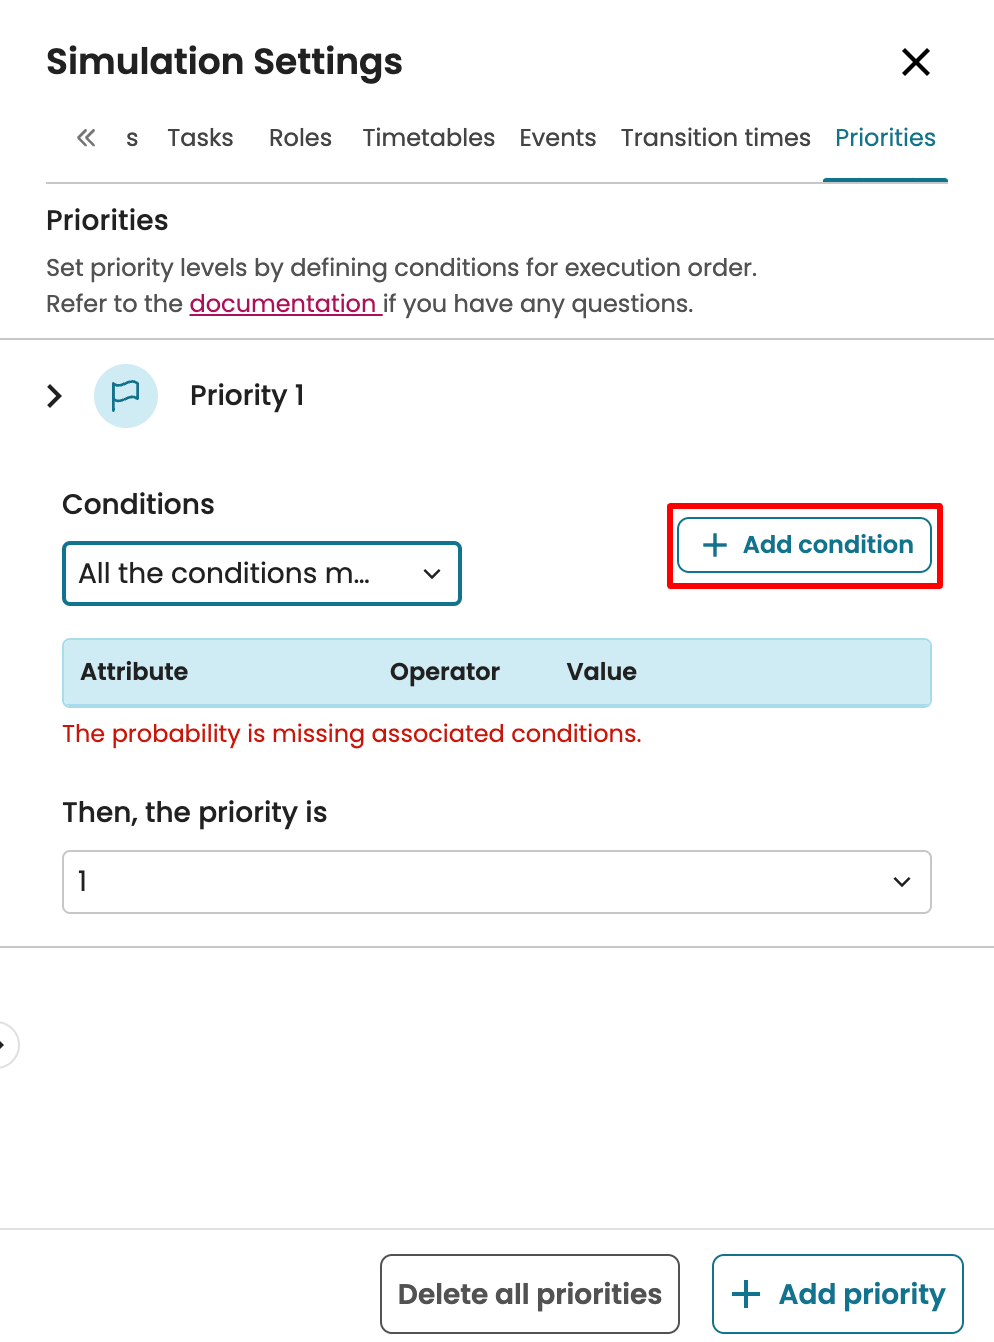
Specify the condition.
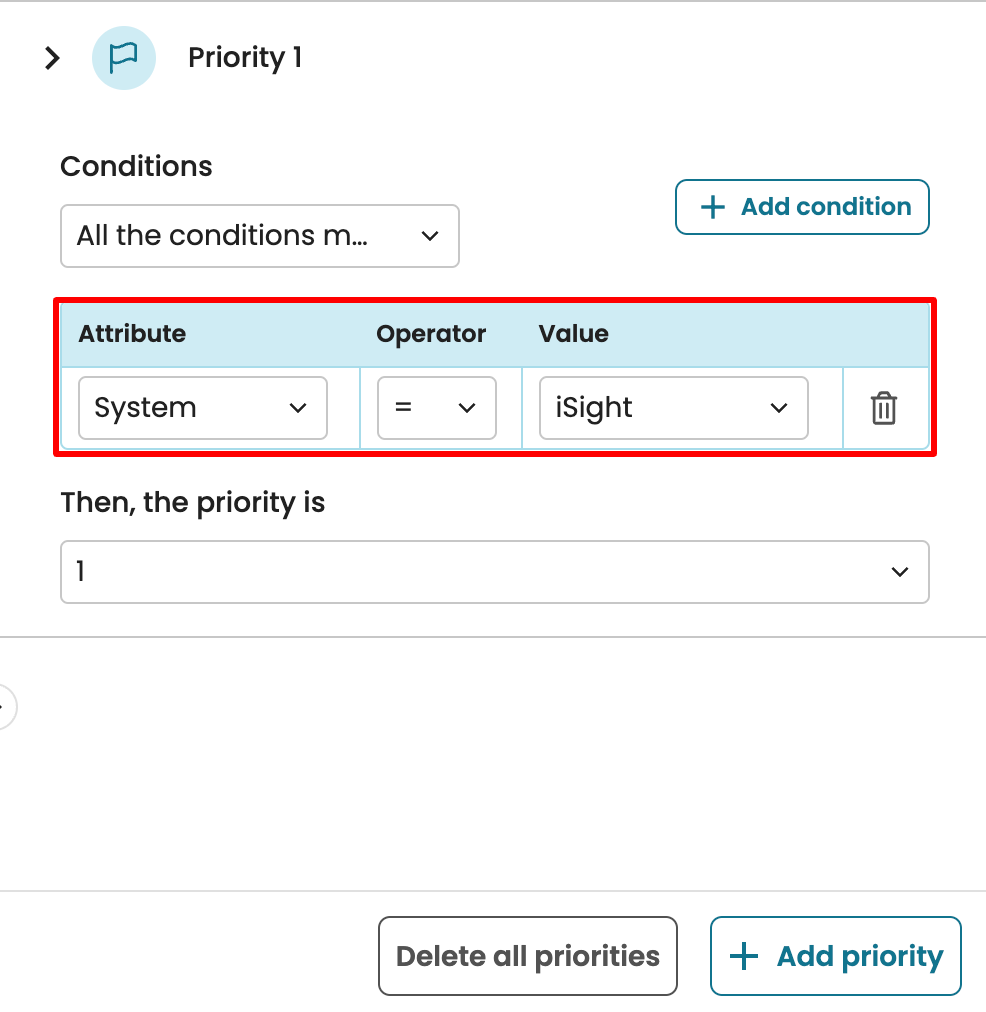
Priority is an integer from 1 to 10, with 1 indicating low priority and 10 indicating high priority. Specify the priority value.
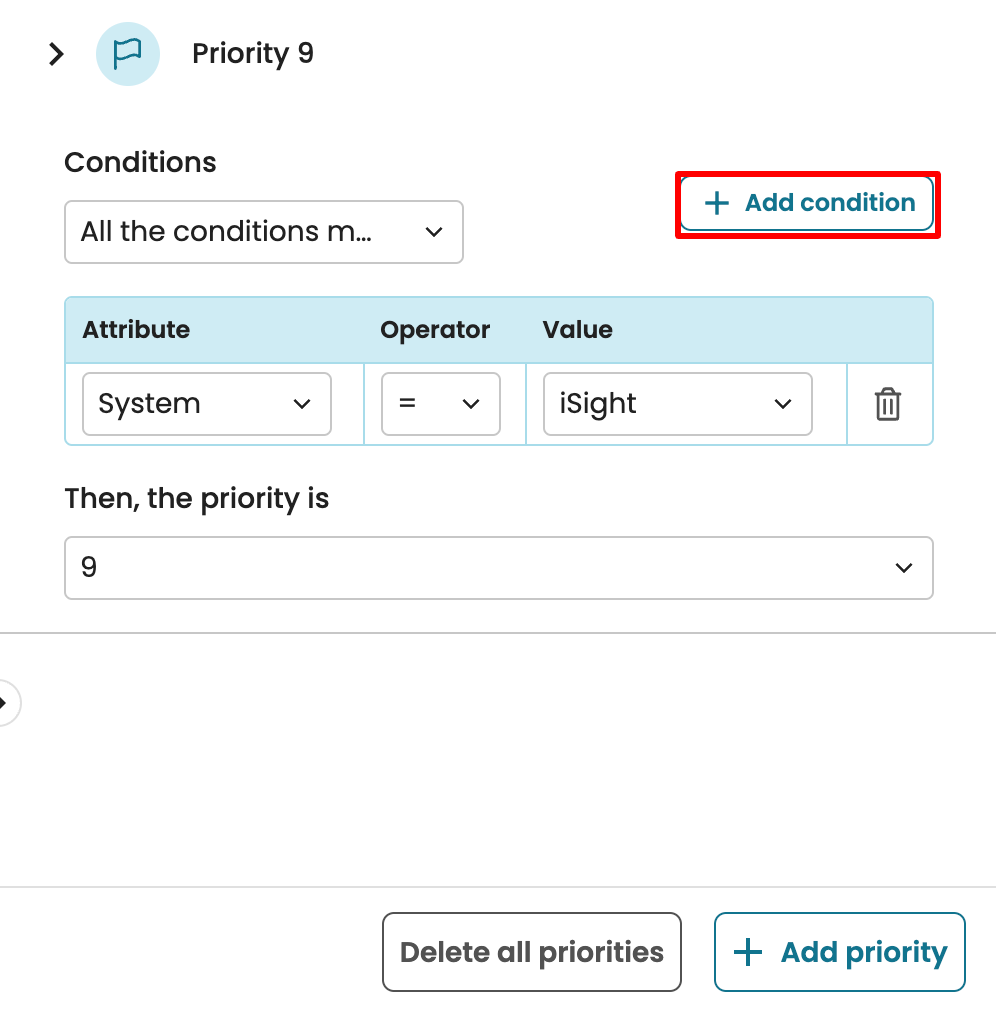
We can add multiple conditions to define a priority. To do so, click Add condition and specify the new priority condition.
We can also add more priorities by clicking Add priority and specifying its details.